Search is based on keyword.
Ex: "Procedures"
Do not search with natural language
Ex: "How do I write a new procedure?"
Modo Bridge for Unity
Modo has the ability to communicate with Unity in real-time and allows you to transfer meshes, mesh instances, textures, materials, and cameras between Modo and Unity.
Installing the Modo Bridge Plug-in
Installing from the Unity Asset Store
You can download the Modo Bridge plug-in from the Unity Asset Store.
| 1. | Click Open in Unity. |
This opens the Unity project browser.
| 2. | Select a project to open or create a new project. |
This opens the project and displays the store page for the Modo Bridge plug-in in a Unity browser.
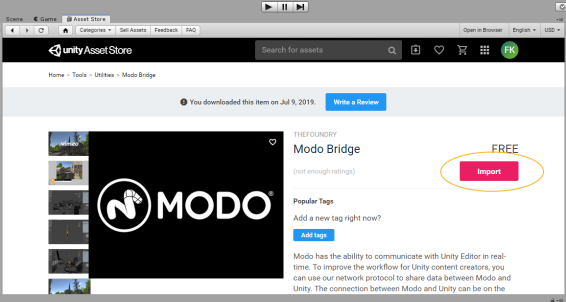
| 3. | Click Import. |
The Import Unity Package dialog opens.
| 4. | Click Import again. |
The plug-in is imported into Unity. A ModoBridge folder is added in the project's Assets folder.
| 5. | Find your Unity project folder on your local drive and create a folder called Plugins in the Assets folder. |
Windows: C:\Users\<username>\Documents\<Unity Project Name>\Assets\Plugins
macOS: /Users/<username>/<Unity Project Name>/Assets/Plugins/
| 6. | Place the ModoBridge folder into the Plugins folder of your Unity project. |
Modo Bridge for Unity is now installed.
Configuring the Server and Client
To get started, the Modo Bridge needs to connect through the network. Both the Modo server and the Unity client must use the same port number and corresponding addresses to communicate with each other.
In most cases where Modo and Unity are started on the same machine, it is sufficient to just start the Modo Bridge server and the Modo bridge client in Unity. In more complex cases where the connection is made on the local network or over the internet, the Address and Port options in Modo, and the Server IP/name and Port options in Unity should be changed according to the network and firewall specifications.
For example, for LAN networks, Server IP/name could be "192.168.1.100" or "192.168.20.32" , and for internet connections it could be different, like "216.27.61.137".
Here's how to configure the server and the client:
Configuring Modo Preferences
To configure Modo:
| 1. | Launch Modo. |
| 2. | Click Systems > Preferences and under Defaults, click Application. |
| 3. | Under Foundry Link Settings, in the Address field, type the TCP server IP address. |
By default the TCP server address is 127.0.0.1. This is the loopback Internet Protocol (IP) address used to point back to your computer's TCP/IP network configuration.
| 4. | In the Port field, type the port number for your TCP connection. |
By default, the Port number is 12000.
Configuring the Unity Client
| 1. | In Unity's menu bar, click Foundry > Set Client Options. |
Note: This option is only accessible while the client is off.
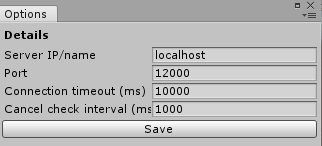
| 2. | Set the followings: |
Server IP/name: 127.0.0.1
Port: 12000
Other settings you can edit are:
• Connection timeout (ms)- Sets the number in milliseconds when the client should break the connection with the server if no response has been received.
• Cancel check interval (ms) - Sets the number in milliseconds when the client should check if the user clicked the Cancel Import command.
| 3. | Click Save. |
Starting the Communication between Modo and the Unity Client
To enable communication on the Modo server:
| 1. | Launch Modo. |
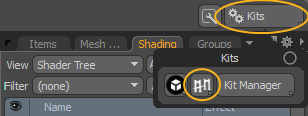
| 2. | In the top-right corner of the UI, click Kits, then click the Modo Bridge button. |
This opens the Modo Bridge options.
Note: For more information on each option, see Modo Bridge Options.
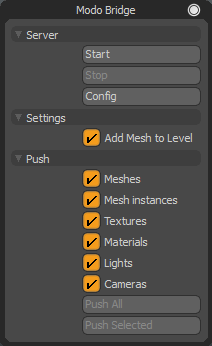
| 3. | Under Server, click Start. |
The Modo Bridge server is connected to the IP address and port specified in the Preferences and waits for incoming client connections.
To enable communication on the Unity client:
| 1. | Launch Unity. |
The Projects tab displays your available projects.
| 2. | Click the project you want to load. |
Unity opens the selected project
| 3. | In the menu bar, click Foundry > Start Client. |
The Unity client connects to the server's IP address and port. The communication between Modo and Unity is now established.
Using the Modo Bridge Plug-in
Updates made in both Modo and Unity are transferred simultaneously using the Push functionality. You can select individual geometry items or selected polygons, edges, or vertices, materials, and textures to transfer them to the other application.
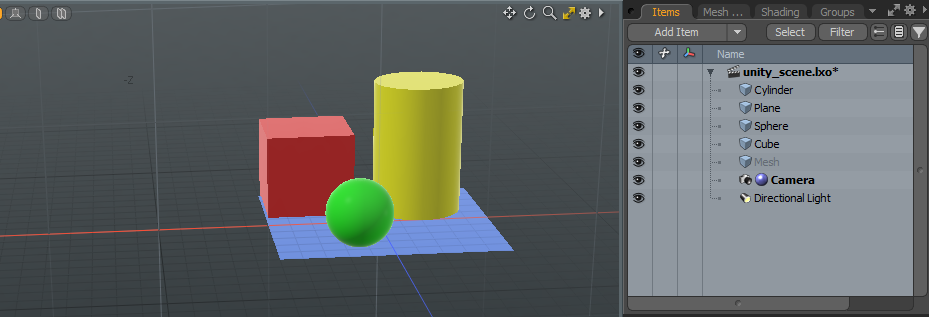
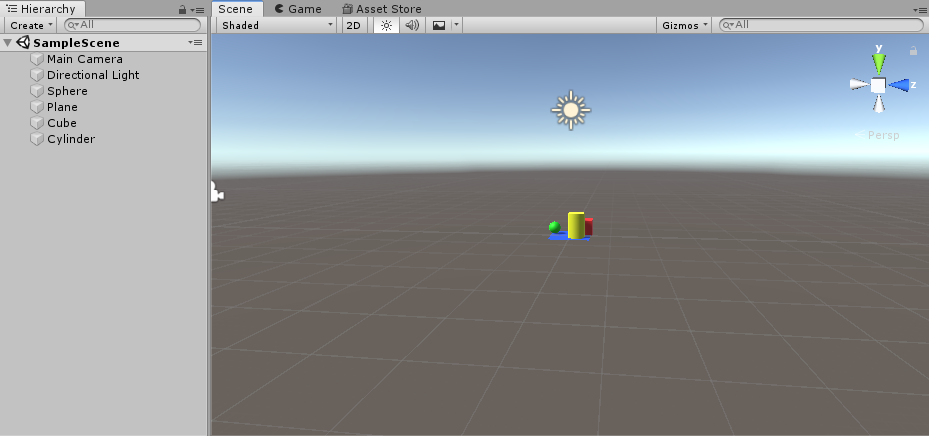
By using unique Foundry Tokens, items created in Modo and sent to Unity preserve their mapping and reconnect in the event of server-client connection break, level, or item renames, changes in the scene graph hierarchy, and so on. Taking the examples below, pushing the Cylinder mesh always updates the Cylinder GameObject in Unity, rather than creating a new cylinder GameObject.
Pushing Objects from Modo to Unity
Meshes can be transferred dynamically from Modo to Unity. Mesh transfer supports geometry data, as well as normal and UV vertex maps and surface sets used for materials.
Note: You must complete the steps of Configuring the Server and Client before doing the following procedure.
To push a scene from Modo:
| 1. | In Modo, in the top-right corner, click Kits, then click the Modo Bridge |
This opens the Modo Bridge options dialog.
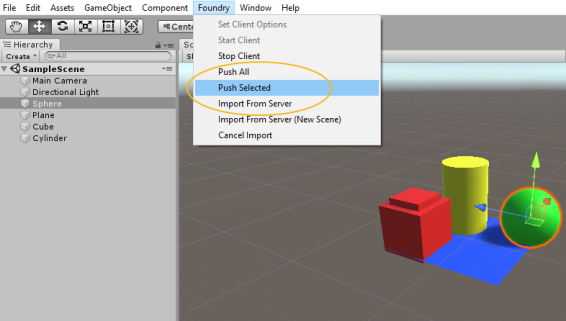
| 2. | Under the Push category, enable the objects you want to transfer, and click Push All. |
The items are transferred to your Unity project.
Transferring meshes from Modo to Unity generates new Prefab assets with Unity mesh objects as children in the Project browser. This workflow preserves mesh data, creates Unity GameObject components and settings connecting materials to Unity sub-meshes (material surfaces of the mesh). Unique Foundry Tokens are created to preserve links between objects in Modo and Unity, and the fully shaded mesh GameObject becomes available to be used in the level.
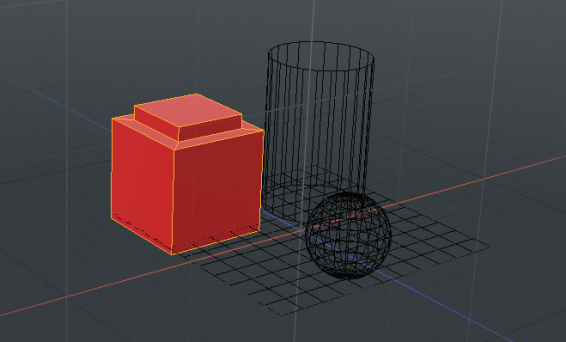
If you make any modifications to your scene in Modo, you can repeat the transfer process by transferring only the modified item. In this example, we bevelled the top of the cube:
| 1. | Save your changes in Modo. |
| 2. | Select the item, and in the Modo Bridge dialog, click Push Selected. |
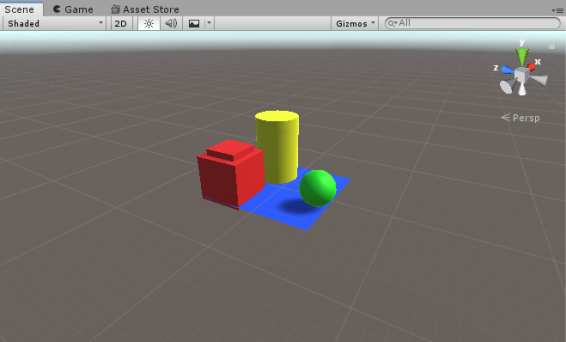
The item is updated in your Unity scene.
Pushing Objects from Unity to Modo
When you've made changes to your transferred scene in Unity, you can update your scene in Modo. You can transfer the entire scene, or only selected objects.
To transfer selected objects:
| 1. | Select your object in Unity. |
| 2. | In the Unity menu bar, click Foundry > Push Selected. |
Your scene is updated in Modo.
To transfer the entire scene, in the menu bar, click Foundry > Push All.
Transferring Mesh Instances
You can transfer Mesh Instances back and forth between the two application, just like regular meshes. In Modo they are displayed as mesh Instance items and in Unity they appear as Unity GameObjects in the current level.
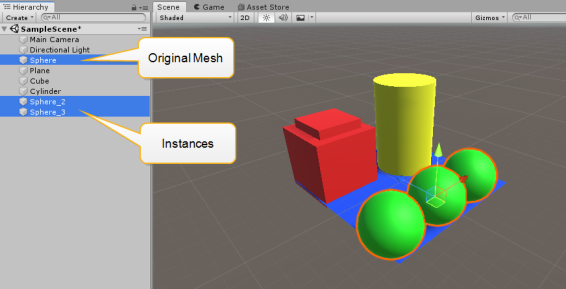
Note: Meshes or mesh Instances in Modo only generate a scene graph hierarchy in the current level in Unity when the GameObject is first created, not on subsequent updates. There is limited support for meshes and mesh Instances parented to other meshes and mesh Instances.
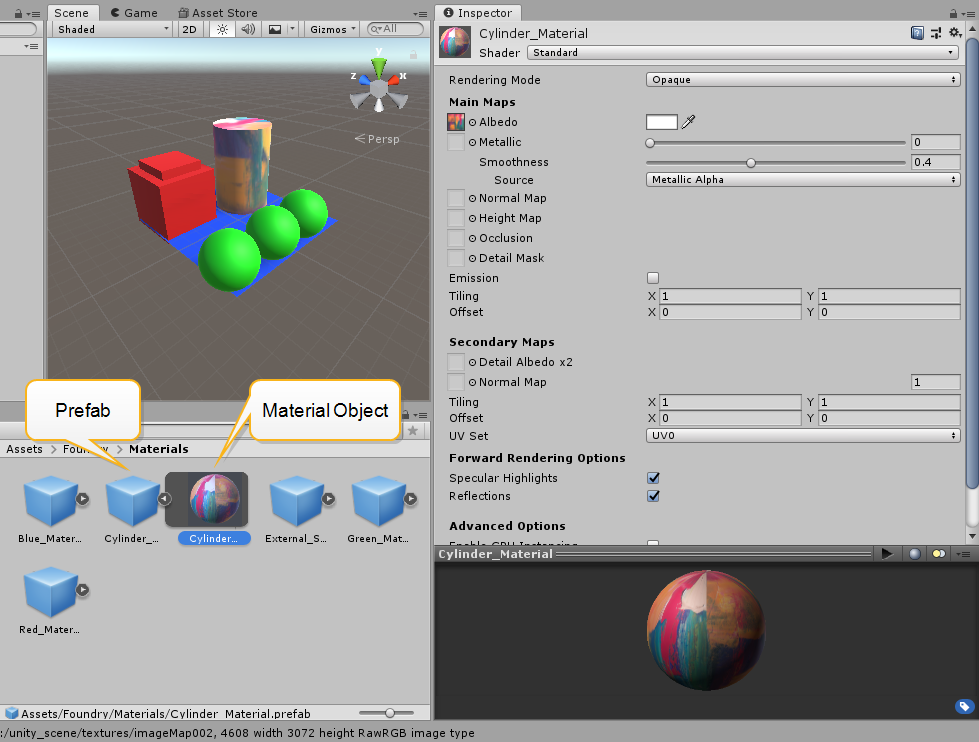
Transferring Materials
When you transfer materials from Modo to Unity, Unity generates Prefabs with material objects as children. Textures are sent alongside material data and automatically connect to the resulting material in Unity with the Unity standard shader.
Note: Subsequent material pushes are currently not supported. You can only update materials by first deleting the created material in Unity.
Note: When transferring materials without mesh data, the materials don't automatically get connected to the mesh, you have to assign the material to the required mesh in Unity.
The currently supported Unity material data are:
• Base Albedo color value
• Metallic float value
• Smoothness float value
• Emissive color value
The currently supported Unity texture effects are:
• Unity Albedo
• Unity Bump
• Unity Metallic
• Unity Normal
• Unity Ambient Occlusion
• Unity Emission
• Unity Detail Mask
• Unity Detail Albedo x2
• Unity Detail Normal
Note: The above two data sets are currently mutually exclusive. For example, Base Albedo is overridden by Unity Albedo texture effect.
Transferring Texture Images
When you transfer texture images from Modo to Unity, Unity generates Prefabs with texture image objects as children.
Once you've saved your images in Modo, click the Push All button or select the texture effect in the Shader Tree in Modo and click Push Selected. This creates or updates the texture in Unity.
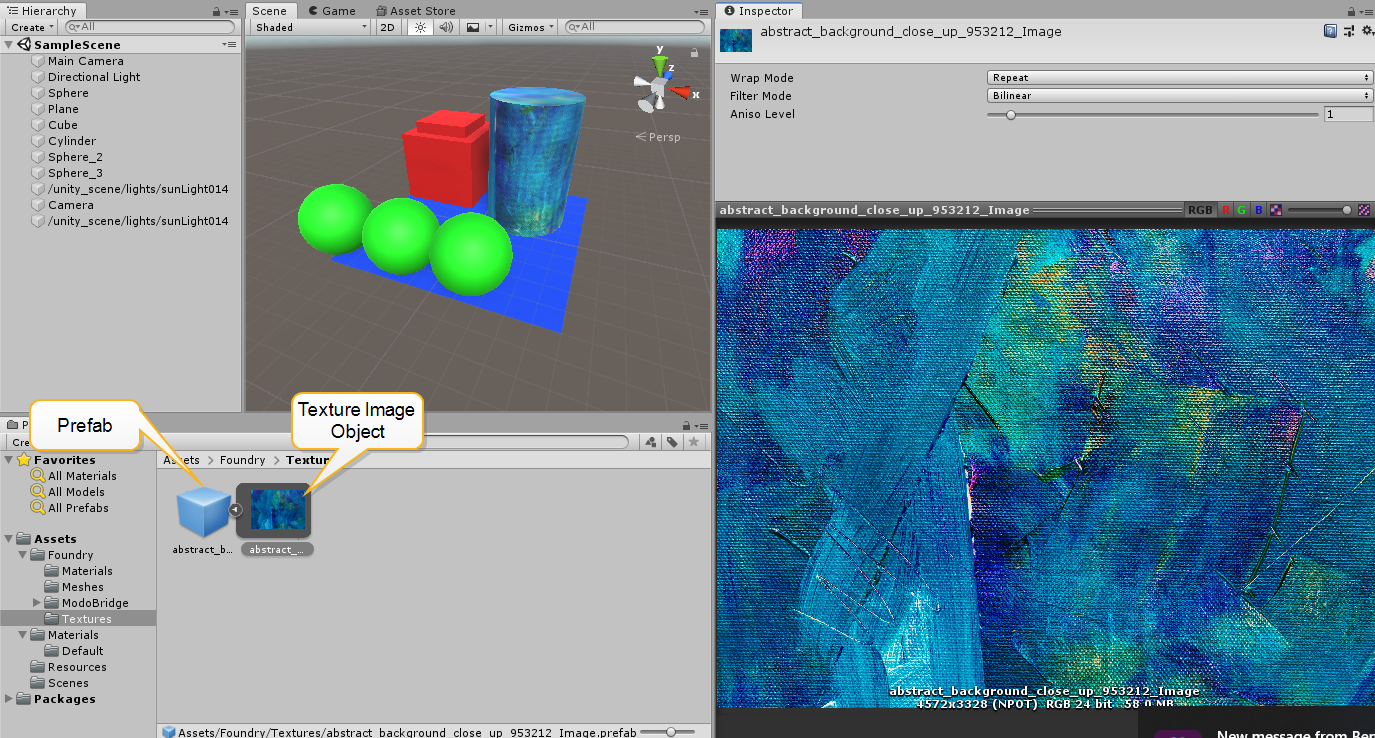
Subsequent transfers of the same texture effect update the already existing texture image in Unity.
Note: Make sure that you save the edited image before transfer.
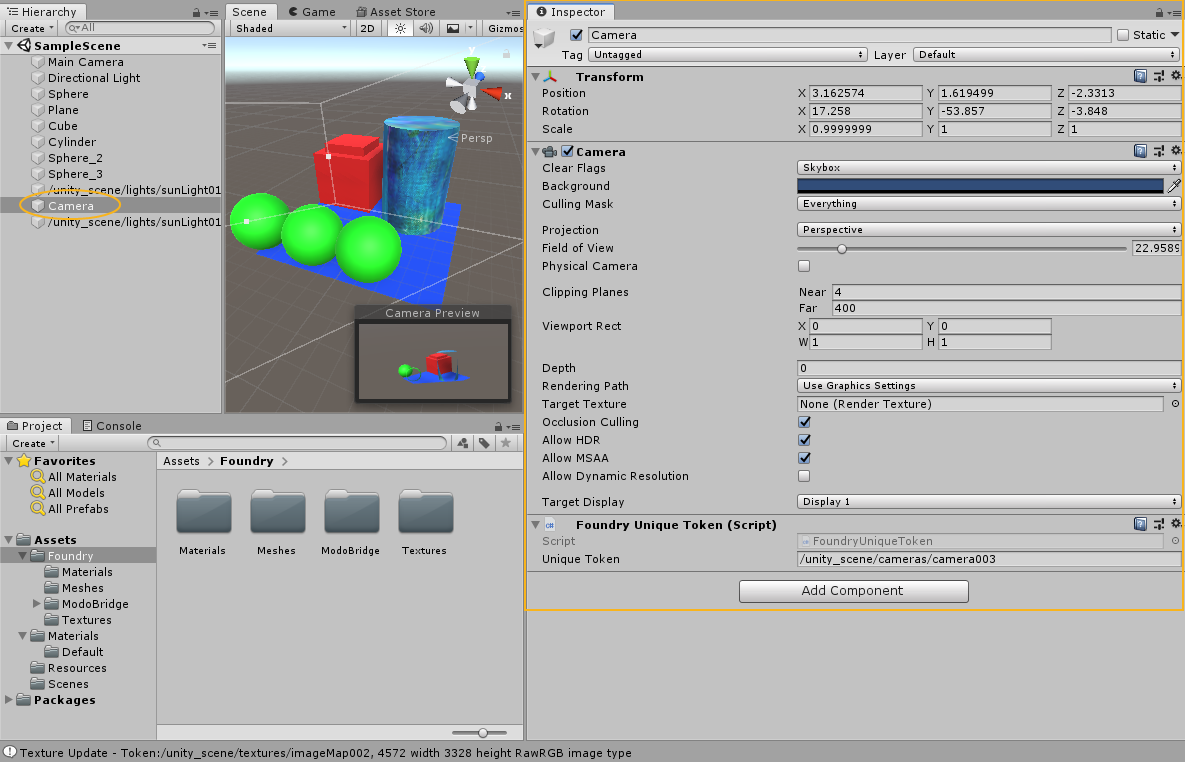
Transferring Camera Data
You can transfer camera data from Modo to Unity. Unity generates a GameObject in the current open level with the camera component. The only supported Projection Type is Perspective.
The following camera data are transferred:
• Angle of View (Field of View)
• Near Clipping Plane
• Aspect Ratio
Sorry you didn't find this helpful
Why wasn't this helpful? (check all that apply)
Thanks for your feedback.
If you can't find what you're looking for or you have a workflow question, please try Foundry Support.
If you have any thoughts on how we can improve our learning content, please email the Documentation team using the button below.
Thanks for taking time to give us feedback.