Search is based on keyword.
Ex: "Procedures"
Do not search with natural language
Ex: "How do I write a new procedure?"
Quick Align
With the Quick Align tool, you can align geometry interactively in the 3D viewport. The tool also allows you to flatten, move, and rotate the geometry you're aligning. Quick Align can be useful for straightening an edge by aligning it to another one.
Note: Quick Align doesn't work with procedural geometry.
You can find the Quick Align tool in the Deform sub-tab of the Model toolbox, which is easily accessible from the left toolbar of the Model and Modo layouts.
To use the tool:
Select the component you want to align to something else. This can be a vertex, edge, or polygon.
| 1. | In the Modo or Model layout, click the Model toolbox |
| 2. | Go to the Deform sub-tab and under Align Tools, click Quick Align. |

| 3. | Click and hold the cursor on the component you want to align your geometry to. |
This displays three arrows corresponding to the three axes.
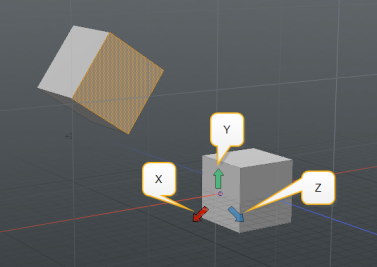
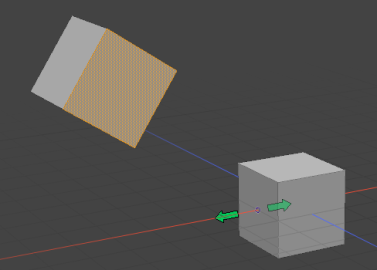
| 4. | Still holding the cursor down, move it in the direction of the axis you want to align the geometry along. When hovering over an arrow, it becomes bigger. Release the cursor. |
Your selection is aligned to the selected geometry on the selected axis.
You can modify the tool's behavior using the following modifiers:
• To simultaneously flatten the geometry to the target axis, hold down the Ctrl/Cmd key, then click and hold to select the component and axis to align to. Alternatively, in the Tool Properties, enable Flatten. For more information on the properties, see Quick Align Properties.
• To move the selection and all connected geometry to the target position, hold down the Shift key, then click and hold to select the component and axis to align to. Alternatively, in the Tool Properties, enable Connected.
• To Align the selection to the target element's normal direction, hold down the right mouse button instead of the left. This displays two arrows corresponding to the normal directions. Move the cursor over one of the arrows and release.
Alternatively, in the Tool Properties, set Mode to Orientation and left-click and hold the cursor over the target element.
Quick Align Properties
|
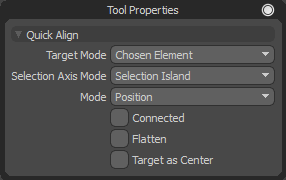
Target Mode |
Determines what your geometry is aligned to. You have the following options: • Chosen Element - The default behavior, aligns to an element you select in the 3D viewport. • Local Axis - Aligns to the center/rotation of each selection group, based on the set component selection mode. • Origin - Aligns to the workplane center or the world origin. |
|
Selection Axis Mode |
Specifies the selection axis. You have the following options: • Selection Island - Aligns each mesh selection to the selected component independently. • Mesh Island - Aligns the center of each mesh selection to the selected component independently. • Total Selection - Aligns the center of the entire selection to the selected component. |
|
Mode |
Sets the tool behavior when clicking in the viewport. The following options are available: • Position - Aligns the selection to the target position on the X, Y, or Z axis. • Orientation - Rotates the selection to match or oppose the target normal. You can also right-click and hold the cursor over the target element in the 3D viewport to do this. |
| Connected | When enabled, the tool affects any connected geometry. When disabled, only the selection is affected. You can also hold the Shift key while selecting the target element to move all connected geometry. |
| Flatten | When enabled, flattens the geometry to the target axis/normal. You can also hold the Ctrl/Cmd key while selecting the target element to flatten the geometry. |
| Target as Center | Use the target element as the rotation center when rotating the selected geometry. |
Sorry you didn't find this helpful
Why wasn't this helpful? (check all that apply)
Thanks for your feedback.
If you can't find what you're looking for or you have a workflow question, please try Foundry Support.
If you have any thoughts on how we can improve our learning content, please email the Documentation team using the button below.
Thanks for taking time to give us feedback.