Search is based on keyword.
Ex: "Procedures"
Do not search with natural language
Ex: "How do I write a new procedure?"
Checker
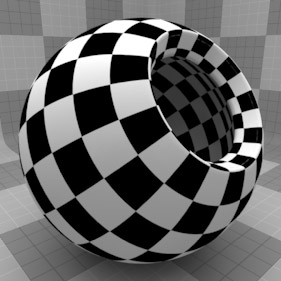
The Checker texture uses two colors (or values) to create a pattern of alternating squares to resemble a checkerboard. By changing the Transition Width, Bias, and Gain options, you can create a variety of checkered and diamond-like shapes. Additionally, as a procedurally created texture that is mathematically generated at render time, the Checker texture has no fixed resolution and can be magnified nearly infinitely with no visual loss in detail.
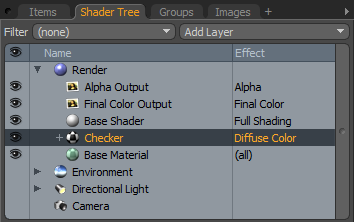
Note: For information about adding and working with Shader Tree item layers, see the Shader Tree topic.
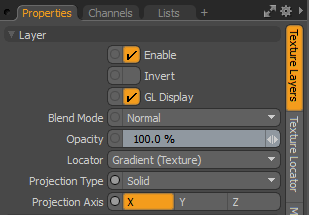
Layer Properties
|
Enable |
Toggles the effect of the layer on and off. This duplicates the functionality of toggling visibility in the Shader Tree. When disabled, the layer has no effect on the shading of the scene. However, Modo saves disabled layers with the scene, and they are persistent across Modo sessions. |
|
Invert |
Inverts the colors (RGB values) for the layer to produce a negative effect. |
|
Blend Mode |
Affects the blending between different layers of the same effect type. With this, you can stack several layers for different effects. For more about blending, see Layer Blend Modes. |
|
Opacity |
Changes the transparency of the current layer. If there are layers below this layer in the Shader Tree, reducing this value increasingly reveals the lower layers. Reducing the value always dims the effect of the layer. |
|
Locator |
Sets the association for the Texture Locator. Most texture layers have a Texture Locator that Modo automatically creates in the Item List. This defines the mapping of the texture (how Modo applies the texture) to the surface. You can specify alternate locators, but this is normally not required. Although you may want multiple texture items to share a single locator. |
|
Projection Type |
Defines how a texture/material is applied to a 3D surface. Types vary significantly in their effects. For a guide to each Projection Type see Projection Type Samples. |
|
Projection Axis |
The texture/material is projected down this axis. This applies to Planar, Cylindrical, Spherical, Cubic, Box, and, Light Probe projection types. |
Checker Properties

|
Checker |
|
|
Value 1 |
The magnitude of the texture on the first set of alternating squares. The color ramps to Color 2 based on the Transition Width. When using Bump or Displacement effects, this value describes the height of the first set of squares. |
|
Color 1 |
The color of the texture on the first set of alternating squares. This color ramps to Color 2 based on the Transition Width. The Alpha value determines the level of transparency. |
|
Alpha |
The level of transparency for Color 1. Note: You can adjust the Alpha value using the Color Picker. |
|
Color 2 |
The color of the texture on the second set of alternating squares. |
|
Value 2 |
The magnitude of the texture on the first set of alternating squares. The color ramps to Color 1 based on the Transition Width. The Alpha value determines the level of transparency. When using Bump or Displacement effects, this value describes the height of the second set of squares. |
|
Alpha |
Determines the level of transparency for Color 2. |
|
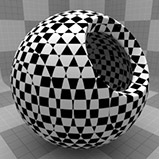
Type |
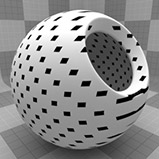
Specifies the style for the Checker texture and determines the method of projection. See Type for examples. • Square - Projects the checkered grid from a single axis (which you define in the Texture Locator). • Cubic - Projects the checker grid from all three axes (this may look odd on curved surfaces because the edges interact with each other). |
|
Transition Width |
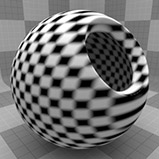
Controls the amount of gradient falloff across each of the texture edges. Driving this value over 100% can yield interesting effects. See Transition Width for examples. |
|
Bias |
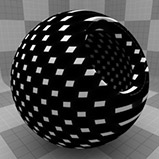
Determines whether the texture favors Color 1 or Color 2. Increasing this value causes the texture to favor Color 1; decreasing the value favors Color 2. This value is dependent on the Transition Width as it works across the gray tones of the image. See Bias for examples. |
|
Gain |
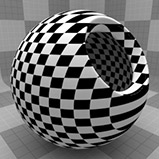
Determines the falloff effect for the texture. This is similar to a gamma control that affects the falloff of the gradient ramp between the two colors. Setting the Gain to 100% creates a sharp falloff effect; setting the value to 0% creates a plateau around the value (or color mid-point) with a sharp falloff at either gradient extreme. This value is dependent on the Transition Width as it works across the gray tones of the image. See Gain for examples. |
|
|
|
|
Type Square |
Type Cube |

|
|
|
|
|
Transition Width 0% |
Transition Width 50% |
Transition Width 100% |
|
|
|
|
|
Bias 0% |
Bias 50% | Bias 100% |
|
|
|
|
|
Gain 0% |
Gain 50% | Gain 100% |


Sorry you didn't find this helpful
Why wasn't this helpful? (check all that apply)
Thanks for your feedback.
If you can't find what you're looking for or you have a workflow question, please try Foundry Support.
If you have any thoughts on how we can improve our learning content, please email the Documentation team using the button below.
Thanks for taking time to give us feedback.