Search is based on keyword.
Ex: "Procedures"
Do not search with natural language
Ex: "How do I write a new procedure?"
Convert UVs to Mesh
The Convert UVs to Mesh command converts the currently selected UV map into a new Mesh Item.
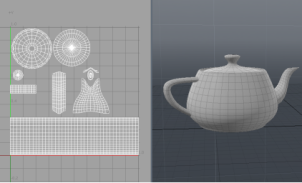
|
|
| A mesh and its UV map. | The UV map as a mesh, created by the Convert UVs to Mesh command. |
For more information on creating UV maps, see Working with UV Maps.
To convert the mesh:
| 1. | Select Texture > Convert UVs to Mesh. |
This opens the Convert UVs to Mesh dialog.
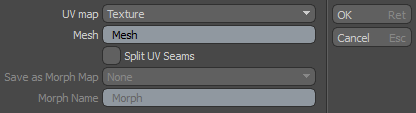
| 2. | Select the source map from the UV map dropdown. |
| 3. | Edit the name of the mesh if needed. Click OK. |
The new mesh is added to the Item List.
Note: As UV maps have no inherent size or scale, Modo converts the UV 0-1 grid to meters. So when converting from a normalized UV, the resulting Mesh Item fits within the 0m to 1m area of the XY plane.
Preserving Vertex Order
For some operations it is useful to match the order of the vertices in the source mesh with the new (UV) mesh. To preserve the vertex order, the source mesh topology must be the same as the new mesh topology. However, there is usually a mismatch as the UV map consists of a series of islands with different seams to the source mesh. To remedy this, you can split the source mesh to form seams that match the UV mesh, and therefore create a matching topology.
To split the source mesh to match the UV mesh:
• Check the Split UV Seams option in the Convert UVs to Mesh dialog when converting a mesh.
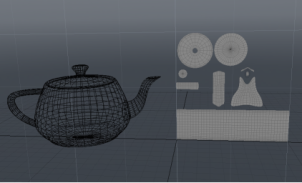
|
|
A UV map of the default teapot primitive. The continuous polygon body is selected and the matching UV islands are shown. You can see that their topology differs. |
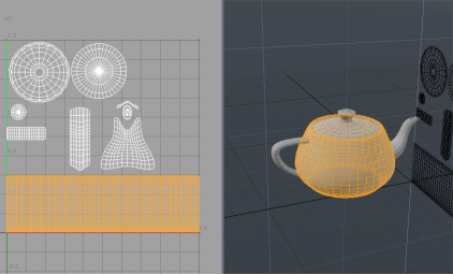
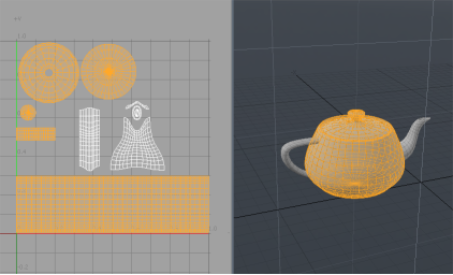
|
|
A new mesh is generated from the UV map using Split UV Seams. The source mesh is now split to match the topology of the UV mesh. This is demonstrated by reselecting the body - notice how topology of the body now matches the UV island (the lid and base of the teapot are now split from the body). |
Using Morph Maps
Instead of generating the UV map as a new mesh, it can be used to create a morph map for the current mesh. This is made possible by preserving the vertex order when choosing Split UV Seams. With the same vertex order, the edges in the source mesh match the edges of the new mesh and the morph is seamless.
Note: The Morph Map can either be Relative or Absolute. For more information, see Morph Maps
To generate a Morph Map:
| 1. | When converting a UV to a mesh, check Split UV Seams on the Convert UVs to Mesh dialog. |
| 2. | Select the morph map type from the Save as Morph Map dropdown: Relative offsets a particular vertex relative to its current position. Absolute positions a vertex to a specific absolute position |
| 3. | If preferred, edit the Morph Name to assign a new name to the Morph Map. Click OK. |
The new Morph Map is displayed in the Lists viewport under Morph Maps.
Procedural Convert UV to Mesh
The Convert UVs to Mesh command is available as a mesh operation.
Tip: For more information on procedural modeling and mesh operations, see Procedural Modeling.
To use the Convert UV to Mesh operation:
| 1. | Add a new mesh layer where you want to place the new geometry: open the Mesh Ops tab on the right panel and click Add Item, then under Items, double-click Mesh. |
Tip: If the Mesh Ops tab is not visible on the right panel, click the + button on the right of the tab names, and select Data Lists > Mesh Ops.
This adds a new mesh layer to your scene.
| 2. | Select the new mesh layer in the Item List at the top of the Mesh Ops tab and click Add Operator. Under Mesh Operations > UV, double-click Convert UV to Mesh. |
The Convert UV to Mesh operation is added to the Mesh Operations list.
| 3. | To specify what geometry it should use, expand it in the list by clicking the small arrow in front of its name. |
This reveals the mesh operation's inputs: Source Mesh and Selection.
| 4. | Under Source Mesh, click (Add Source Mesh). |
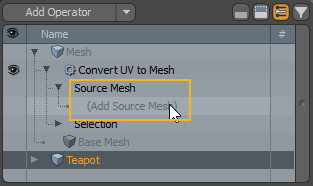
This opens the Add Operation dialog.
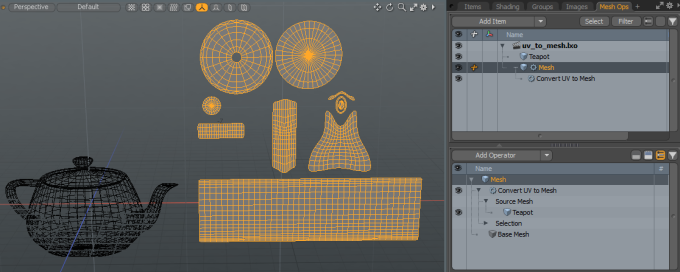
| 5. | Double-click the mesh you want to use. |
The converted UV map appears in the 3D viewport.
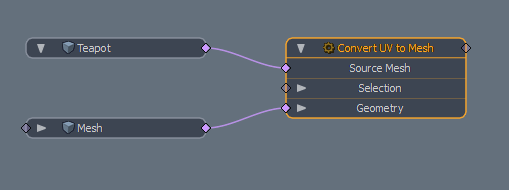
Convert UV to Mesh in the Schematic
In the Schematic viewport, the Convert UV to Mesh node has the same inputs as the mesh operation.
To add the Convert UV to Mesh node, click Add... at the top of the viewport, then click Mesh Operations > UV, and double-click Convert UV to Mesh.
Connect the mesh you want to convert to the Source Mesh input of the Convert UV to Mesh operator. This places the converted mesh to the same mesh layer as the original mesh. To place it in a new mesh layer, as in the example above, add a new Mesh node and connect it to the Geometry input of the Convert UV to Mesh node.
Note: If nothing is connected to the Source Mesh input, Modo reads the UV from the Geometry input.
Tip: For more information on working in the Schematic viewport, see Schematic Viewport.
Sorry you didn't find this helpful
Why wasn't this helpful? (check all that apply)
Thanks for your feedback.
If you can't find what you're looking for or you have a workflow question, please try Foundry Support.
If you have any thoughts on how we can improve our learning content, please email the Documentation team using the button below.
Thanks for taking time to give us feedback.