Search is based on keyword.
Ex: "Procedures"
Do not search with natural language
Ex: "How do I write a new procedure?"
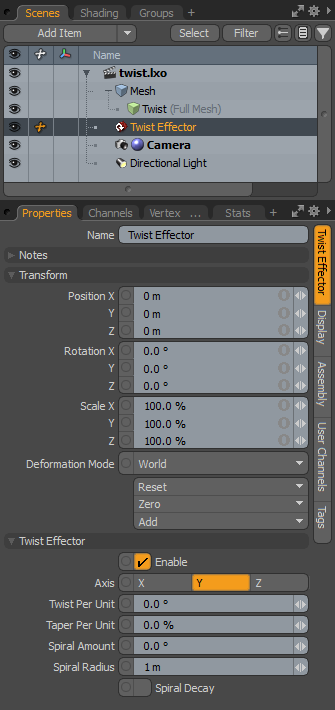
Twist Effector
Effectors are a means to affect a target item, generally a mesh layer, to deform it in specific ways. The Twist Effector, when assigned to an item, deforms the object in a twisting motion. It has options for Decay to apply a spinning-tornado type of deformation to the target item.
Note: Before Modo 14.0v1, Twist Effector was called Vortex Effector.
Applying an Effector
You can add an Effector by using the Item List's Add Items command, but it won't produce the intended result because it only places the Effector in the Items list. For proper results, you must connect the Effector to the mesh layer by way of a General Influence. The General Influence acts upon the mesh, and the Effector, itself, produces the instructions on how the Influence should modify its target.
If you add the Effector in Items mode, Modo connects the Effector and the mesh layer automatically. First, select the target item(s) either in the Items list or any 3D viewport and then right-click the item and choose Add Mesh Operation, then under Effectors, double-click Twist Effector. Also, you can select the target item(s) and click the Effector button in the Deformers sub-tab of the Layout interface. Once you create the Effector, you can position it and modify its values to produce the desired results. When you apply an Effector to multiple items, Modo deforms each affected item based on the Effector's relative position to the mesh.

Name: Displays the current item's name. You may change the name by clicking the current name and typing a new name.
Transform
Position XYZ: Indicates the numerical position of the Effector item in XYZ space. These values define the origin of influence for the Effector.
Rotation XYZ: Indicates the rotation of the Effector item numerically. These values define the direction of influence for the Effector.
Order: Indicates the order that Modo applies rotations to the Effector item. By changing this order, you can sometimes reduce or eliminate gimbal lock.
Scale XYZ: Sets the size of the item's representation in the 3D viewport numerically.
Deformation Mode: Determines how the transforms of the Effector translate into a deformation:
• World - This is the default setting and determines the deformation based on the World Position of the Effector. In most cases, this provides the expected results.
• Local - This applies the deformation relative to the Setup position of the item as if the item were still in the rest state regardless of the position of the Effector. This is useful for the order of operation workflow when rigging.
• Local ** Rotation Modes - This is identical to the Local mode, but Modo only applies the specified rotation. This creates a deformation that is more like a Rotation Effector with Parametric interpolation.
Reset: Resets the selected transform values to (0,0,0) and returns the item to its default state.
Zero: Resets the selected transform property values to 0 but leaves the item's position and the mesh position intact. Modo does this by adding a negative transform item to the Mesh Item's channels.
Add: Adds a Transform item to control an item's position, rotation, or scale. By default, new items do not have any transform items associated with them (although they are visible within the Properties panel). Only add the necessary transforms on an as-needed basis to reduce scene overhead. You can also use this Add function to add a selected set of transforms to the Channel list while keeping the default 0,0,0 values, which is necessary for Referencing. (To override channels, they must exist.)
Twist Effector
Enable: Toggles the effect of the layer on or off. When clear, the layer has no influence on the scene. However, Modo saves disabled layers with the scene and their values are persistent across Modo sessions.
Axis: Determines the general directional Axis for the twisting motion.
Twist Per Unit: Indicates the amount of rotation that Modo adds for every unit of distance from the base of the Twist.
Taper Per Unit: Specifies the change in the radius for every unit of distance from the base of the Twist.
Spiral Amount: Indicates the rotation amount that Modo adds as the effect moves away from the center axis of the cylinder. The angle equals the Spiral Amount when the distance equals the Spiral Radius.
Spiral Radius: Specifies the distance from the axis at which the spiral rotation that Modo adds is equal to the Spiral Amount.
Spiral Decay: Sets whether the spiral increases or decreases with distance along the axis.
Sorry you didn't find this helpful
Why wasn't this helpful? (check all that apply)
Thanks for your feedback.
If you can't find what you're looking for or you have a workflow question, please try Foundry Support.
If you have any thoughts on how we can improve our learning content, please email the Documentation team using the button below.
Thanks for taking time to give us feedback.