Search is based on keyword.
Ex: "Procedures"
Do not search with natural language
Ex: "How do I write a new procedure?"
RPC Mesh Item
RPC items allow you to utilize Rich Photoreal Content, specially processed photographic content that can be leveraged to increase the complexity and depth of a scene. Developed by Archvision, RPC technology uses high quality image data combined with minimal polygonal geometry to create the illusion of 3D. By synthesizing image data as the camera moves through the scene, images effectively reproduce the appearance of a 3-Dimensional object without relying on complex geometry. An easy to use interface makes the placement of RPC content a simple operation. A simplified representation is first used to orient RPC content within the scene, and at render time the RPC plug-in calculates the viewing angle of the RPC item relative to the camera. The appropriate corresponding images are then calculated, creating the illusion that a complete 3D object exists in the scene.
Using RPC Items in Modo
To add an RPC item to a scene, go to the Items list and click Add Item. In the Preset Browser, navigate to Locator > Procedural, and double-click RPC Mesh. Once the item itself is added, browse to a library and specify an RPC element before anything shows in the 3D viewport. Modo includes a selection of preset content that you can browse through and add to your scene. You can also purchase additional libraries directly from Archvision's website, http://www.archvision.com/ ![]() . Libraries include trees, automobiles, people, bushes, furniture and other useful objects. Whenever an RPC item is added, a corresponding Material Group and RPC Texture is added to the Shader Tree as well, providing you with a means to adjust the image's Gamma for linear workflows and other situations.
. Libraries include trees, automobiles, people, bushes, furniture and other useful objects. Whenever an RPC item is added, a corresponding Material Group and RPC Texture is added to the Shader Tree as well, providing you with a means to adjust the image's Gamma for linear workflows and other situations.
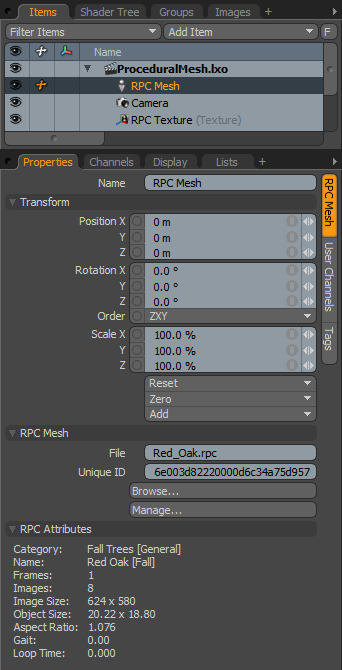
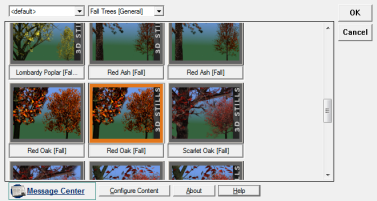
Once an RPC item has been added to the Items list, select the item and navigate to the Properties panel. Here you have two buttons: Browse and Manage. Use the Browse option to locate RPC content archives locally on your systems. Click the Manage button to open the RPC Thumbnail Browser. Here you can select and configure content for use in their scenes. Once a specific item is selected, press OK to utilize the selected content in the scene. By default, the item appears at the origin location. You can then utilize Modo's item transform tools to position the element within the scene.

|
Option |
Description |
|---|---|
|
Name |
This data field displays the current item name. Change it by clicking on the field and typing the new name. |
|
Transform |
|
|
Position |
An item transform that allows you to numerically position the item in XYZ space. By default, position transforms originate from the center position. |
|
Rotation |
An item transform that allows you to numerically set the rotation of the item. By default, rotation transforms originate from the center position. |
|
Order |
Allows you to set the order that rotations are applied to the camera item. Changing the order that rotations are applied can sometimes help to reduce or eliminate gimbal lock. |
|
Scale |
An item transform that allows you to numerically set the size of the item. By default, scale transforms originate from the center position. |
|
Reset |
Resets the selected transform values to (0,0,0) returning the items to their default state. |
|
Zero |
Resets the chosen transform property values to 0, leaving the center position and item position intact. |
|
Add |
Transform items are the channel groups associated with an item that store its transform values, controlling its position, rotation and scale. By default, new items do not have any transform items associated with them, even though they are visible within the Properties panel. This is useful as an optimization as only the necessary transforms are added on an as-needed basis, reducing scene overhead. There are several ways to add them. You can simply transform the target item with one of the various transform tools, or by editing the value input fields. This action causes the particular transform item to be added automatically to the Channels viewport list. The Add function here can also be used to add the selected set of transforms to the channel list while keeping the default 0,0,0 values. A necessary step for referencing, in order to override the channels, they must first exist. |
|
RPC Mesh |
|
|
File |
This data field displays the file location of the currently loaded RPC mesh. |
|
Unique ID |
An identifier related to the file. |
|
Browse |
The browse function is used to locate and select RPC archives on the local machine. |
|
Manage |
Opens the RPC Thumbnail Browser (shown below). Here you can select and load elements visually within the RPC archive and configure the content. |
|
RPC Attributes |
These options are merely information displays regarding the chosen asset, giving you a quick reference to the technical. |
Note: RPC objects are only compatible with the Windows version of Modo.
Sorry you didn't find this helpful
Why wasn't this helpful? (check all that apply)
Thanks for your feedback.
If you can't find what you're looking for or you have a workflow question, please try Foundry Support.
If you have any thoughts on how we can improve our learning content, please email the Documentation team using the button below.
Thanks for taking time to give us feedback.
