Search is based on keyword.
Ex: "Procedures"
Do not search with natural language
Ex: "How do I write a new procedure?"
Edge Slice
With the Edge Slice tool you can click from edge to edge, creating a slice between the edges as you go. After clicking down on an edge, you can drag along the edge's length to set a precise cut location. You can also edit previously-made edge cuts by clicking directly on the handle point that represents the desired cut point and dragging it to a new location.
Often you may wish to use the Edge Slice to create a closed cut where the last point and the first point are joined by an edge so that you have created a new "edge loop". To do this you can create a final cut on the edge that received the first cut. As you drag the new cut point towards the first cut point on the edge, the color of both points changes when they overlap, so you can see that they have been merged. At this point, you can deactivate the tool as you have completed the edge loop.
Activating the Edge Slice Tool
• In the Model layout Toolbox, under the Mesh Edit sub-tab, click Edge Slice.
• In the Topology layout Tools sub-tab, click Edge Slice.
From the menu bar, click Geometry > Slice > Edge.
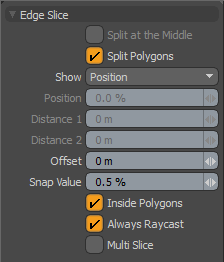
Edge Slice Properties

|
Split at Middle |
When active, this option forces all cuts to be centered on each edge as it is cut. This option can be activated temporarily by holding down the Ctrl key while cutting an edge. |
|
Split Polygons |
When enabled, the Split Polygons function creates a new edge between the cut points of the previous edges. With this disabled, new points are added to the polygons, but no edges connect them. |
|
Show (None/Position/Distance) |
Provides a small heads up display of data related to the current cut point as a position along the edge as a percentage, or a two distance values indicating the distance to either point in the cut edge. There is also the None option that disabled the display. |
|
Offset |
Defines the distance from an edge cut to a cut position within the polygon. The length value is updated automatically when a cut is performed and while the tool is interactive, the value can be adjusted measuring the length of the resulting cut line from the prior edge to the interior cut. |
|
Snap Value |
Constrains the newly created vertices to specified increments. To adjust the slice vertices without constraint, simply set this value to 0%. |
|
Inside Polygons |
With this toggle setting active, you can click anywhere inside a polygon to create a new edge that goes into the interior of the polygon. This option makes it very convenient to carve in additional details to existing polygons. |
|
Always Raycast |
Helps when cutting elements while working in wireframe mode, culling out any occluded polygons, meaning that, when enabled only, front-most facing polygons can be cut by the tool. |
|
Multi Slice |
When enabled, a dashed line is drawn in the viewport, showing the link between the location of the last cut to the current cursor position. |
Sorry you didn't find this helpful
Why wasn't this helpful? (check all that apply)
Thanks for your feedback.
If you can't find what you're looking for or you have a workflow question, please try Foundry Support.
If you have any thoughts on how we can improve our learning content, please email the Documentation team using the button below.
Thanks for taking time to give us feedback.