Search is based on keyword.
Ex: "Procedures"
Do not search with natural language
Ex: "How do I write a new procedure?"
Using the Mesh Ops Tab
The procedural modeling tools are available in the Model layout, in the Mesh Ops tab. You can find it on the right-side of the interface, next to the Item List.
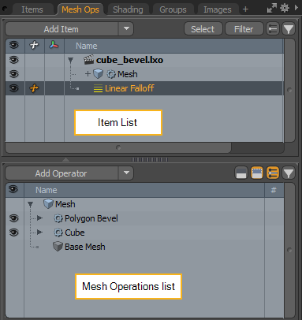
The tab consists of two lists. You can find the Item List on top, and the Mesh Operations list below it.
Note: For more information on the Item List, see Items List.
Mesh Operations List
The Mesh Operations list contains a list of the mesh operations in your scene. These can be primitives, like a Cube or a Cylinder, or they can be tools, like the Smooth or the Bevel tool. The order of evaluation is determined by the order of mesh operations. Modo evaluates mesh operations at the bottom first and proceeds upwards in the list.
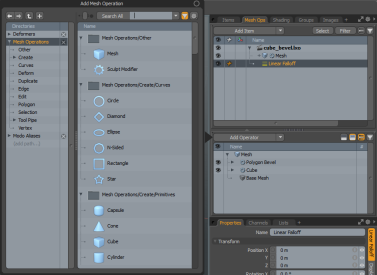
You can add operations to the list by clicking the Add Operator button above it. This opens the Procedural Preset Browser, where you can find various operations organized into categories: you can add deformers, mesh operations, and assemblies. You can use the scale slider to change the size of the icons. The category headers have folder icons and the tools have their individual icons. You can find a subset of the procedural versions of the traditional modeling tools in this menu.
Alternatively, you can click the small arrow next to the Add Operator button to reveal a dropdown menu of the available items.
Tip: You can pin the Preset Browser to your workspace by dragging it to a different place in the interface, or clicking the small circle in the top-right corner. To unpin, click the circle in the right-hand corner.
For example, you can add a cube the following way:
| 1. | Select the base mesh in the Mesh Operations list. |
| 2. | Click the Add Operator button and navigate to Mesh Operations > Create > Primitives. |
Tip: Alternatively, you can search for the required mesh operation by typing its name in the search bar at the top of the window. You can click the button on the left side of the search bar to adjust your search. Search All searches all mesh operations, and Search View searches through the currently-visible operations.
| 3. | Double-click the Cube mesh operation from the list on the right of the panel. |
The cube primitive is added to your Mesh Operations list and shows up in the 3D viewport. You can then edit the properties of the cube in the Properties panel below the Mesh Operations list.
Creating instances of items in the Mesh Ops Tab
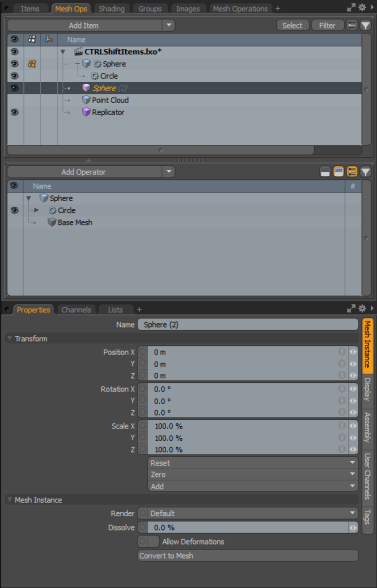
You can quickly create an instance from a selected item in the Mesh Ops tab. The instance is only relevant for the selected Items. The result is a duplicate of the selected item that is simply a reference to the original item. Instances can be transformed at the item level and can have their own materials and textures applied to them using item-level masks. However, they can not be edited at the instance-level, as they derive all information from the original Item. The advantage is that all item changes made to the original Item propagate to its instances.
You can make an instance of all items in the Mesh Ops tab.
Tip: You can also use the Ctrl/Cmd + Shift keys to create instances in the Mesh Operations List and add keyframes in the Graph Editor.
To create an instance:
| 1. | In the Mesh Ops tab, press Ctrl/Cmd + Shift, click on a item, and drag the item to anywhere in the Mesh Ops tree. |
An instance is created and the properties are displayed in the Properties.
Mesh Operation Inputs
Once a mesh operation is added to your list, you can add other operations to it to modify its behavior. The items you can add depend on the type of mesh operation. The most common inputs are Tool Pipe and Selection. For example, the Cube primitive only has a Tool Pipe input, but a Polygon Bevel also has a Selection input. A Curve Rebuild tool, on the other hand, calls for a Curve input.
You can reveal a mesh operation's inputs by clicking the small arrow in front of the operation in the Mesh Operations list.
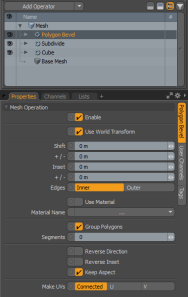
The image below shows the Selection and Tool Pipe inputs of the Polygon Bevel.
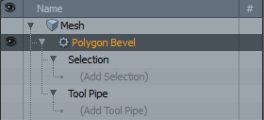
Clicking (Add Selection) lets you add a selection operation. For more information on procedural selection, see Procedural Selection.
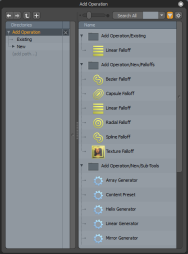
Clicking (Add Tool Pipe) opens a Preset Browser, where you can select mesh operation modifiers to add to your scene.
The panel has two categories: the items you've already added to your scene can be found in the Existing category, while available and compatible items are under New. Once you add any item under New to your scene, it appears under Existing. To add an item to the list, double-click it in the list.
The modifier appears in the selected mesh operation's Tool Pipe. By hovering the mouse over the right side of the field, two additional controls appear:

Clicking the x icon removes the item from the list. Clicking the arrows opens the Add panel, and you can change the existing modifier to a different one.
Note: Modo displays a Modifier Dependency Loop Warning when you try to add a tool or mesh operation to its own input.
Ghosting, Single Item View, Filtering
In the top right corner of the list, you can find four buttons to control how the Mesh Operations list displays information.

Ghosting
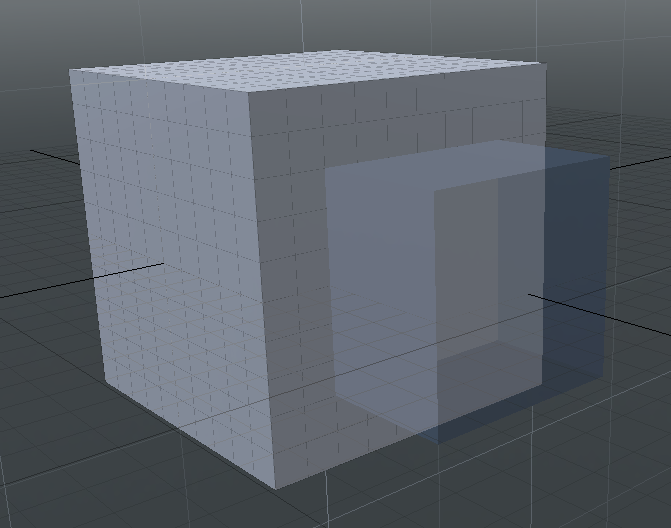
Ghosting is automatically activated when selecting a base mesh in the Items list. Alternatively, clicking the Ghosted view ![]() button enables ghosting. In ghosted view, when you select a mesh operation, Modo evaluates and displays the list up until that operation, and displays a ghosted view of the whole list over the top. By default, the mesh appears shaded blue, but you can customize the look of the ghosted view in System > Preferences > Defaults > Procedural Modeling > Ghosted Mesh Drawing.
button enables ghosting. In ghosted view, when you select a mesh operation, Modo evaluates and displays the list up until that operation, and displays a ghosted view of the whole list over the top. By default, the mesh appears shaded blue, but you can customize the look of the ghosted view in System > Preferences > Defaults > Procedural Modeling > Ghosted Mesh Drawing.
In addition, in the Item List, right-click on a mesh and select Edit Base Mesh from the pop-up contextual menu. This command allows you to quickly edit the base mesh.
Note: For more information on ghosted mesh properties, see Procedural Modeling.
The image below shows a Cube with a Polygon Bevel operation. Selecting the Cube in the Mesh Operations list with ghosting enabled, the Polygon Bevel is displayed with blue shading.
Modo also allows you to hide the non-evaluated parts completely. You can do this by clicking the Hide ![]() button, or you can set the Drawing Style to Hide in the Procedural Modeling preferences.
button, or you can set the Drawing Style to Hide in the Procedural Modeling preferences.
Solo Mode
By default, you are viewing the Mesh Operations list in single item view. This means that only the deformers and mesh operations applied to the selected mesh layer are displayed in the list. You can toggle this view by clicking the Single item view ![]() button.
button.
Filtering
When having a long list of items, you can search through them by clicking the Filter ![]() button. Clicking the button reveals a search bar, where you can type in the name of the required operation.
button. Clicking the button reveals a search bar, where you can type in the name of the required operation.
Procedural Mesh Operation Properties
Procedural mesh operations also have a Properties panel, but as opposed to traditional tool properties, these are located on the lower-right of the interface, below the Mesh Operations list.
To display the properties of an operation, select it in the Mesh Operations list.
The image below shows the Properties panel of the Polygon Bevel:
Here you can manually edit an operation's properties and see the updated results in the 3D viewport.
Sorry you didn't find this helpful
Why wasn't this helpful? (check all that apply)
Thanks for your feedback.
If you can't find what you're looking for or you have a workflow question, please try Foundry Support.
If you have any thoughts on how we can improve our learning content, please email the Documentation team using the button below.
Thanks for taking time to give us feedback.
