Search is based on keyword.
Ex: "Procedures"
Do not search with natural language
Ex: "How do I write a new procedure?"
Add Loop
The Add Loop tool is the faster, interactive version of the Loop Slice tool. With it, you can easily add a continuous edge through a series of polygons (typically quad polygons). Loops are generally a continuous band of polygons encircling a surface or terminating at an edge, but the Add Loop tool only needs two or more polygons that share and edge to add the loop.

To use the tool, follow these steps.
| 1. | In the Model layout, open the Edges sub-tab in the Toolbox, and click Add Loop. |
Alternatively, this tool is available in the Topology layout, under the Tools sub-tab as well in the menuGeometry > Edges > Add Loop.
This activates the tool.
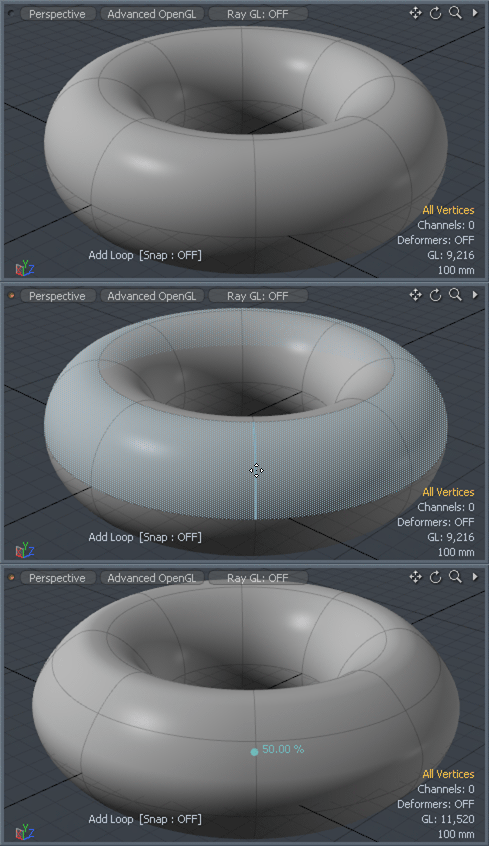
| 2. | Next, in the 3D viewport, locate the target edge for the operation. The mouse pointer must be close enough to the edge to trigger the pre-highlighting, turning the edge a light blue color. Click it to add a new edge perpendicular to the target, that cuts though the polygon band at the intersection of the mouse pointer and the target edge. |
The tool is now in interactive mode, subsequent clicks reposition the edge, clicking and dragging slide the edge loop. Click away from the active edge to remove it. Press and hold the Shift key and click, or click on a new highlighted edge to trigger a new edge loop. When the newly generated edge encounters a triangle polygon, the edge terminates. When a polygon is encountered with more than four sides, the tool attempts to cut through the center of the polygon, but may produce undesirable results, especially in polygons with odd numbers of edge.
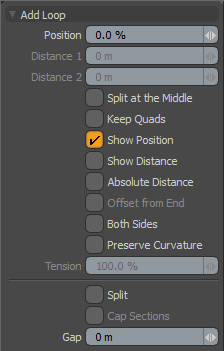
When the tool is activated, the following options are available in the tool's Properties panel.

|
Add Loop |
|
|---|---|
|
Position |
This value determines the slice position across the entire edge length displayed as a percentage, with 50% being the center. This interactively changes as you adjust the edge in the 3D viewport. You can also type in a new value manually to adjust the active edge in the viewport. Note: An edge must be active in order to manually enter its position. |
|
Distance 1/2 |
The slice position displayed as a numeric distance value from the start (1) to the end (2) of the edge. |
|
Split at the Middle |
When enabled, Modo automatically slices at the middle (50%) position regardless of where the edge was clicked. You can enable this option temporarily by holding Ctrl before clicking. |
|
Keep Quads |
Forces the Add Loop tool to produce quad polygons if possible, such as when meeting a polygon with more than 4 edges. This is achieved by adding additional connecting edges. |
|
Show Position |
When enabled, displays a text overlay of the new position as a percentage. |
|
Show Distance |
When enabled, displays the distances between the edge positions and the new position as a numeric value. |
|
Absolute Distance |
When enabled, the offset of the new loop is defined by an absolute distance instead of as a percentage, maintaining a fixed distance from the closest edge when created. |
|
Offset from End |
When enabled, allows the offset of the loop from the opposite end of edge. This option is only available when Absolute Distance is enabled. |
|
Both Sides |
When enabled, simultaneously slices loop from both sides of the existing loop providing two edge loops. |
|
Preserve Curvature |
When enabled, the Preserve Curvature option attempts to maintain the flow of surrounding geometry. The new position is computed along a curve through the surrounding edges to maintain the overall curvature of the surface. Once enabled, the Tension setting becomes available. |
|
Tension |
Determines the strength of the curvature preservation. The default value of 100% calculates the curvature similar to a spline generated along the edge's length, placing the new vertex appropriately, where a value of 0% is like disabling the Preserve Curvature option. Negative values inset the curvature and higher values further offset the vertex out from the curve's position. |
|
Split |
When enabled, the resulting loop splits the surface, producing two distinct overlapping edges, rather than a single connected edge. |
|
Cap Sections |
When using the Split option, the Cap Sections option can be added to create a single polygon cap connected to the two resulting edge loops, in effect closing off the two new edges. |
|
Gap |
When splitting surfaces, this option defines a width around the split line, in effect thickening the width of the resulting cut by the defined value. |
Sorry you didn't find this helpful
Why wasn't this helpful? (check all that apply)
Thanks for your feedback.
If you can't find what you're looking for or you have a workflow question, please try Foundry Support.
If you have any thoughts on how we can improve our learning content, please email the Documentation team using the button below.
Thanks for taking time to give us feedback.