Search is based on keyword.
Ex: "Procedures"
Do not search with natural language
Ex: "How do I write a new procedure?"
Images/Clips List
The Clips or Images viewport provides access to all images loaded into Modo, organized by scene. The size of the viewport determines how the image information is displayed. In the compact view, you can select particular images, and add images to the list using the Add Clip button. Hovering the mouse over the edge of the frame and clicking and dragging the frame resizes it to reveal larger views. The small list only displays the current image, and clicking opens a gallery browser for navigating and adding images.
If the image is located relative to the scene directory, in the parent directory to the scene, or relative to the project directory (if any), then the file path is displayed as relative to that location. Otherwise, the absolute path is displayed. In both cases, you can see the absolute path in the tooltip when you hover the cursor over the image.
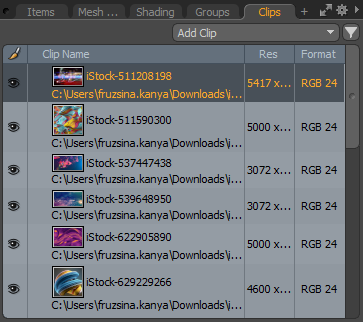
At full size, the list view shows the image by name, includes an icon of the image for visual reference, and has data about the resolution and format of the image. You can also select a Gallery view from the viewport widget, choosing the Viewport Settings menu.
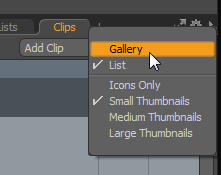
To access the Options menu you can either:
• Click on the Settings ![]() icon, or
icon, or
• Right-click on the tab and select Viewport Settings.
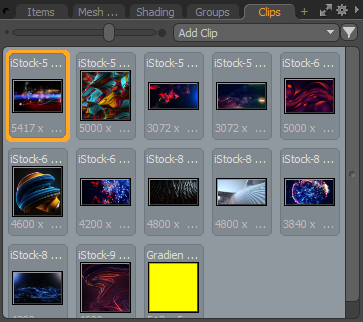
The gallery mode has a slider across the top of the viewport where you can resize the icon images interactively.
|
|
|
|
Clip List Compact |
Clip List Small |
|
|
|
|
Clip List Full Size |
Clip List Gallery |

When opening the Clips viewport from the Texture Layer properties, a full-size viewport appears with additional controls.
Tip: For more information on using images as textures, see Image Map.
The Add Clip button provides you with commands for not only loading still image and image sequences, but for creating blank new images and sequences. Selecting any of the commands opens a file browser where you can navigate to a folder and either load or save the image, depending on the operation chosen.
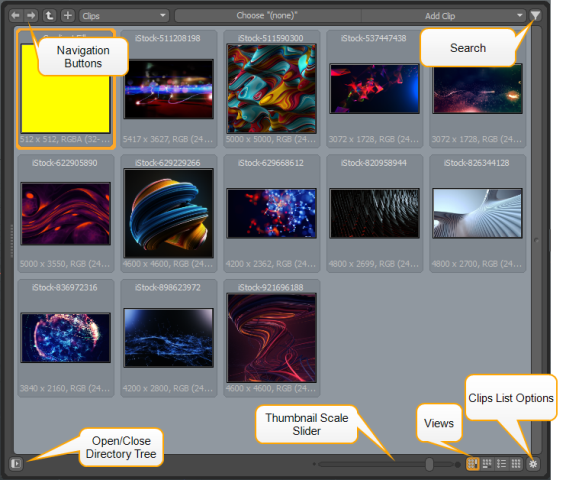
Navigating in the Viewport
You can navigate the Clips list by using the buttons in the upper-left of the window:

Forward, Back, Up to Parent, and Create New Folder respectively. The Forward and Back options are only available when folders have been navigated (much like a web browser).
If you prefer to use the directory tree, you can open it by clicking the Directory Tree ![]() button in the bottom-left corner of the viewport. The directory tree is displayed on the left of the viewport.
button in the bottom-left corner of the viewport. The directory tree is displayed on the left of the viewport.
You can scale the thumbnails using the slider at the bottom.

You can set how the Clips list displays information using the buttons in the lower right corner.
|
|
Thumbnails view with vertical scrolling. |
|
|
Thumbnails view with horizontal scrolling. |
|
|
List view, showing assets in a vertically scrolling list. |
|
|
Thumbnail grid view. You can arrange the thumbnails arbitrarily. |
|
|
Opens the Clips list options. For more information, see Clips List Options. |
Double-clicking an image in the viewer opens it in a Preview Viewport set to Clips, so you can view the image at a larger resolution. Right-clicking an image provides the image item context menu, with a variety of options:
|
Rename |
Renames the current image. This new name only affects the reference name in Modo and does not rename the file itself. |
|
Editor Color |
Provides you with the means to use color for organizational purposes. |
|
Delete |
Removes the image from the scene. If the image is applied to a surface, Modo pops up a requester stating that the image is in use and asking if you are sure you want to remove the image. |
|
Reload |
Reloads the image as saved to disk. This is useful for when edits, made in an external application, don't trigger Modo to reload it automatically. |
|
Replace as Still |
Replaces all instances of the current image or sequence in the scene with a new still image loaded from disc. |
|
Replace as Sequence |
Replaces all instances of the current image or sequence in the scene with a new image sequence loaded from disc. |
|
Reload Layered Image |
Similar to Reload, but works for layered images. |
|
Replace layered Image |
Similar to Replace as Still, but works for layered images. |
|
Instance Sequence |
Creates an instance of an image sequence that can be assigned different attributes from its source, without the need to have the entire sequence loaded multiple times. |
|
Save |
Saves the current image to disk, overwriting the previous version. Use this command to save any changes made to images using Modo's painting and sculpting tools. |
|
Save As... |
Saves the current still image to a new location and/or name. |
|
Save Sequence |
Saves the current image sequence to disk. |
|
Export as Tiled EXR |
Exports all the selected clips into the tiled EXR format. A memory-efficient format that only loads the applicable image tile as necessary. The resulting tiled EXR images are saved into the same folder as the source image, and if the Replace Source option is enabled the source image is replaced with the tiled EXR file in the active scene automatically. When invoked, the following dialog panel opens representing the export options for the resulting files. |
| Export as Tiled EXR to... | Similar to Export as Tiled EXR but allows the user to specify a specific location to save files before conversion takes place. |
| Export as LRL | Exports all the selected clips to .lrl files. |
| Open with Default Application | Opens the selected image in the default external image editor (as specified in the OS) for the associated file format. |
| Open Containing Folder | Opens the image location in a file browser. |
Export as Tiled EXR Dialog
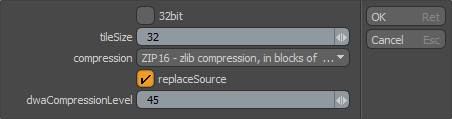
| 32 bit | When enabled, saves the files as 32 bit extended bit depth .exr format images. |
| Tile Size | Determines the smallest tile size generated in pixels. Depending on the image, should be in the area of 16x16 to 64x64 for best results. |
| Compression | Determines the type of compression assigned to the resulting images. Default option is for the ZIP 16 compression format. |
| Replace Source |
When enabled, the selected image is automatically replaced by the generated tiled .exr in the associated scene. |
| dwaCompression Level | Determines the amount of compression when using Dreamworks DWAA or DWAB compression options. These lossy formats are variable in quality and can minimize the compression artifacts. Higher values will result in greater compression and likewise smaller file size, but increases the chance for artifacts. |
Searching for Clips
You can search for specific images by using the Search feature. Search is located on the top-right of the viewport. Click the Search ![]() button to open the search string input field. Type a term into the field to see all images that contain the term in either the clip name or the clip's keyword tags. By default, the entire hierarchy is searched.
button to open the search string input field. Type a term into the field to see all images that contain the term in either the clip name or the clip's keyword tags. By default, the entire hierarchy is searched.

The first matching item is highlighted in the search results. You can scroll through the list using the cursor keys, and then press enter to open the image.
To change the search options:
• In the Search input field, click the More options ![]() button on the right of the search field, and select one of the following options:
button on the right of the search field, and select one of the following options:
• Simple Search - Locates assets using the text entered. Ignores case.
• Pattern Matching - Locates assets using the exact pattern of the text entered.
• Match Case - Matches the case of the search term against the clip name.
Note: If the cursor keys don't work on Mac OS X, try Alt+cursor to scroll through the options. This is due to a glitch in Modo's key handlers.
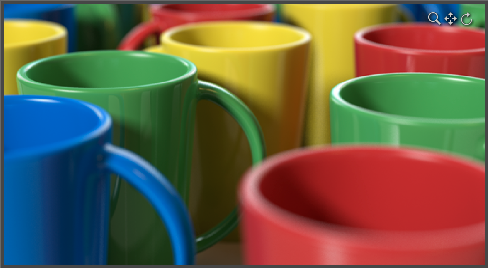
Preview
You can see a preview of any image in Modo by double-clicking on any image in the image list/clips browser. This opens an Image Preview pane. You can move around the image using the navigation widgets in the upper-right corner. Alternatively, you can use the following keyboard shortcuts:
• Alt+click and drag to pan,
• Shift+Alt+click and drag to zoom
Tip: You can double-click the initial image again to close the window.
Clips List Options
The Settings ![]() button, in the bottom-right corner of the Clips list, opens the viewport options dialog, which allows you to further customize the information displayed in the viewport.
button, in the bottom-right corner of the Clips list, opens the viewport options dialog, which allows you to further customize the information displayed in the viewport.
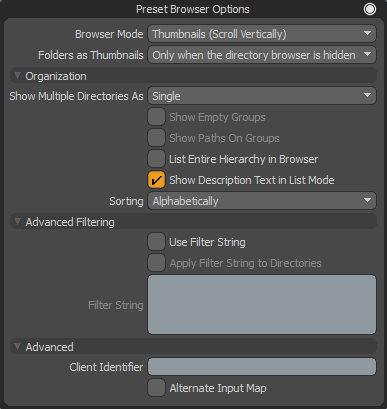
Organization Options
|
Show Multiple Directories As |
Controls how multiple folder selections are displayed (hold down Shift or Ctrl to select more than one folder in the Directories tree at a time): • Single - Displays the contents of single folders only (no multiple folder selections allowed). • Multiple (Merged) - Displays the contents of all selected folders simultaneously, as if they were a single folder. • Multiple (Grouped) - Same as above, but separates the contents of each folder with a named divider. |
|
Show Empty Groups |
Empty folders are displayed in the browser. Files can be dropped into empty groups when they are visible. Note: This option is only available when the Show Multiple Directories is set to Multiple (Grouped). |
|
Show Paths on Groups |
Displays the full directory hierarchy in the group name in the clip list. This only applies if you are viewing multiple directories using the Multiple (Grouped) option. |
|
List Entire Hierarchy In Browser |
When this option is enabled, all child folders in the hierarchy are also displayed in the browser without being explicitly selected. |
|
Controls the display order of the clips in the browser. • Alphabetically - Displays in alphanumerical order. • Manually - Allows you to define the order by dragging-and-dropping within the browser (not available for multiple directories as merged). • Star Rating - Ordered by the number of stars assigned to a clip. • File Extension - Ordered by the clip's file extension, organized alphabetically. • Modification Time - Defines the order based on the last time the file was saved (or modified), starting with the most-recent file or directory. • File Size - Defines the order based on the actual size of the file as saved on the disc. |
Advanced Filtering Options
The Clips list adds markup information to clips. Filtering procedurally refines what is visible in the browser, based on a scripting-like annotation
The filter options take into account both the user-defined markup, as well as metadata (information associated with the file, such as name and format).
|
Use Filter String |
Toggles the filtering on or off for the browser. |
|
Apply Filter String to Directories |
When this option is enabled, the filtering is applied to the directory folders as well, otherwise all directories are shown. |
|
Filter String |
Enter the data string to filter the elements in the Clips list. Note: The Use Filter String and/or Apply Filter String to Directory option must be set before typing a filter string. |
Advanced Options
|
Client Identifier |
Allows a Preset Browser to have its own unique selection. This is most useful when configuring a Preset Browser to be used with a specific tool. For example, this is how the Polygon Bevel tool knows which of many possible Preset Browser viewports to use (in the case of Polygon Bevel, the browser viewport is embedded in the Tool Properties viewport). Note: Each tool must be specially coded to look for a specific client identifier, so this feature is only really useful to tool developers. For more information, see our SDK documentation. |
|
Alternate Input Map |
An advanced setting for developers that controls the number of mouse clicks used to assign a preset to a tool. When enabled, they assign with a single click, and when disabled they assign with a double-click (the default behavior). For more information, see our SDK documentation. |
Sorry you didn't find this helpful
Why wasn't this helpful? (check all that apply)
Thanks for your feedback.
If you can't find what you're looking for or you have a workflow question, please try Foundry Support.
If you have any thoughts on how we can improve our learning content, please email the Documentation team using the button below.
Thanks for taking time to give us feedback.