Search is based on keyword.
Ex: "Procedures"
Do not search with natural language
Ex: "How do I write a new procedure?"
Linear Gradient
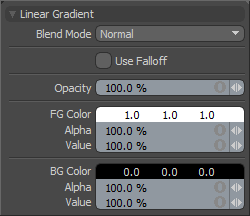
The Linear Gradient paint tool applies a flood fill of ink that ramps from the FG color to the BG color. Clicking and dragging in the 3D view creates a line from the cursor. This line is used to define the ramp distance from the FG to BG color. The color ramp is calculated in a linearly according to the line you defined. The ramp can be created in 3D views or directly in the UV view. You can select the tool from the Paint interface tab under the Paint Tools sub-tab of the toolbox.
The Linear Gradient tool can also be activated from the menu bar option under the Texture > Paint Tools menu. Once selected, new gradients are created in the active image map, defined by the layer in the Shader Tree with the small paintbrush icon next to it (![]() ). Simply select a different target layer if you wish to paint onto a different layer. When selected, the associated attributes display in the Properties panel.
). Simply select a different target layer if you wish to paint onto a different layer. When selected, the associated attributes display in the Properties panel.

|
Linear Gradient |
|
|---|---|
|
Blend Mode |
The Blend Mode defines how the filled area blends into the existing canvas. The default Normal setting applies opaquely (as defined by the Opacity option) over the top of the existing canvas. The alternate options works in the same respect as the layer blending options documented with examples on the Layer Blend Modespage of the documentation. |
|
Use Falloff |
The Use Falloff option allows any of the variousUsing Falloffs to mask the application of fill effect. |
|
Opacity |
This value determines how the total opacity of the ink distributed by the gradient. If the value is less than 100% the ink maxes out at that percentage and never becomes fully opaque no matter how many times you paint over the stroke. |
|
FG Color |
Sets the foreground color for the gradient. You can set it through the color component on the tool properties or by clicking on the Color Picker while the tool is active. |
|
Alpha |
This option allows an alpha value to be associated with the FG paint color. |
|
Value |
You can use this percentage to increase or decrease the overall value of the ink being applied. This value can be set over 100% enabling high dynamic range paint strokes (if your image was created with the floating point (FP) mode active or loaded as a file that supports HDRI). |
|
BG Color |
Sets the background color for the gradient. You can set it through the color component on the tool properties or by clicking on the Color Picker while the tool is active. |
|
Alpha |
This option allows an alpha value to be associated with the BG paint color. |
|
Value |
You can use this percentage to increase or decrease the overall value of the ink being applied. This value can be set over 100% enabling high dynamic range paint strokes (if your image was created with the floating point (FP) mode active or loaded as a file that supports HDRI). |
Sorry you didn't find this helpful
Why wasn't this helpful? (check all that apply)
Thanks for your feedback.
If you can't find what you're looking for or you have a workflow question, please try Foundry Support.
If you have any thoughts on how we can improve our learning content, please email the Documentation team using the button below.
Thanks for taking time to give us feedback.