Search is based on keyword.
Ex: "Procedures"
Do not search with natural language
Ex: "How do I write a new procedure?"
Constraint Modifier
The constraint modifier works like virtual glue to constrain dynamic items (often shattered items) together during a simulation. It is designed to work with Modo's group system. You can attach groups to this item's dynamics graph in the Schematic viewport, connecting the group's relationship connector output to the constraint modifier's dynamics relationship input. For more information about working with the Schematic viewport, see Schematic Viewport.
If no groups are attached, all dynamic bodies in the scene are considered for constraint. Another important concept is that constraint modifiers can be layered. So, you could glue all of the pieces together in a shattered object using a weak glue and then layer on another constraint modifier to harden up certain sections. Since there can only ever be a single glue constraint between two bodies, the later created one replaces any earlier ones.
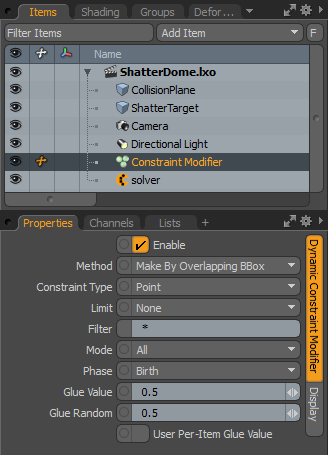
To add a constraint modifier, in the Items list, click Add Item > Dynamics > Constraints, and double-click Contraint Modifier in the list. When you select the newly added constraint modifier in the Items list, the following options appear in the Properties panel.

|
Option |
Description |
|---|---|
|
Enable |
This option enables/disables the effect of the constraint modifier. |
|
Method |
There are six constraining methods to the constraint modifier. The first three create new constraints, and the last three modify existing constraints. Make By Overlapping Box checks all of the bodies in the dynamic world and records which ones bounding boxes that overlap. It makes constraints at those points. Make By Contact checks all of the bodies in the dynamic world and records which ones have opposing faces that are touching (such as those created by the Shatter command, making constraints at those points. When Make By Proximity is selected, there are two other channels that work with this option: the Proximity Search Range, and Max Constraints. Proximity Search Range is the maximum distance, using the body centers, that it looks to find neighboring bodies. Max Constraints is the maximum number of constraints that is connected from one body to other bodies. It should be noted that there is only ever allowed one constraint between two bodies, so any connected bodies don't count against the Max Connections value. In this mode, if you have the constraint modifier selected, you can see a preview of the constraints that are created. The Break, Decay, and Strengthen options modify existing constraint values when layering subsequent constraints. |
|
Constrain Type |
Defines the type of constraint created between the bodies. A Pin constraint is a fixed rigid connection and a Point constraint rotates around on the connection point. |
|
Limit |
Limits the types of items that constraints are added to, providing three options. None is for no limits. Volume Less Than uses the bodies calculated volume, only considers bodies whose volume is less than the specified Volume Threshold, and Volume Greater Than only considers bodies whose volume is less than the specified Volume Threshold. |
|
Filter |
This takes a wildcard string that is compared against the item's name. Considers bodies that are true. If the filter field is set to Cube*, only items whose name is prefixed Cube is considered. Note: This option is case sensitive. |
|
Mode |
An additional control for constraining items. • All - All bodies are considered. If groups are attached to the modifer, only the items in that group are considered, if not, all dynamic items are considered. • Boundary - If multiple groups are attached, this only considers creating constraints between items in those groups. • Area - This, along with the Area channel, divides up the space of the attached bodies and only constrains items that fall into the same section together. The Area channel defines how many cubic meters the space should be divided into. |
|
Phase |
There are three Phase options, Start and Tick and Birth. This option defines when the constraint modifier fires. Start is at the beginning of the entire simulation, Tick is every simulation sub-step (defined by the Physics Rate (Hz) value of the solver item), and Birth fires every simulation tick, but only affects newly created rigid bodies. |
|
Defines the strength of the connection between the constrained items for this particular constraint. |
|
|
Glue Random |
Determines a randomizing amount for the Glue Value applied to constrained items. |
|
Use the Per-Item Glue Value |
If this option is enabled, then the specified Glue Value is multiplied by the Glue Value defined on the dynamic element itself. |
|
Recovery |
When forces hit a constraint they weaken it until it breaks. When the Make By Contact constraint method is selected, the Recovery value determines how quickly a constraint recovers to full strength. |
|
Volume Threshold |
When using the Limit option, this value defines the min or max volume that is culled from the constraint. |
Sorry you didn't find this helpful
Why wasn't this helpful? (check all that apply)
Thanks for your feedback.
If you can't find what you're looking for or you have a workflow question, please try Foundry Support.
If you have any thoughts on how we can improve our learning content, please email the Documentation team using the button below.
Thanks for taking time to give us feedback.