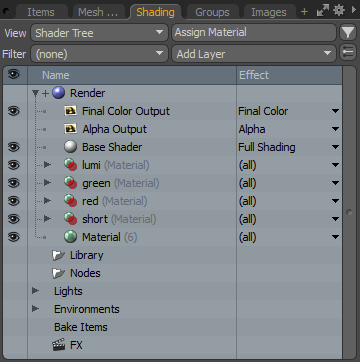
Shader Tree
Modo employs a unique global shading model for surfacing, allowing attributes to apply to any number of layers or items within a scene or, even the entire scene very easily. The basics of shading any surface begin with applying a polygon tag (see Defining Shaders). This determines where the surfacing attributes are applied during render time. Once those tags are applied, the actual shading itself is controlled by the layers of the Shader Tree.
These layers determine if a surface is shiny or dull, red, or green, transparent or opaque, or whatever surfacing attribute combinations you may want to apply. Found in the Shading viewport, the Shader Tree has two distinct modes for operation. The Material mode, which simplifies assigning surfaces and applying surfacing, and the more advanced Shader Tree mode gives full control to the shading and rendering of the scene. If you have never worked with Modo before, it may be helpful to make sure you are comfortable with the viewport UI, by referring to the Shader Tree viewport topic.
Shader Tree Views
Before covering how to work with the Shader Tree, it should first be explained how the two view modes of the Shading viewport differ. In the top-left of the panel, there is a View option; clicking the button offers two choices: Materials and Shader Tree. They are similar in many respects, but their differences make surfacing tasks easier for certain workflows.
Material View

The Material view of the tree is meant to only displays the Material tags ![]() of selected item layers. By only viewing the tags of the selected items, the number of layers visible at any time is reduced, providing a more streamlined workflow. Also, the tags are displayed alphabetically in this mode, making it easier to find a specific layer.
of selected item layers. By only viewing the tags of the selected items, the number of layers visible at any time is reduced, providing a more streamlined workflow. Also, the tags are displayed alphabetically in this mode, making it easier to find a specific layer.
In Material view, each individual tag operates as a layer, using hierarchy to define how surfacing is applied. Toggle the preceding arrow ![]() , to reveal the associated material item. This is the same item as in Shader Tree mode and represents multiple aspects of the final rendered surface.
, to reveal the associated material item. This is the same item as in Shader Tree mode and represents multiple aspects of the final rendered surface.
You can apply new tags to any target geometry by first selecting the surface in Polygons selection mode and pressing the Assign Material button in the viewport, or by pressing the M keyboard shortcut. This opens a dialog, allowing you to customize the tag name. Clicking OK then adds the resulting tag as a layer to the tree. Additional layers can also be added to individual tags to control other shading aspects of the surface by clicking the Add Layer button and choosing from any of the numerous options.
Note: For more information on working with materials, see Material.
To provide the simplified workflow of the Materials mode, certain layers aren't visible in the tree. Environments can't be edited directly, nor can any shading or render output edits be made. These are done while in the Shader Tree view.
Shader Tree View
The Shader Tree view displays the entire tree as it's evaluated for rendering. In the Shader Tree, tags aren't displayed directly, but instead are replaced by the Material Group mask layers. Hierarchy plays a role here as well, where surface shading is constrained by the masks defined by the material groups.
Note: To hide unselected background elements, click the Show Only Selected Items ![]() button next to Add Layer.
button next to Add Layer.
Understanding the Shader Tree
The Shader Tree is so named because it is conceptually similar to a tree where the Render Item ![]() can be considered the trunk, with each individual material group item
can be considered the trunk, with each individual material group item ![]() as the branches. Each branch can contain other material groups nested inside for different layering effects. Eventually, all these layers (nested or otherwise) feed into the Render Item. This information is then fed into any Render Outputs
as the branches. Each branch can contain other material groups nested inside for different layering effects. Eventually, all these layers (nested or otherwise) feed into the Render Item. This information is then fed into any Render Outputs ![]() , producing the final rendered image when you activate any of the render commands.
, producing the final rendered image when you activate any of the render commands.
To produce the final result, layers are processed in a bottom to top fashion. Thus, anyone familiar with Photoshop's layer's palette might be familiar with how Modo's Shader Tree works - as any opaque layer above another always supersedes the underlying layers, obscuring them. These underlying layers can only be made visible by either changing the transparency of the upper layer, changing the blending mode, or by applying a mask to the layer.
Adding and Modifying Shader Tree Item Layers
While the Shader Tree does control the shading and rendering of any scene, the main functionality of the tree itself is for adding, removing, organizing, and otherwise managing the many Shader Tree item layers. When adding new items to the tree, the various item layers can be added by clicking the Add Layer option of the full viewport window and selecting an item from the context menu. New items are always added to the top of the list in the Shader Tree directly below the Base Shader ![]() item. In cases where a Material Group Item
item. In cases where a Material Group Item ![]() is selected, new layers are added within that sub-group, directly below the Group Item itself. For information regarding which types of layers can be added, see Shader Tree Item Layers.
is selected, new layers are added within that sub-group, directly below the Group Item itself. For information regarding which types of layers can be added, see Shader Tree Item Layers.
Any of the editable properties related to item layers appear within the Properties Panel when the layer is selected in the Shader Tree. Selected layers are indicated by the dark bar highlighting the layer name. Multiple non-consecutive layers can be selected by holding down the Ctrl key on the keyboard and clicking subsequent layers in the list. Consecutive layers can be selected automatically by holding down the Shift key on the keyboard, and clicking on a new layer - any layers between the current and active selections are selected as well. Multiple layer selections of identical item types allow for gang editing of property values, eliminating the need to individually adjust item properties.
For organizational purposes, you may wish to rename layers, which can be accomplished by selecting the target layer and choosing the menu bar command Item > Rename. This opens a dialog where you can enter the new name.
Tip: You can import PBR textures to the Shader Tree using the PBR loader. See PBR Textures for more information.
Tip: Be aware, if multiple items are selected, including anything in the Item List, all selected items receive the new name.
To avoid this from happening, it's better to use the Rename option from the context menu when right-clicking on the layer name itself.
Finally, you can also rename a layer inline. Simply double-click directly on the layer name and then type a new name inline, pressing the Enter key when done to accept the change.
Any layer within the Shader Tree can be repositioned by clicking and dragging the layer, and moving it to a new position. The orange line that appears when dragged indicates the position the item takes when the mouse button is released. When nesting layers within a material group, the layer inherits the mask, if any, specified by the Material Group Item. Layer positions are an important concept of the Shader Tree, as they control the order in which items are evaluated at render time. Higher layers in the tree supersede lower layers.
Layers can be easily removed by selecting the target layer in the Shader Tree and selecting the menu command Texture > Delete Shader Tree Layer. Also, right-clicking the layer and selecting Delete from the context menu or by pressing the delete key on the keyboard also allows you to delete layers.
Tip: When assigning the layer order, remember the tree works bottom up. When setting a layers Effect to Layer Mask, it only masks the texture layer directly above it. Also, gradients that use other layers for Input Parameters need to be below the gradient itself, so the layer is calculated first, to feed into the gradient. If a layer's effect is dependent on another, and it isn't working, sometimes changing the layer order can solve the issue.
Adding Environment Presets to the Shader Tree
You can quickly select an Environment Preset from the Preset Browser and drag it into the Environment folder on the Shader Tree. A contextual menu appears, allowing you to either replace or add your selected Environment Preset. This is useful when experimenting with different backgrounds using different colors, gradients, and image maps.
To apply a environment preset:
| 1. | Load your mesh using the Model layout and click Render > Open Preview. |
| 2. | Click the Shader Tree button to render your scene. |
| 3. | On the top of the Toolbar, on the left panel, click Preset. |
The Preset Browser opens in a window.
| 4. | On the left panel, expand Assets > Environments. |
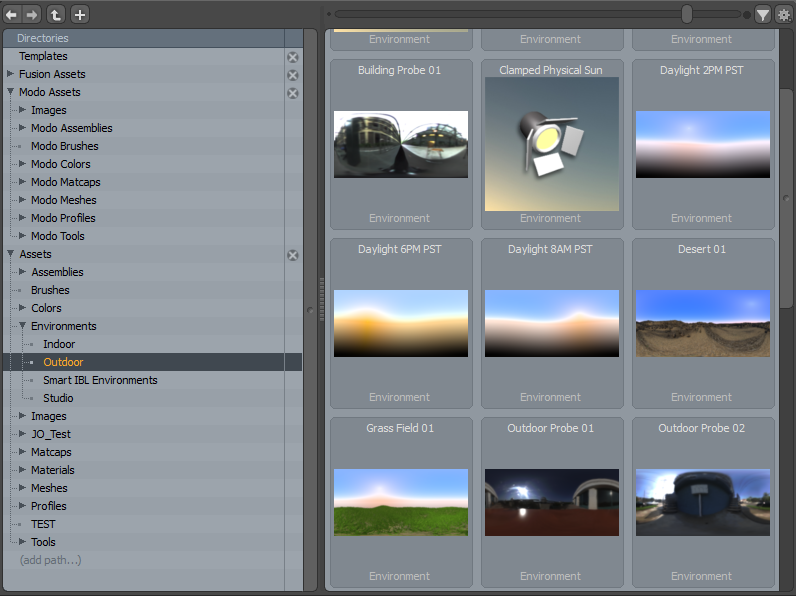
| 5. | Expand any one of the sub-categories. |
| 6. | On the right panel, open the Shading tab to view the Shader Tree. |
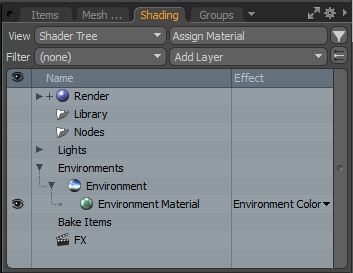
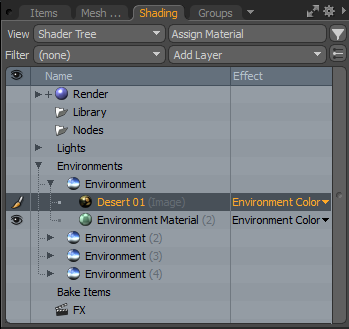
| 7. | Click the arrow beside Environments and then Environment to expand the items in the list. |
The default Environment Material item displays in your list.
| 8. | In the Preset Browser, Ctrl/Cmd + click and drag one of the environments onto the Environments item and hold until the contextual menu displays. |
Tip: If you have more than one Environment item, you can place your selected Environment Preset anywhere in your list under Environments by dragging it into place.
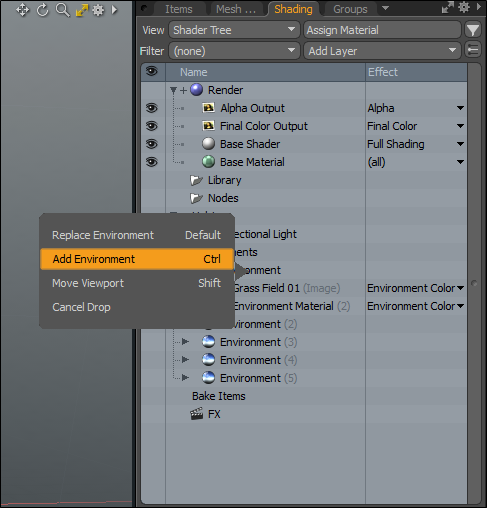
| 9. | Select one of the following: |
|
Option |
Description |
Shortcut Key |
|
Replace Environment |
Replaces the existing Environments set up with the selected Environment Preset. |
n/a |
|
Add Environment |
Keeps the current environment set up and adds a new Environment(#) item under the parent Environments item. This allows you to select the new Environment item and change the Properties to determine which ray types should be visible and to apply other properties.
Note: If the Preview Viewport is open at that time, the environment is updated in the viewport. |
Ctrl |
|
Move Viewport |
Replaces the existing Environments set up with the selected Environment Preset. |
Shift |
|
Cancel Drop |
Cancels your action. |
n/a |
Hierarchies
Hierarchies are quite important to the Shader Tree, as this is how associations are made to material groups, which generate the masks necessary to limit surfacing to individual sections of geometry. Any item that is a child of a material group inherits the Group Item's mask settings. Hierarchies are denoted by the small indentation in subsequent item layers. Material Group Items that contain child layers are preceded by a small arrow ![]() . Clicking the arrow toggles the hide/reveal action of the nested layers. Successive nested Material Group Items are further indented, indicating their association to the parent item. The parent/child associations are created by dropping a layer onto another closed group, or between two layers of an open group. When adding new layers, selecting the parent Material Group Item before selecting the new item layer type nests the new layer inside the group.
. Clicking the arrow toggles the hide/reveal action of the nested layers. Successive nested Material Group Items are further indented, indicating their association to the parent item. The parent/child associations are created by dropping a layer onto another closed group, or between two layers of an open group. When adding new layers, selecting the parent Material Group Item before selecting the new item layer type nests the new layer inside the group.
Finally, if a texture layer or procedural (image-based or otherwise) is dropped onto another texture layer, the dropped layer automatically becomes a layer mask to the parent. Masked layers are preceded by a small + icon. Click the icon to toggle the view of the item's mask, which is now also indented to show its relationship to the parent item.
Tip: The key to a smooth workflow is organization when it comes to the Shader Tree. If left unattended, materials and groups could quickly stack up, leaving a long unwieldy list that is difficult to navigate. Multiple material groups can be further grouped by multi-selecting several layers, using the Shift or Ctrl modifier keys. Once selected, press Ctrl+G on the keyboard to move the highlighted layers into another group. When used this way, the groups properties are set to (all). When set as such, the group merely provides a means to organize multiple material groups.
The resulting Group Item can be renamed either by right-clicking the title and choosing Rename from the context menu, or by double-clicking for inline editing. Grouping items layers can greatly simplify the visual appearance of the Shader Tree list, making it much easier to navigate. You can quickly expand and collapse all nested layers within a hierarchy by pressing the Shift key when toggling the arrow ![]() icon.
icon.
Specifying Layer Effects
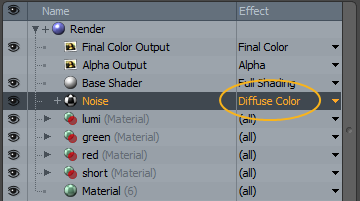
By default, any new texture layer added to the Shader Tree modulates the Diffuse Color channel, meaning the layer affects the apparent visual color of the surface. Should you wish to affect the surface differently, such as specifying a layer as a bump or displacement map, this is specified in the Effect column of the Shader Tree. A layer can be set to modulate a specific effect, by way of a right-clicking the effect name itself in the effect column, and selecting a new effect type from the pop-up context menu.
Whenever a texture layer is created, such as an Image Map ![]() or a procedural texture
or a procedural texture ![]() , an associated Texture Locator is added as well to the Items List. Texture locators hold position and projection settings specific to the texture layer, and define how it is applied to the surface, while also providing a means to animate the texture using basic transforms, applied with keyframes to the locator itself.
, an associated Texture Locator is added as well to the Items List. Texture locators hold position and projection settings specific to the texture layer, and define how it is applied to the surface, while also providing a means to animate the texture using basic transforms, applied with keyframes to the locator itself.
Filtering the Item List View
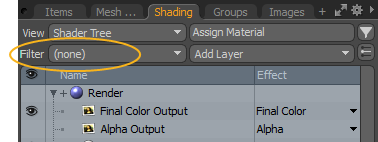
At the top of the Shading viewport, under the View option, is the Filter control. This determines how layers are displayed within the viewport. The Filter control always defaults to the (none) value, which displays all items within the Shader Tree. Alternate options available in the menu can be selected by clicking the small triangle widget to the right of the bar. When any of the other options are selected, they temporarily toggle the visibility of the items in the list, without removing or disabling them, making it easier to locate a specific layer, or to make selections for gang editing multiple items easier.
The Filter options, in addition to (none), include:
• Material - displays only Material Items ![]() in the tree.
in the tree.
• Texture - displays only Texture Items ![]() ,
, ![]() in the tree.
in the tree.
• Group - displays only Material Group Items ![]() in the tree.
in the tree.
• Shader - displays only Shader Items ![]() in the tree.
in the tree.
• Render Output - displays only Render Output Items ![]() in the tree.
in the tree.
• Fur Materials - displays only Fur Material Items ![]() in the tree.
in the tree.
• Filter on Selection - when this option is enabled, filtering only displays Shader Tree layers applied to currently-selected items.
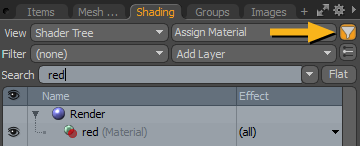
Searching Layers
Next to the Assign Material button is the Find ![]() button that opens the Find functionality, allowing you to search for layers by name. Clicking the button opens a search bar. Typing some text into the input field isolates only the Shader Tree layers that contain the same string. There are two modes for the Search function that are designated from the arrow drop down: Simple Search and Pattern Matching.
button that opens the Find functionality, allowing you to search for layers by name. Clicking the button opens a search bar. Typing some text into the input field isolates only the Shader Tree layers that contain the same string. There are two modes for the Search function that are designated from the arrow drop down: Simple Search and Pattern Matching.
Simple Search locates layers based on matching the exact input (including spaces); so typing "1 2" locates "Apple1 2" and "1 2Banana", but not "Apple12" or "2Banana".
Pattern Match allows for a more robust type of search, allowing for symbolic characters. For more information, see Shader Tree UI. Enabling the Match Case option further constrains the search to also matching the upper and lower casing of the alphabet characters. The Flat option toggles the indentation of the layers in the panel, making it easier to locate specific layers.
Using the Library
The Shader Tree has a Library function that serves to store surfacing definitions that can then be applied to Material Group Items elsewhere in the tree. When the Library material is updated, the changes are propagated to all the references in the tree. This can be useful to reduce the number of total layers required in the Shader Tree as well as simplify workflows where identical materials are used multiple times for different surfaces.
Use of the Library is easy; you can drag and drop preset materials to the Library section of the Shading viewport (custom materials can be created as well, as long as they exist under a single Material Group Item). To apply any of the library items to a surface, click the topmost Material Group Item in the Library, then drag and drop this into the target location in the Shader Tree, most likely inside another material group, masking it. This drops a named reference item ![]() into the group that represents the shading of the library item. Any updates or additions made to the material group in the Library are propagated to all the associated references throughout the Shader Tree. Like standard Shader Tree layers, placement of the layer within the tree determines shading, but library references cannot be masked or modified directly. To convert a library reference to standard Shader Tree layers, right-click on the layer and apply the De-Reference command.
into the group that represents the shading of the library item. Any updates or additions made to the material group in the Library are propagated to all the associated references throughout the Shader Tree. Like standard Shader Tree layers, placement of the layer within the tree determines shading, but library references cannot be masked or modified directly. To convert a library reference to standard Shader Tree layers, right-click on the layer and apply the De-Reference command.
Tip: When creating Library materials, Shader Tree material group layers (and their hierarchy) can also be dragged and dropped into the Library, however, any masks generated by the material group itself is retained in the library item and, therefore, needs to be disabled before its creation or the resulting surface doesn't properly evaluate.
Toggling Layers
Sometimes you may wish to toggle the effect a layer has on a scene without removing the item from the list. This can be accomplished by clicking over the eye icon ![]() within the visibility column on the left side of the viewport. Toggling a layer disables/enables its affect on shading in the scene, but the item itself retains all settings and remains part of the Shader Tree list when scenes are saved or closed. The ability to toggle layers can be extremely helpful in a variety of scenarios, including creating various shading passes that you want to enable and disable when making Render Passes, applying a variety of textural options when rendering out conceptual product stills, and experimenting with alternate shading options while exploring looks for a scene.
within the visibility column on the left side of the viewport. Toggling a layer disables/enables its affect on shading in the scene, but the item itself retains all settings and remains part of the Shader Tree list when scenes are saved or closed. The ability to toggle layers can be extremely helpful in a variety of scenarios, including creating various shading passes that you want to enable and disable when making Render Passes, applying a variety of textural options when rendering out conceptual product stills, and experimenting with alternate shading options while exploring looks for a scene.
Contextual Menu
Additional options for working with the item layers are available by right-clicking on an item layer name and choosing an option for the pop-up contextual menu.

The following options are available in the contextual menu:
• Rename - allows you to assign a new name to the specified layer.
• Editor Color - 12 color options are provided for colorizing the Shader Tree layer itself; meant to be used as a visual organizational device. Choosing any of the colors from the supplied menu applies the selected color as the layer background.
• Properties - opens the Properties viewport with the selected layers corresponding attribute settings.
• Select Polygons - makes all the polygons in the scene related to the current mask selected, switching the Modo interface into Polygons selection mode if not already active.
• Duplicate - creates a copy of a layer with identical settings. Changes in the original item are not reflected in the duplicate layer, nor are modifications to the duplicate reflected in its original layer.
• Create Instance - creates a clone of a layer that references the original source. Changes to one layer automatically propagate to all instances. Instanced layers are denoted by their italicized name in the Shader Tree. This is especially useful when separate surfaces with identical properties reside within different masks. When instances are used, changing one item's attributes automatically clones the changes on the instance. Changes to the instance itself act as local overrides, modifying the attribute directly, while changes are not applied back to the source of the instance. Further changes to the source are propagated, except to those changes made individually on each instance, on a channel-by-channel basis.
• References - opens a menu with access to the controls for working with references.
• Lock Preset/Unlock Preset - when the Lock Preset command is applied to any Library material, this prevents any accidental changes from being applied to the material group. The target layer needs to be unlocked for further editing. The Lock Preset/Unlock Preset commands have no effect on standard Shader Tree layers.
• Select Instances - if a layer has any instances of it in the Shader Tree, the Select Instances command selects all the associated instances of the target automatically.
• Select Source of Instance - selects the parent source items of any instance. Instances are denoted by their italicized name in the Shader Tree.
• Copy/Paste/Delete - entire layers, as well as the settings of individual layers themselves, can be copied, pasted, and/or deleted using these commands. When pasting values from one layer to another, the layers must be of the same type (for example, material item to material item).
• Preset Browsers Palette - opens a Preset Browser palette.
• Save Preset - a Preset stores settings so they can be applied at a later time. In the case of materials, a preset stores Shader Tree layers with an associated icon for visual browsing in the Preset Browser. A material Preset can be as simple as a single layer, or it can contain any number of layers with complex blending. For multi-layer Presets, these must all be contained under a single material group ![]() item. Right-clicking on the target layer and selecting the Save Preset option from the contextual menu presents you with an OS dialog, prompting where to save the Preset itself.
item. Right-clicking on the target layer and selecting the Save Preset option from the contextual menu presents you with an OS dialog, prompting where to save the Preset itself.
• Save Preset with Thumbnail - works in the same way as the Save Preset command, above, but once the preset is saved, a second dialog opens, allowing you to specify any saved image that is then used as the browser icon.
• Save Selected as Assembly - saves the selected layer as an assembly preset.
• Change Type - offers the ability to convert a layer of one type, such as an image map, to another type such as a procedural. Associated Texture Locators retain their settings, if applicable, but layers themselves lose their settings.
• Bake to Texture - offers the ability to generate a texture map image of a layer. Baking textures from inside the Shader Tree is useful for baking a single Effect, such as Color or Diffuse, into an image, whereas the Bake command (from the Render menu) bakes all light and texture contributors into a final shaded image. It is reasonable to think of the Shader Tree-level of baking as similar to "flattening" layers in Photoshop.
Only layers of the same Effect setting, underneath the texture layer that is triggering the bake, contribute to the baked layer. Once "baked", this texture can remain in the Shader Tree as a pre-computed result of all contributors, which results in a savings of render time and provides a real-time view of the effect. The Bake to Texture command requires a UV map on the baked surface, as well as a blank image map to bake into. For more on baking textures, see the Baking topic.
• Bake to File - functionally identical to the Bake to Texture command, above, but writes the resulting texture as a file to disc, to a location specified by you. When saving to a 16-bit or greater format, the Floating Point option must be enabled.
• Bake From Object to Texture - offers the ability to use the UV map of a low polygon count model to bake a texture map from a higher polygon count model. Maps can be used for any of the various effects, including diffuse color, displacement, and normal. Like Bake to Texture, a UV map and a blank image map to bake into are required . Both surfaces must have different material names and cannot share the same UV map. When calculating a displacement map, the distance setting from the dialog should be used as the Displacement Distance setting in the material dialog box when applied. For more on baking textures, see the Baking topic.
• Reload Image - reloads the image, as saved to disk. This is useful for when edits made in an external app don't trigger Modo to reload automatically, or when you wish to undo a series of internal edits all at once.
• Replace Image - opens a dialog allowing you to select an alternative bitmap image that replaces the selected image, while retaining its existing settings.
• Open Image Folder - opens the saved file's folder location on the internal hard disc, using the system's default file manager.