Counter 1
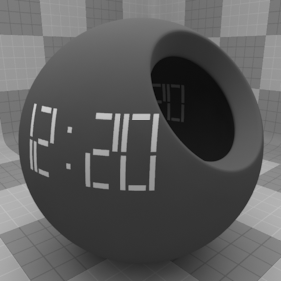
The Counter 1 texture is one of the many procedurally generated textures provided with Modo. Procedural textures are mathematically created at render-time, and therefore have no fixed resolution, they can be magnified nearly infinitely with no visual loss in detail. The shaders in the Display group differ from the other Enhance:Modo textures in that they present procedurally generated text rather than traditional textures. Similar to the other shaders, Counter 1 can be addressed by its two zones, the Background and Foreground colors. The texture modulates from one zone to the other based on your settings. Each zone can have either a Value or a Color and Alpha. The applied zone is dependent on the Layer Effects to which the texture is applied. For instance, if the texture is applied as a Displacement, the Value settings would be used, whereas setting the texture effect to Diffuse Color would use the Color and Alpha settings for Background and Foreground. The look of this particular shader is a digital timer readout, such as those seen on a speedometer or a clock.
Note: For information regarding adding and working with Shader Tree item layers, see the Shader Tree topic.
Layer Properties
>
|
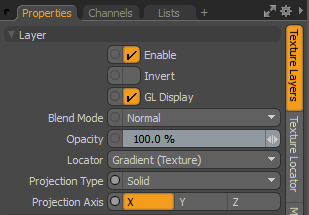
Enable |
Toggles the effect of the layer on and off. This duplicates the functionality of toggling visibility in the Shader Tree. When disabled, the layer has no effect on the shading of the scene. However, Modo saves disabled layers with the scene, and they are persistent across Modo sessions. |
|
Invert |
Inverts the colors (RGB values) for the layer to produce a negative effect. |
|
Blend Mode |
Affects the blending between different layers of the same effect type. With this, you can stack several layers for different effects. For more about blending, see Layer Blend Modes. |
|
Opacity |
Changes the transparency of the current layer. If there are layers below this layer in the Shader Tree, reducing this value increasingly reveals the lower layers. Reducing the value always dims the effect of the layer. |
|
Locator |
Sets the association for the Texture Locator. Most texture layers have a Texture Locator that Modo automatically creates in the Item List. This defines the mapping of the texture (how Modo applies the texture) to the surface. You can specify alternate locators, but this is normally not required. Although you may want multiple texture items to share a single locator. |
|
Projection Type |
Defines how a texture/material is applied to a 3D surface. Types vary significantly in their effects. For a guide to each Projection Type see Projection Type Samples. |
|
Projection Axis |
The texture/material is projected down this axis. This applies to Planar, Cylindrical, Spherical, Cubic, Box, and, Light Probe projection types. |
Counter 1 Properties

|
Display - Counter 1 |
|
|
Number of Characters |
Specifies the total number of characters to display. |
|
Character Gap |
Specifies the spacing between the individual characters within the overall content dimensions. |
|
Character Scroll |
Allows the characters to scroll on a character-by-character basis. As this value is increased, the characters scroll from left to right. |
|
Character Skew |
Applies a skew to all of the display characters. Positive values skew the characters to the right, while negative values skew the characters to the left. |
|
Segment Thickness |
Defines the thickness of the individual segments for each display character. |
|
Segment Gap |
Determines the spacing between the individual segments for each character. |
|
No. Of Leading Zeros |
Prefixes the counter with a defined number of zeros. |
|
Decimal Point |
Specifies the number of zeros to be shown after a decimal point. |
|
Count Value |
Specifies the number that is shown in the display. In the case of time, the value is represented in seconds, then converted to hours:minutes in the display. |
|
Number Base |
Specifies the number base used to display the count value. The options are Decimal, Hexadecimal, Octal and Binary. |
|
Counter Format |
Specifies the format of the count for display. Options are Simple Count, Realtime Clock,or SMPTE time code (either SMPTE24, SMPTE25 or SMPTE30.) |
|
24 Hour Clock |
Forces a 24-hour clock display when the Realtime Clock option is selected in the Counter Format. |
|
Display Seconds |
When this option is enabled and the Counter Format is set to Realtime Clock, the character for seconds is included in the display. |
|
Draw Unlit Segments |
When enabled, all of the unlit segments and decimals are included in the display. |
|
Scroll Direction |
When enabled, the scroll direction switches from the default setting of left to right and scroll from right to left. |
|
Swap UV |
When enabled, the UV coordinates of the display text are swapped. |
|
Flip U |
When enabled, it flips the U coordinates of the display text. |
|
U Offset |
Specifies U (horizontal) offset of the display text. |
|
V Offset |
Specifies V (vertical) offset of the display text. |
|
Output Controls |
|
|
Lower Clip |
Specifies a clip level for the Background Color/Value, truncating values beyond the defined setting. Combined with the Upper Clip value, you can apply this option to extend or contract the total range of values for the texture. |
|
Upper Clip |
Specifies a clip level for the Foreground Color/Value, truncating values beyond the defined setting. Combined with the Lower Clip value, you can apply this option to extend or contract the total range of values for the texture. |
|
Bias |
Increasing this value causes the texture to favor the foreground color over the background color, whereas decreasing the value causes the background color to be favored. |
|
Gain |
Similar to a gamma control that affects the falloff of the gradient ramp between the two color values. Setting the Gain to 100% creates a very sharp falloff effect, whereas setting the value to 0% creates a plateau around the value or color mid-point with sharp falloff on either extreme of the gradient. |
|
Output Regions |
When the Output Regions option is enabled, the procedural texture outputs random gray shades per region rather than outlines for tiles, providing a means to add random variety to the procedurally created texture. You can further control the amount of variation using the Regional HSV process layer. |
|
Background Color/Value |
Specifies the Color (or Value) of the texture's background area, which ramps toward the Foreground Color/Value. |
|
Background Alpha |
Specifies the Alpha transparency of the Background Color. |
|
Background - Use Last Layer |
When enabled, the Background Color area is completely transparent, revealing the shading results of any lower layers. |
|
Foreground Color/Value |
Specifies the Color (or Value) of the texture's foreground area, which ramps toward the Background Color/Value. |
|
Foreground Alpha |
Specifies the Alpha transparency of the Foreground Color. |
|
Foreground - Use Last Layer |
When enabled, the Foreground Color area is completely transparent, revealing the shading results of any lower layers. |