Group Locator Item
As a project becomes more complex, you may find that the flat listing of layers in the Items list becomes unwieldy to work with. Parenting items to a group locator helps to organize the project. Different from an actual group, group locators are simply a special kind of Locator Item that does not draw anything in the 3D Viewports, eliminating additional scene clutter. Group locators can be easily collapsed within the Items list, which keeps the viewport clean and manageable. Group locators have an icon that looks like a folder in the Items list to distinguish them from regular locator items. In all other aspects they act the same as a normal locator, for example, they can be moved and rotated in the 3D Viewports.
To create a group locator, in the Items list, click Add Items and choose Locators > Group Locator from the dropdown menu. Once created, you can begin to drag and drop items into a hierarchy, organizing the list.
You can parent several items to a group locator by selecting all the target layers in the Items list.
| 1. | Hold Ctrl and click on the items you want to select. |
| 2. | Once selected, press Ctrl+G to create a new group locator, with all selected items parented in one step. |
Then you can click the small arrow (![]() ) preceding the layer to toggle the visibility of the child items.
) preceding the layer to toggle the visibility of the child items.
|
Option |
Description |
|---|---|
|
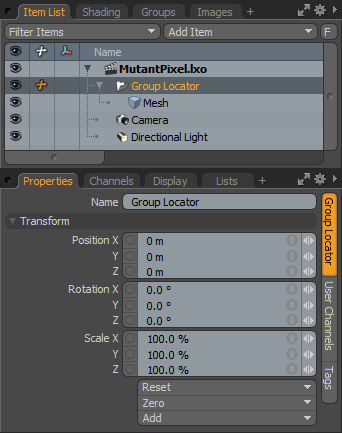
Name |
This data field displays the current item name. Change it by clicking on the field and typing the new name. |
|
Transform |
|
|
Position |
An item transform that allows you to numerically position the item in XYZ space. |
|
Rotation |
An item transform that allows you to numerically set the rotation of the item. |
|
Scale |
An item transform that allows you to numerically set the size of the item. |
|
Reset |
Resets the selected transform values to (0,0,0), returning the items to their default state. |
|
Zero |
Resets the chosen transform property values to 0, leaving the center position and item position intact by adding a negative item transform to the channels list. |
|
Add |
Transform items are the channel groups associated with an item that store its transform values, controlling its position, rotation and scale. By default, new items do not have any transform items associated with them, even though they are visible within the Properties panel. This is useful as an optimization as only the necessary transforms are added on an as-needed basis, reducing scene overhead. There are several ways to add them. You can simply transform the target item with one of the various transform tools, or by editing the value input fields. This action causes the particular transform item to be added automatically to the Channels viewport list. The Add function here can also be used to add the selected set of transforms to the channel list while keeping the default 0,0,0 values. A necessary step for referencing, in order to override the channels, they must first exist. |