Render Passes
Render passes offer you a way to control any aspect of a scene that is, in-turn used to automatically produce multiple rendered images. Each rendered image reflects all the settings of an individual pass. In their most basic sense, Render Passes are simply containers for channel values. Once you add a pass, subsequent edits to the scene are stored within the current pass or passes.
When the Render Passes command is invoked, each particular pass of the pass group is rendered in succession and saved as specified. This way of working is simple, yet incredibly powerful, providing you a means to create rendered variations that were previously very difficult, if not impossible to do within a single scene.
Understanding Passes
Passes conceptually work as containers that only hold channel values. A channel is simply any attribute of an item that can be animated. For more information about channels, see the Channels Viewport topic of the documentation. Once these channel values are created, they sit in their pass container as a layer above the scene itself, called the Setup layer. When a pass is selected, any values held in the pass replace the ones of the Setup layer below it. For example, a cylinder could be colored red at the Setup level, and a pass could be created that changes the color to orange. Disabling the pass would return the color to red. If the passes were rendered, there would be two resulting images, one with a red cylinder and another with an orange one. The layering of the channel values is an important aspect to understand, because there is also a layer in-between a pass and a scene, called the Edit layer, explained further on.
Basic Pass Workflow
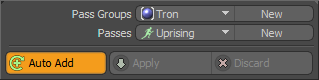
The Render Passes UI is found in the Render interface tab. It is controlled mainly by the buttons above the default Properties viewport. The workflow for passes moves top to bottom, first with the Pass Groups field with a button to select the group, and a button to create a new group. Next, the Passes field, also with a selector and a New button. Next are the Auto Add, Apply and Discard buttons that further control pass creation.
Before creating any passes, you need to first create a pass group. Pass groups are collections of different passes, meant strictly as an organizational device. You cannot create individual passes until a pass group is defined and selected.
| 1. | To create a group, click the New button and define a name in the pop-up dialog. |

| 2. | Click OK to accept all other defaults. |
When you create the pass group, it is automatically selected and any passes created are automatically added to that group.
| 3. | The next step is to create the pass itself. Click the New button to the right of Passes to open the Group Layer dialog, where you can name the pass. |
| 4. | Once a name is entered, click OK to define the pass. |

| 5. | Next, edit the channel values. |
With Auto Add enabled (the default state), any changes made to any attribute automatically adds that attribute channel to the currently selected pass. This means that you can simply edit the scene and any modifications are automatically stored/saved in the pass. Disabling the pass, by returning the pass selection to (none) returns all the values to the underlying scene state.
Note: With the addition of passes to a scene, complexity can increase exponentially, therefore it is important to maintain a well-organized scene, especially in relation to the Shader Tree.
Tip: To quickly identify which render pass you are currently working on, the 3D Information Overlays, at the bottom right corner of the 3D Viewport, displays the name of the selected Pass Groups item and the selected Passes item.
Click on the image below to view an animation.
Applying and Discarding
Modo's pass system conceptually works in layers, you have the bottom base layer called the Scene layer, this is the initial default state of any item as it is added to the scene, including Mesh Items, cameras, lights, and so on. The next layer is the most important, it is the Setup layer, all attributes from any item in the scene as they are modified are stored at this level. Each named pass exists as a layer above the Setup layer. For any channel values stored in the pass, when that pass is enabled, simply by selecting it, the stored values replace those of the Setup layer values as long as the pass is active. However, when you select a pass and begin to make changes, a new layer is inserted between the current Pass and Setup layers, called the Edit layer. This is where the 'Apply' and 'Discard' buttons come in to play. When a modification is made to a scene with a pass active, the values don't go directly into the pass. They can be pushed into the pass by either exiting the pass, or clicking the Apply button. Clicking the Apply button allows you to continue making modifications, clicking Discard returns the values to either their previous state when the Pass was entered or when Apply was last pressed.

Advanced Render Passes
For successfully using Modo's Render Passes you don't need to be aware of what is going on in the background. Using the Auto Add function and then making normals scene modifications, Modo automatically takes care of all the technical details, as long as the proper passes are selected when attributes are modified. However, if something does go wrong, a basic understanding of the mechanics of it can be helpful in resolving any issues that may arise.
Editing scene attributes for passes can be a highly controlled manual process or completely automatic,depending on your preference. This is controlled by the Auto Add button, which is enabled by default. In order for a channel value to be stored in the pass container, the channel itself needs to be stored in the pass. The Auto Add button places the channel of any modified attributes in the pass. If you disable the Auto Add function, then you need to add the channels you wish to modify manually. This is done in the Groups viewport. Passes are actually a function of the Groups Viewport, used to store the collections of channels and their resulting values. Anyone familiar with groups understands why the dialogs that pop up are called Create Group and Group Layer. The channels can be added by selecting them in the Channels viewport and dragging and dropping them into the pass group in the Groups viewport, or by using the Add Items function found in the Groups viewport itself. For more information on working with groups, see the Groups Viewport
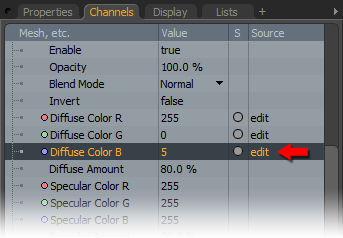
There is also some additional information provided regarding pass states in the Channels Viewport viewport. Down the right-hand side of the viewport is a Source column. When any pass is selected and channel values are modified, the source column shows edit, meaning that the current value is in the Edit layer, it has not yet become part of the pass, and has been modified from the Setup level. When you apply those changes, pushing the values into the pass, the Source column displays the name of the pass. When the pass is disabled, the name reverts to setup, letting you know that the current value for that channel is the base level. This can be very helpful in instances where values were mistakenly applied in a pass that were meant for the scene, or vice-versa. By right-clicking on the channel to open the contextual menu, a number of options are provided to give you some ability to push those values around between the different layers.
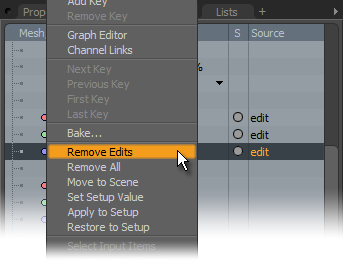
Remove Edits: This option reverts the values to the last saved state, such as if a Render Pass was selected and then several edits were applied, prior to exiting the pass or pressing Apply, you can use the Remove Edits command, returning the values to the initial state they were in when the pass was selected. This is the same function as the Discard command.
Remove All: This command removes all edits to the target channel, reverting the values back to the initial default (Scene) state.
Move to Scene: Takes the current Edit state value and pushes it to the Scene level.
Set Setup Value: Sets current channel values as the base Setup value and pushes value to the Render Pass.
Apply to Setup: Moves the current edit value to the Setup layer, leaving any selected pass values unchanged.
Restore to Setup: Reverts the current pass value to that of the Setup.
Adding New Items
An important detail to understand is that passes cannot contain items, only channels, therefore, any item that is added is placed at the Scene level and subsequently becomes a part of all existing passes. If an item is added to the scene, it needs to be added at the Scene level. If you accidentally add an item while a pass is active, the Channels Viewport offers functionality to move data in and out of the Setup level of the scene, so your work doesn't get lost.
Rendering Passes
Once the various passes have been created, in order to actually render the passes, you only need to use the Render Passes command found in the menu bar, under Render. You can select a pass group and all of the contained passes are rendered in succession and cached into the Render Display window. You can use the Save As function to save the image to your local hard drive. To automatically save images when rendered, use the Render Animation command and determine the pass group for rendering in the dialog where the files get saved according to the settings of the render outputs of each pass. File names conform to the settings of the render item's Output Pattern. Additionally, passes within a pass group may be enabled and disabled temporarily, controlling whether they render or not. You can disable a pass within a pass group in the Groups viewport by clicking the small camera icon in the Render State column of that viewport. Click the empty column slot to enable rendering for the pass.