Applying Deformers
Modo has a powerful set of deformers for you to twist, bend, and otherwise distort your creations in many ways and to provide simplicity and power in an easy-to-use workflow.
|
|
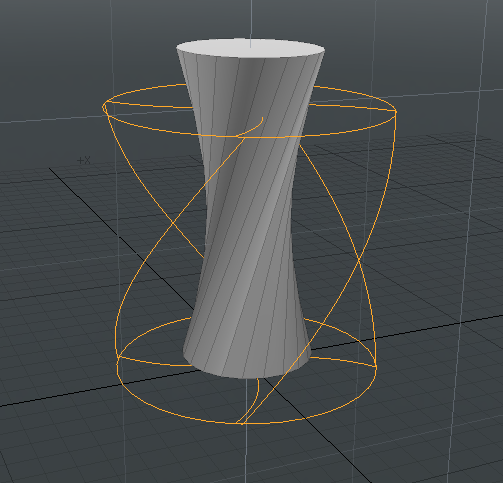
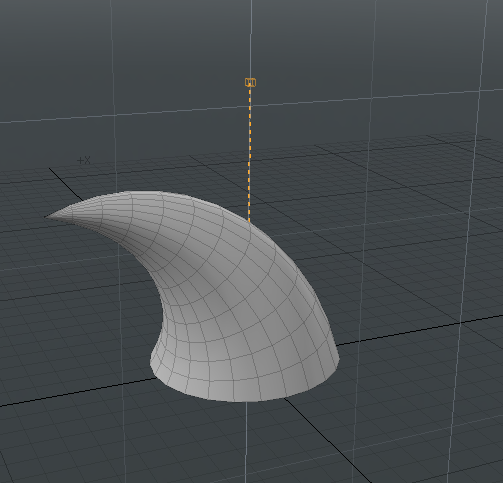
| A Vortex effector applied to a cylinder. | A Bend effector applied to a cone. |
You can fully animate each deformer, so deformations can happen over time. You can combine and stack these flexible deformers in the Deformers viewport and control them by using deformer falloffs.
In Modo, deformers have two basic parts: an effector and an influence. These two parts collectively are considered deformers. Effectors provide instructions on how to affect the Target, and the influence determines what gets affected. Having these two parts provides flexibility.
For example, say a cartoon car needs to bend as it goes around a tight corner. The car has multiple parts, which include its four wheels. You can apply a Bend effector to the body to distort it as it goes through the curve, but the wheels, if included in the deformation, produce undesirable results. To keep the wheels connected to the car as it bends, you could add an additional influence and then connect it to the same Bend deformer. In this case, have it change the items' positions and rotation but not actually deform the geometry itself. This keeps the wheels in proper position relative to the bending car and all items use a single simple-to-control effector. You could attach additional deformers to the wheels to further fine-tune their local deformations while under the influence of the prior effector.
As indicated in the example, each deformation is layered upon the previous to produce an easy-to-understand workflow that provides an incredible amount of depth with Modo's ease of use.
Modo offers a variety of options for working with deformers. If you are just starting out with deformers, follow the steps outlined below to learn how to apply them for specific situations. Deformers in Modo have multiple pieces that need to be connected together (usually in the Schematic viewport). By selecting a Target mesh and applying the appropriate commands, Modo automatically makes these connections for you. If you are a more advanced user, you can add the effectors and influences separately and then connect them manually in the Schematic viewport. By combining deformers with modifiers, Modo provides a powerful rigging toolbox that allows the whole to be much greater than the sum of its parts.
Applying Deformers
Modo has some procedural deformers (such as the Bend, Magnet and Vortex effectors), which you can animate over time and work with in a manner similar to Modo's modeling tools. For example, to animate a car's antenna whipping in the wind, you could use the Bend deformer. (If you combine this with a modifier that modulates the bend amount, you could create a simple animation with very few keyframes.)
For the procedural deformers, the position of the effector defines the origin of its influence over the Target, so animating its position changes how it affects what it's deforming. By selecting the effector, you can edit its attributes in the Properties panel. By selecting the influence, you can adjust which parts of the mesh get influenced.
Modo also has reactive deformers (such as the Slack or Lag deformer), which are dependent on the object's keyframed motions. These deformers create deformations based on the positions or motions of an item and can apply secondary motions to an animation. Deformers, such as the Rotation and Transform effectors, provide you with a riggable way to connect items in a controlled manner.
When you assign an effector, you also assign a General Influence. The effector determines how to deform the Target, and the influence specifies what to affect (by default, the entire mesh). Once you have applied the deformer, you can select the effector in the Items list and modify its attributes in the Properties panel to deform the Target as needed.
Applying Deformers Using the Item List
| 1. | Right-click on the item in the Items (Scenes) List and select Add Mesh Operation. |
This opens the Preset Browser.

The different types of deformers can be found under the Deformers directory.
| 2. | Double-click on a deformer name to apply it to the item. |
Applying the Deformers using the Toolboxes
You can also assign a deformer by selecting the item and then clicking the associated deformer button. Deformers can be found in the following locations:
Note: Certain modes offer a subset of deformers according to the context.
• Deformer sub-tab in the Commands tab in Setup mode.
• Deform sub-tab in Model mode.
Applying Deformers Using the Mesh Operations List
Deformers are tightly integrated into the procedural modelling workflow. Deformers and mesh operations are managed from the same list, and can be mixed together, to apply deformers before or after mesh operations and vice versa. The following steps assume you have a mesh in the list that you wish to deform.
| 1. | Click Add Operator in the Mesh Operations List to open the Preset Browser. |
| 2. | Click a category under Deformers to view the options. |
| 3. | Double-click on a deformer to add it to the list. |
The deformer is added as a General Influence with the deformer defined under the Effector branch.
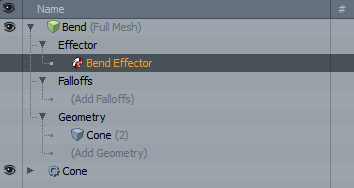
Select the effector to edit the properties in the Properties panel. The procedural item has the following sub-tools:
• Falloffs - You can add one or more Using Falloffs to the deformer. Click (Add Falloffs) to open the Preset Browser and select a falloff.
• Geometry - This lists any geometry that is affected by the tool. Meshes are connected automatically if they are below the tool in the Mesh Operations list. You can connect additional meshes by clicking (Add Geometry) to open the Preset Browser. From there you can select an existing mesh or add a new, empty mesh.
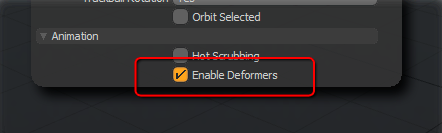
Viewing Deformers in 3D Viewports
Because the modeling and animation workflows are significantly different, Modo provides visibility options on the 3D Viewports that are set appropriately for each workflow. When modeling, you most likely want to see the mesh in its relaxed, un-deformed state. Therefore, in the Model, Model Quad, Paint, and UV tabs, Modo has the Enable Deformers checkbox clear (disabled) by default. If you are working with one of these tabs when you add a deformer, you do not see any effect. The Animate and Render tabs have this option selected (enabled) by default. To change the state, press the O key with pointer over a 3D viewport. Alternatively, at the bottom of the Viewport Properties dialog, click the Enable Deformers checkbox to enable or disable this option.