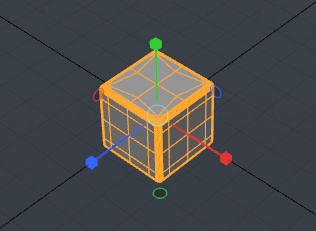
Uniform Scale
The Uniform Scale tool is identical to the Scale tool, except that you may haul anywhere in the viewport and all three axes are constrained, forcing all scaling operation to be uniform. This ensures the mesh does not become distorted when scaling.
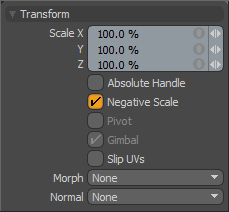
The following Transform options are available for adjusting the Uniform Scale tool:
• Scale - you may use the X,Y, and Z input fields to apply specific scaling values. When adjusting an object interactively in the viewport, the Scale input fields display the current scale factor applied, providing useful user feedback.
• Absolute Handle - applies an additional function to the tool handles, allowing you to scale the handle itself without affecting the transform amount. In some cases, this provides finer control over very large or very small adjustments.
• Negative Scale - enables/disables Modo's ability to interactively apply negative scale values when manipulating the tool handles in the viewport. When disabled, you can always input negative values in any of the input fields directly.
• Pivot - allows you to easily modify an item's pivot position without the need to go into Pivots mode.
• Gimbal - setting is grayed out in Scale mode.
• Slip UVs - (only in component modes) UV values are generally fixed to specific vertices; subsequently, further edits to the geometry may warp, deform, or otherwise distort the UV values in undesirable ways, requiring you to adjust the map or redo it altogether. To avoid this undesirable result, you can enable the Slip UVs function, so as to not disturb any existing UV mapping applied to the geometry.
|
|
|
|
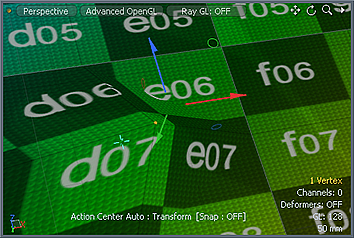
Slip UVs function disabled: texture warping occurs. |
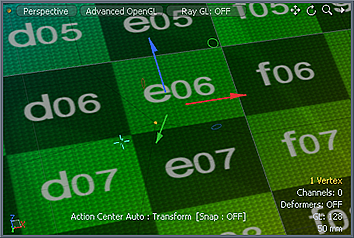
Slip UVs function enabled: texture remains even. |
• Morph - (only in component modes) determines how Modo treats stored Morph information, when applying transforms to geometry (Move, Rotate, Scale). In previous versions of Modo, in order to transform a morph, along with its base, it needed to be selected in the Vertex Map list. If it wasn't, relative morph map data, when recalled, would produce distorted, undesirable results. If you are unaware of the requirements, it's easy to accidentally mess up a model. To remedy this problem, there are now three options controlling how the morph map vertex data is dealt with when applying any transforms:
• None - unselected Morph data is not affected, though selected (visible) morphs can still be transformed, independent of their source.
• Transform - with this option selected, Morph data is transformed, along with the base mesh.
• Keep Positions - with this option selected, Morph data is converted into an absolute morph map and all vertices retain their pre-transformed positions.
• Normal - (only in component modes) when working with vertex normal maps, the Normal options control how the map values are affected. Refer to Transform Vertex Normals for more information.
• None - vertex normal map values won't be affected at all by Transform operations.
• Edit - only vertex normal map values are modified by the tool, and only in the selected Vertex Map.
• Update - all vertex normal map values, selected or otherwise, and any selected geometry, is modified by the Transform operation.
• Child Compensate - (only in Items mode) when disabled, passes along the transform value to any child items of the current selection. When enabled, the child items ignore any transform values. This is useful to transform a single item in a hierarchy, such as adjusting a joint, allowing it to be re-positioned relative to other elements without moving child items.