Tool Pipe
In any 3D modeling toolset, each tool needs to infer, or be informed about, several key variables in order to work properly. It needs to know its central position, meaning the location in 3D space, from where the desired effect is applied. It also needs to know its operational axis or orientation. And, finally, it needs to know which portion of the scene is going to be affected and by how much. In Modo, each of these variables has been extracted to its own operational layer. Modo offers each as a building block individually, such as Specifying Action Centers and Falloffs , which combines a center location and an axis orientation, andUsing Falloffs that provide a means to automatically attenuate or fade the strength of a tools' action across a distance.
You can assemble these blocks to make custom tools. Taking a basic Rotate tool and adding a linear falloff makes it a twist tool. Taking a Move tool, and adding an element action center and radial falloff, makes it a Soft Move tool. However, having to manually define each of these variables each time would get very tedious, so Modo has a system of defining collections of these functions as presets. As a matter of fact, this is how all the tools in Modo are built. They are essentially pre-built combinations of a variety of functions packaged into a single tool. All of these presets are defined with the Tool Pipe viewport.
The Tool Pipe is a seemingly simple but very powerful viewport that allows the combination of the tools and the tool modifiers, activating the proper functions automatically. It is also useful as a simple view to the currently-active tool combination. There are many settings available through the Tool Pipe interface using context menus on the specific Tool Pipe components. The Tool Pipe also acts as a list, which shows all the tools in the current preset combination, with the action tool at the bottom.
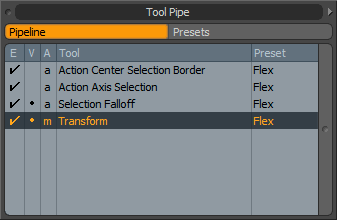
In the default Modo setup, the Tool Pipe is found in the Model interface layout. It is located on the right-hand side of the screen, under the Lists tab (next to the Properties viewport tab). The viewport itself is divided into several columns, where tools can be made visible or invisible, and enabled or disabled. They can also be removed, renamed, or reset. The columns are labeled E, V, A, Tool, and Preset.
E column
The E column indicates the state of the enable/disable toggle. When the check mark is visible in this column, the tool or modifier is enabled. This can be very useful when working with modifiers such as falloffs or guides, and it allows you to quickly disable the effect of the modifier without removing it from the Tool Pipe completely. It also allows the modifier to be re-enabled with its settings intact.
V column
The V column indicates the handle visibility setting for the current tool or modifier. There are several visibility states available for most tools. Right-clicking on this column opens the contextual menu. The default setting (in most cases), Preference, uses the tool handle drawing setting in the Preferences file. This allows you to globally set the tool handles to a specific style. The Advanced setting, in many case, adds extra handles, or in-viewport display elements that add additional controls for the tool or modifier. The Basic setting uses the core set of primary tool handles available, and the Invisible setting hides the handles altogether, if you prefer the hauling behavior over handle manipulation. (Hauling is off-handle tool manipulation achieved by clicking and dragging in the viewport when the tool is active.) The icons in the column indicate the current state. A dot designates Preference, a - (dash) for Basic, a + (plus) for Advanced, and nothing for Invisible. You can quickly toggle between the Invisible and Preference settings by clicking in this column over the target element.
A column
The A column indicates the tool or modifier's current state. This columns lists three possible states: m for manual, a for automatic, and blank for inactive. When a tool or modifier is set to Manual, it is then defined by user input; when set to Automatic, it is derived automatically by the system.
Tool column
The Tool column shows a list of the tools and modifiers that currently occupy the tool pipe. Right-clicking on this column opens up yet another contextual menu that allows the user to Apply, Reset, Remove, or Swap a tool from the Tool Pipe, as well as Save and Load new presets and set the activation, locking, and selection style states.
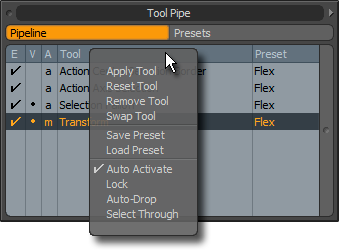
• Apply Tool - applies the tool's settings using the attributes defined in the Properties panel. This does not result in the tool being activated. It is the same as the more convenient Apply button found in the Tool Properties panel.
Many of the transform tools are set to Auto Activate, which makes the Apply option irrelevant. However, in some cases when working with an enormous number of polygons where editing feedback would be diminished, it would be beneficial to disable the Auto Activate feature and simply define a value for the tool, then Apply those settings. This allows any of Modo's tools to be used non-interactively.
• Reset Tool - resets the properties of the currently-selected tool or modifier to the pre-defined default state. This is useful to return a tool to its initial state when a user has arrived at an unsatisfactory result, where it would be easier to simply start over.
• Remove Tool - removes a tool or modifier from the Tool Pipe stack without affecting the other components of the Tool Pipe.
• Swap Tool - opens a dialog that allows the user to swap out the target in the Tool Pipe stack for any other tool or modifier.
The resulting dialog organizes each tool or modifier by its functionality and then by the individual command used to activate that option. The ones of particular interest in the case of modeling tools are the Falloffs, Visual Aids, Action Centers, Snap, Constraint, Action Axis, and Actor (Actor being all the basic tools).

• Save Preset - allows the entire contents of the Tool Pipe to be captured as a preset that can be recalled at a later time using the Load Preset option or using the command toolset.
• Load Preset - inserts the contents of a preset configuration into the existing Tool Pipe. If there are components of the preset that collide with any elements present when it is loaded, the components being loaded take precedence. Any contents that don't overlap remain in place.
• Auto Activate - this is a useful toggle that can help reduce a click when working with certain tools. When active, a tool becomes activated immediately upon clicking its button or pressing the hotkey. All of the transform tools in Modo are set to Auto Activate and this is why their handles appear immediately in the 3D viewport. Geometry creation tools, such as the Cube or Bevel tools, are not auto activated, so they require an initial click in the 3D viewport. This allows you the opportunity to set values on the Property viewport prior to activating, or simply applying the tool.
• Lock - keeps the current state of the tool's properties as the default setting each time the tool is enabled. For instance, if you use the Cube tool to drag out a 1 meter cube and then activate the Lock flag, whenever you activate the Cube tool, the numeric properties are set up for a 1 meter cube. Without Lock on, each time you complete the Cube tool, the resulting values become the values for the next activation.
• Auto-Drop - most useful for painting style tools, such as Mesh Paint or 3D painting operators. With most tools, when you release the mouse, the tool is still active and allows you to edit the current values. For instance, if you activate Bevel, you can click and drag repeatedly in the 3D view to edit the same Bevel settings. If you Shift+click you start a new bevel. If the same were true of Mesh Paint, each time you clicked the previous mesh, placement would jump to your mouse rather than creating a new mesh. With Auto-Drop active, each new stroke is a new Mesh Paint. If you set the Bevel tool to Auto-Drop, you could quickly click and drag multiple times to create complex bevels.
• Select Through - a highly useful option for a specific workflow, where you may not want to drop tools to change their current selection. In the default mode, Modo uses any click away from a tool's handle to haul the primary values. If you set the tool to Select Through you no longer have hauling behavior but get selection events instead.
Preset Column
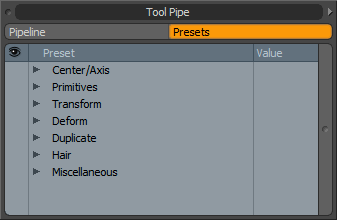
The Preset column displays the saved preset name to which the function belongs to, or the tools command. The Tool Pipe presets view displays all the available presets organized by tool task.