MeshOp Stack
The procedural system in Modo is built around an order of operations that evaluates from bottom to top in a list. When working in the Schematic Viewport, it can be difficult to establish that order of operations an manipulate operations to the fullest extent. The MeshOp Stack node makes it easy to visualize the order in which operations deform your mesh and allows you to fully manipulate multiple deformers from the Schematic Viewport without needing to jump back and forth between the Schematic Viewport and the Mesh operation Viewport.
Order of Operations
In Modo, the way in which operations are ordered within a stack or list can greatly impact how your mesh is deformed. Modo evaluates operations in a bottom-up way: the last operation in your list will be the first one to be evaluated, while the first one in your list will be the last to be evaluated.
Changing the order of your operations impacts how your mesh is evaluated. For example, if a mesh has a bevel applied followed by a chamfer, the bevel is evaluated first and the chamfer will be applied on top of the bevel. If the order of these two operations are changed so that the chamfer is applied before the bevel, the mesh item being edited will produce a different result.
|
|
|
Changing the order of your operations impacts how your mesh is edited. |
Being aware of how the order of your operations impacts how your mesh is evaluated is important when procedural modeling
Stacks in the Schematic Viewport
Because Modo evaluates operations starting at the bottom and then ending at the top of a list, using the Schematic Viewport with this node is recommended as it allows you to visualize the order operations of you procedural model.
There are two ways to create a MeshOp Stack node in the Schematic Viewport:
• In the Schematic Viewport, click Add and create a MeshOp StackNode
You can find this operator either by typing MeshOp Stack in the Search Allbar, or under Deformers > Grouping in the Add to Schematicwindow.
• Create a MeshOp Stack operation in the Mesh Operations Viewport and then click and drag the operation into the Schematic Viewport to make it visible.

Any operations dragged into the Schematic Viewport will remain present in your list of operations, while any new operations added to the Schematic Viewportwill also be listed in the Mesh Operations Viewport
Within the node, there are two inputs: Geometry and Deformer Stack.
By default, the Geometry input is linked to the Mesh item that the MeshOp Stack was created within. Additional geometry can be added to this input by dragging mesh items into the Schematic Viewport and dragging a link into the Geometry input.
The Deformer Stack input holds all the deformers and operations within your procedural model. Operations and deformers are added to the stack by dragging a link from the operation or deformer into the Deformer Stack input, or by clicking the plus button found under the deformer tab of the MeshOp stack node. When pressed, the Add Operation window opens and from there you are able to add MeshOps to your stack.
|
|
|
|
Drawing links into the MeshOp Stack |
Adding deformers within the MeshOp Stack |

Whenever a new link is dragged into the MeshOp Stack, an orange line is drawn to indicate the insertion location.
Operators can also be added by dragging from the input connector and releasing on an empty area of the Schematic. The Preset Browser will open and after adding an operator it will be positioned where the Preset Browser was opened. Links can also be dragged out from existing operators in the Stack and the chosen operator will be inserted above the existing operator.
|
|
|
Drawing a link to empty space to assign a new operation |
The MeshOp Stack node evaluates operates in the same way that the Mesh operations Viewport does, so it's important to pay attention to the order in which you create links between your deformers and the Deformer Stack.
Operations can be reordered in the stack by left-clicking and dragging the operation up or down within the stack. As above, an orange line will appear to indicate the insertion location of where the operation will be placed
MeshOps, Deformers and nestedMeshOp Stacks can be selected in the MeshOp Stack node with the left mouse button, allowing for properties to be edited without their node being present in the Schematic Viewport. This allows you to have full control over you deformers and MeshOps within the Schematic Viewport wihtout having multiple nodes present in the viewport, or having to select deformers or operations from the Mesh Operations Viewport.
Multiple operations can be added to the properties window at once by holding down Shift and clicking on the operations you want to change, while holding down the Ctrl/Cmd key and clicking on an operation removes it from the properties window.
Similarly to the MeshOp viewport, deformers within the stack can be hidden or unhidden by clicking the eye icon next to the name of the deformer within the stack.
Stacks in the Mesh Operations Viewport
MeshOp Stacks can also be used in the Mesh Operations Viewport, but we recommend using the Schematic Viewport with stacks, as the Schematic Viewport allows for a finer level of control without the need to jump between operations and deformers to adjust their parameters.
To create a MeshOp Stack in the Mesh operations Viewport, click Add Operator and create a MeshOp Stack. The MeshOp Stack operation can be found under the Deformers > Grouping or by typing MeshOp Stack in the Search All bar.
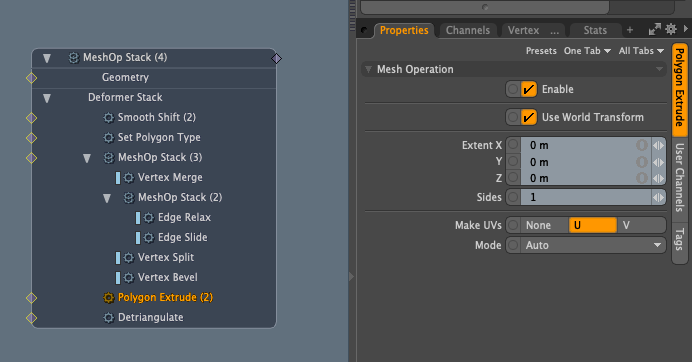
The contents of the MeshOp Stack can be viewed in the Mesh Operations Viewport by clicking the arrow icon next to the mesh item. Once expanded, both the Geometry and the Deformer Stack channels are displayed.
Operations that exist within a stack are highlight by default in light blue. This color can be changed in the Preferences window.
Operations and Deformers can be added to stacks within the Mesh operations Viewport by clicking Add Deformer Stack under the expanded Deformer Stack channel, and then selecting an existing operation or deformer from the Add Operation Viewport.
Operations and deformers can also be reordered within the stack by left-clicking and dragging the operation up or down within the operations list.
Nesting Stacks
MeshOp Stacks can also be nested inside of other stacks. This can be done by drawing a link one stack into the Deformer Stack input og another stack within the Schematic Viewport, or by adding the stack from the Add Operation window by clicking Add Defomer Stack within the Mesh Operation Viewport.
|
|
|
|
Nesting a stack within the Schematic Viewport. |
Nesting a stack within the Mesh operations Viewport |
Using Stack Aliases
MeshOp Stacks can also be used with Aliases. This allows you to collapse a stack with no geometry inputs into an Alias Item so that a series of operations can be easily reused and controlled on multiple meshes.