Bezier Clone
The Bezier Clone tool duplicates an object along a Bezier path a user-defined number of times. The path can be pre-generated, or with the tool active, can be drawn and edited interactively while cloning the target element(s). A Bezier Curve is a type of curve defined by additional off-curve control handles, providing you with an intuitive means to control the amount of incoming and outgoing curvature for each control point.

The Bezier Clone tool is found in the Duplicate sub-tab of the default modeling toolbox. You may have to right-click to open the button pop-up menu to find it (by default, it is located under the Curve Clone tool button). Alternately, the tool is also found in the menu bar under Geometry > Duplicate > Bezier Clone. Click the button to activate the tool. Next, in the 3D viewport, click to position the first control point and then continue to drag the mouse cursor to create the Bezier handle. Releasing the mouse button sets the handle length. Subsequent clicking and dragging draws additional control points and handles with a curve segment drawn between each vertex. Cloned items (as defined in the tool's properties panel) interactively display on each new segment as it is drawn.
When drawing out the Bezier for cloning, control points are always created at the intersection of the Work Plane and the mouse click. The curvature of the segments between control points is defined by the Bezier handles (called endpoint tangent vectors). While the tool is active, you can hover over any of the control points (changing them from blue to yellow) then click and drag to reposition it. Points always move on the two axes relative to the current Work Plane, so rotating the viewport to change an axis may be necessary. Handles are edited in the same manner. Pressing and holding the Ctrl key when editing handles break tangency, allowing opposing handles to be different lengths and/or angles. Editing any handle without pressing Ctrl restores tangency. When editing (moving) control points, pressing and holding Shift moves all downstream control points as a single unit.
There are three Bezier editing modes: Add any additional control point after the most recently-selected control point, Edit to change a control point's location, and Delete removes any control point that is clicked. Control points along the Bezier Curve can also be positioned precisely during editing by selecting the target vertex and using the Point X/Y/Z fields of the tool's properties panel. Once the tool is dropped, by pressing the spacebar, the cloned items are, in effect, set and no further editing of the path is possible. However, using a pre-drawn path allows you to delete the resulting clones and re-create them with modified settings.
Pre-drawn Path
To use a pre-drawn Bezier path for cloning, you need to make sure the path itself is selected prior to activating the tool. This is done while in the Polygons selection mode. With the target curve selected, activate the tool (by clicking the tools button) and then again clicking in the 3D viewport. This triggers the cloning of the selected element along the Bezier. If desired, the Bezier can then be edited in the same manner as if it were drawn with the tool.
Clones
The number of clones is determined by the PathSteps Generator. Adjusting the Steps value increases or decreases the number of clones along the path. The position of clones can be further adjusted with the By Length option, which evenly distributes the clones along the path, regardless of the control points. By default, what is cloned is determined by what is selected. Generally, you would define a selection within a single layer, activate the clone tool, and then draw the curve that results in the cloned elements. If what is to be cloned is on a different layer, the you can adjust the settings of the Clone Effector to specify alternate clone sources. This allows you to specify a specific layer, or use multiple layers randomly for each clone location, based on their foreground/background visibility.

The following properties are available for the Bezier Clone tool.
|
Bezier Path |
|
|---|---|
|
Mode |
The various Bezier curve mode options available are: • Add - the default mode; when you click in the viewport, additional points are added to the curve. At each control point position, two handles extend out that allow you to adjust the curvature of the curve segment between vertices. While drawing you can hover over any point or handle, where it turns yellow, you can then click and drag the control point or handle to further edit the curve. Control points may be added mid-curve by selecting the preceding control, highlighting it yellow, and clicking the position where the new control point is desired (point order is defined by the initial order in which the curve was created, press the F key prior to activating the tool to invert the order). • Edit - in Edit mode, you can freely click and drag any of the control points or handles along the curve to change the look to the desired shape. While pressing the Ctrl key, you may break the tangency of the control handles, allowing for sharp corners. • Delete - in Delete mode, you can click on any control point along the curve to remove it from the Bezier. |
|
Point X/Y/Z |
If you want finer point control, you can assign specific XYZ values in these input fields for the currently-selected (highlighted) control point. |
|
Bank Angle |
The orientation of the cloned elements is determined by the orientation of the geometry being cloned, and the Align options, if enabled. The Bank Angle option provides you an additional control, per path vertex, for banking or angling the clones from side to side. Bank value then smoothly blends with the values of the previous and later control point positions. |
|
Twist |
Works just like the Bank Angle option, but instead of being calculated per knot, the rotation amount is defined across the entire length of the curve, where the Twist value represents the amount of twisting rotation from the first knot in the curve to the last knot. |
|
In X/Y/Z/Out X/Y/Z |
If you want finer handle control can assign specific XYZ values in these In and Out input fields for the currently-selected (highlighted) control point. |
|
Closed |
Adds an automatic curve segment between the first and last control point positions producing a closed curve. |
|
By Length |
When the By Length option is enabled, cloned items are evenly distributed along the path by equal lengths rather than by the span (space between control points), which may produce uneven placement. |
|
Create Curve Polygon |
When the Create Curve Polygon option is enabled, dropping the tool leaves the Bezier Curve path instead of removing it from the scene. This is useful should you wish to use the resulting curve for additional purposes. |
|
Make UVs |
If the Create Curve Polygon option is enabled, this toggle activates auto-generation of UV texture coordinates along the curve. The generated UV values be of a single vertical line ('V' axis in UV) positioning all the control point vertices evenly between 0 and 1. For example, this can be useful for applying a Gradient to a rendered curve (the Render Curves option is available in the Mesh Item's properties. |
|
Path Steps Generator |
|
|
Automatic |
When enabled, Modo assign the number of clones to the path based on the number of control points combined with the Smoothing Angle option. This method bunches-up the most clones around the curvy areas, and produces fewer clones on the straight areas of the curve, which may be desirable. For even spacing of clones, enable the By Length option, above, and disable Automatic. |
|
Steps |
Available only when Automatic is disabled. This option allows you to specify an exact number of clones along the path. |
|
Smoothing Angle |
When enabled, the Smoothing Angle determines the distribution of the clones along the curve. Smaller values produce more clones, and larger values reduce the number of overall clones. The Smoothing Angle basically defines what the difference between two positions along the curve is, if the next position falls within the Smoothing Angle threshold, a new clone is generated. |
|
Align to Path |
When enabled, changes the orientation of the cloned elements along the curve. The first clone retain its original orientation and subsequent clones be angled away from the first based on the changing (vector) angle of the Bezier curve. |
|
Align to Normal |
When enabled, Modo tries to align the direction of the source objects to a straight up position before cloning the source item(s). If the item is already upright when cloned, this option likely has no effect. |
|
Start at Source |
By default, Modo clones items at the actual World Position along the Bezier curve. When the Start at Source option is enabled, Modo offsets each cloned item the distance between the source items center point and the first curve point, producing an effect as if the curve were initiated precisely at the center of the first source item. |
|
Clone Effector |
|
|
Replace Source |
When this option is enabled, Modo removes the source geometry and positions it at the first point along the path. |
|
Invert Polygons |
When enabled, inverts the normal direction of the cloned geometry. |
|
Merge Vertices |
When enabled, merges coinciding vertices into a single vertex. |
|
Distance |
Used in conjunction with the Merge Vertices option, the Distance value determines the maximum distance between vertices where merging occur. Vertices outside this value remain unchanged. |
|
Source |
Determines the mesh that be cloned along the Pen tool path. • Active Meshes - uses the currently-selected geometry as a clone source. • Specific Mesh - allows you to specify a specific Mesh Item as the clone source using the Mesh Item option below. • All BG - combines all the currently-visible background items cloning them as a single mesh. • Random BG - chooses a random background item from all the currently-visible background items at each clone position. • Preset Shape - allows you to clone Profile shapes from the Preset Browser. Open the Preset Browser (press F6) and select a profile before activating the tool. |
|
Mesh Item |
Works when the Source is set to Specific Mesh and allows you to choose the mesh layer to be cloned. |
Bezier Instance
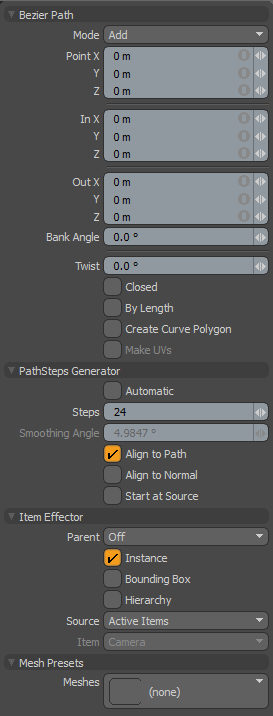
The Bezier Instance tool duplicates an object along a Bezier path a user-defined number of times, creating instances of the source item, rather than actual geometry. You can activate the tool by right-clicking the Bezier Clone tool and selecting Bezier Instance from the list.

In addition to the Bezier Path and PathSteps Generator properties described above, the following parameters are available for the Bezier Instance tool.
|
Item Effector |
|
|---|---|
|
Parent |
Determines how Modo treats instanced items in the Item List. |
|
Instance |
When enabled, each cloned item is an instance of the source mesh. Instances contain no physical geometry, but they reference a source layer and are represented in 3D Viewports by pink wireframes. (This is enabled by default.) |
|
Bounding Box |
When enabled, the resulting instances display as bounding boxes rather than wireframe meshes. This may provide a 3D viewport performance increase when Modo generates many instances. |
|
Hierarchy |
When enabled, clones any child items of the source geometry and retains their hierarchy through each subsequent clone. |
|
Source |
Determines the source mesh that Modo uses. |
|
Item |
Specifies the item to be cloned. This is only relevant if you set Source to Specific Item. |
|
Mesh Presets |
|
|
Meshes |
Opens the Preset Browser, where you can select a mesh preset to use as the Source. |
Bezier Replica
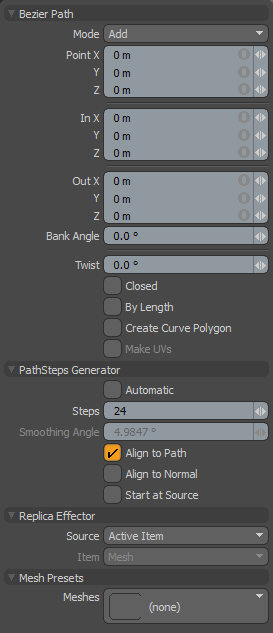
The Bezier Replica tool duplicates an object along a Bezier path a user-defined number of times, creating replicas of the source item. You can activate the tool by right-clicking the Bezier Clone tool and selecting Bezier Replica from the list.

In addition to the Bezier Path and PathSteps Generator properties described in the Bezier Clone topic, the following properties are available for the Bezier Replica tool.
|
Replica Effector |
|
|---|---|
|
Source |
Determines the source mesh that Modo uses.
• Active Items - Uses the currently selected item(s) as a clone source.
• Specific Item - Specifies a Mesh Item as the clone source based on the Mesh Item information.
• All BG - Combines all the currently visible background items and clones them as a single mesh.
• Random BG - Selects a random background item from all the currently visible background items at each clone position. • Mesh Layer Preset - Clones a mesh preset selected in the Preset Browser. Open the Preset Browser (by pressing F6) and select a mesh preset before activating the tool. |
|
Item |
Specifies the item to be cloned. This is only relevant if you set Source to Specific Item. |
|
Mesh Presets |
|
|
Meshes |
Opens the Preset Browser, where you can select a mesh preset to use as the Source. |
Bezier Transform
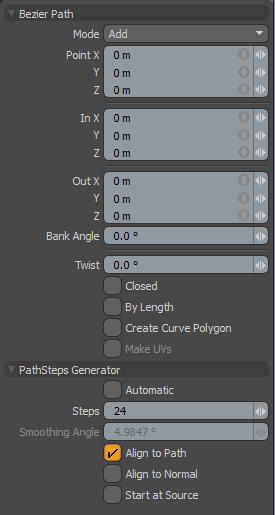
The Bezier Transform tool helps you arrange your existing items along a Bezier path. To activate the Bezier Transform tool, right-click the Bezier Clone icon and select Bezier Transform in the list.

For the Bezier Transform tool, you can set the Bezier Path and PathSteps Generator properties. For more information on these parameters, see Bezier Clone.
