Command History
Modo keeps a listing of every command used during a session in the Command History viewport. This view is useful for quick undo/redo operations, managing macros, quickly assigning keyboard shortcuts to specific commands, and many other utility functions.
To access the Command History viewport, look at the bottom-right corner of the interface where there is a single Command input field, then drag the divider above it upwards until the Command History header is displayed.
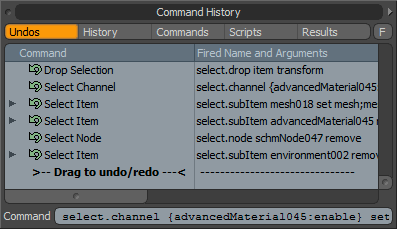
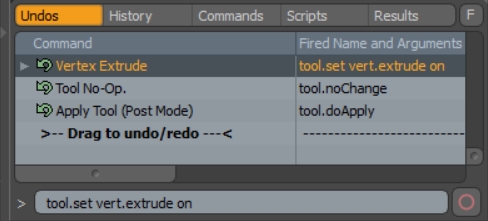
There are five tabs in the Command History panel: Undos, History, Commands, Scripts, and Results. By default, the Undos list is active. Within this list are sections for Command, Fired Name and Arguments, and Description. The listings within these columns display the internal commands that are performed when you press any keyboard shortcut or interact with an interface element.
You can click and drag within the Command list to undo/redo actions. Locate the line that reads Drag to undo/redo in bold, and drag it up to undo multiple commands at once.
Note: You can control the maximum number of available undos in the Preferences. In the menu bar, click System > Preferences > Defaults > Application then adjust the value in the Max Undo Level.
Clicking the subsequent section of the viewport opens the History tab, where a history of the performed commands are listed, with their possible attributes. The Commands tab supplies a complete list of all the commands available within Modo. The Scripts tab gives you access to all recorded macros stored in the configuration file. From here, it's possible to Edit or Run individual lines within these scripts. In the Results tab, the results of any command performed or queried is displayed here.
Creating Keyboard Shortcuts
You can assign keyboard shortcuts to commands in the Command History viewport's Commands tab.
| 1. | Right-click a command item in the list and click the Map Command to Key. |
This opens the key assignment dialog. You can see the command the shortcut is being assigned to in the Command field.
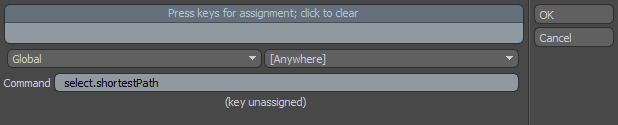
| 2. | Press a keyboard key, or multiple keys in combination, which appear in the assignment area. |
Note: If the intended combination is already in use by another command, Modo displays the associated command at the bottom of the dialog.
By default, the context is set to Global [Anywhere], but you can choose a specific viewport or UI component for the shortcut to work in using the dropdowns.
| 3. | Click OK to save the shortcut. |
Macro Recorder
You can use the Macro Recorder to record custom macros. It is situated at the bottom of the Command History viewport and it is visible even when the Command History viewport is collapsed.

Click the red circle on the right of the command entry to reveal the macro recorder controls.
|
Icon |
Description |
|---|---|
|
|
Click to begin recording a macro, and click again to stop. |
|
|
Click to replay the macro. To replay a macro on repeat, click and hold the icon to reveal the additional Replay Repeat option. |
|
|
Opens the macro recorder options, allowing you to save the macro as an .lxm file or in the user config, and to choose how UI commands are recorded. |
|
|
Opens the Script Editor. |


To hide the controls again, click in the command entry field. This ensures that the maximum possible space is available for typing in new commands.
Creating Shortcuts with Multiple Conditional Functions
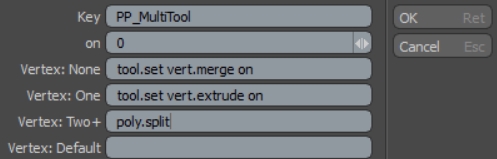
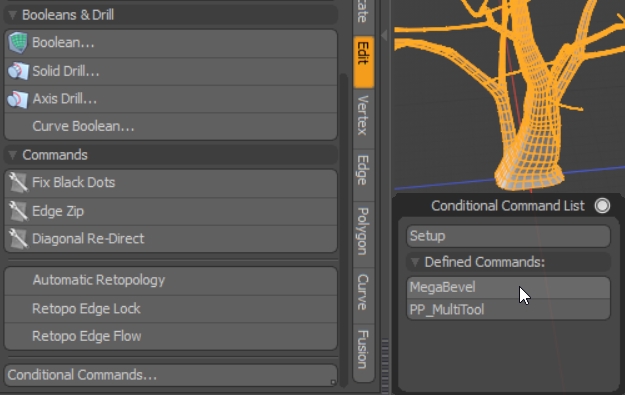
Conditional Commands allow you to add several different tools or commands to one shortcut based on the current selection mode and the number of selected components. In the first part of the video example, William creates a basic tool that behaves differently depending on how many vertices you have selected: no vertices selected enables Vertex Merge, one vertex selected enables Vertex Extrude, and more than two vertices selected enables Split Polygons.
To open the Conditional Command viewport:
- In the Edit tab, click the Conditional Commands button and then click Setup.
- Enter a descriptive name, or Key, so that you can easily identify the command later on.
- The on field controls input key behavior:
- Assign a command to activate in the component mode from which you want to trigger a command. For example, to add a command that enables Vertex Extrude if one vertex is selected, in the Vertex: One field enter:
- Click OK to save the command.
- Activate a command by clicking the appropriate button in the list.
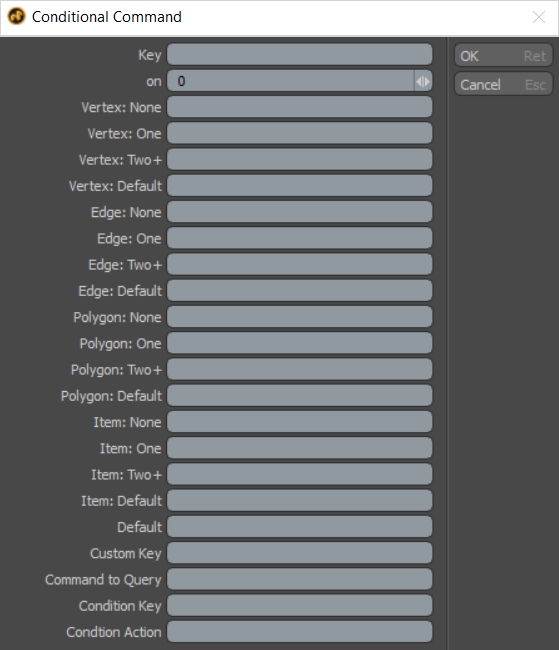
The Conditional Command viewport is displayed.
• 0 - the default value, indicates that pressing the input key switches the command on or off.
• 1 - indicates that the command is a sticky key, meaning you hold the input key down to temporarily activate the tool.
tool.set vert.extrude on
If you're not sure of the syntax for the command you're looking for, perform the action manually in the direct modeling tools and then look in the Command History viewport. All actions in Modo are logged there.
Commands called can be set depending on how many of each component are selected when the conditional command is activated. For example:
• Edge: None - when no edges are selected, run the specified command.
• Edge: One - when a single edge is selected, run the specified command.
• Edge: Two+ - when two or more edges are selected, run the specified command.
• Edge: Default - when in edge component mode and no edges are selected, run the specified command.
This is the same for the vertex, polygon and item component types listed in the conditional commands menu.
Tip: For more information on component selection modes, see Understanding Items vs. Components.
The command is saved in the Conditional Command List viewport.
Depending on the selected mesh type, you can configure conditional commands to call specific commands or custom tools. For example, specifying that a particular MeshOp is called instead of its direct modeling counterpart if a procedural mesh is selected.
Conditions are set via the Custom key, Command to Query, Conditions Key, and Condition Action parameters.
- Custom Key - the name of the custom command you want to run.
- Command to Query - the mesh type you want to apply the custom command to. For example, if you want your custom command to be applied to a procedural mesh, input conditionalCommand.procMesh.
- Conditions Key is the result that you are expecting to receive from the Command to Query. Expected results are treated as true, and the command specified in Conditions Action is run.
- Conditions Action specifies the command you want to run when the Conditions Key is true.
For example, you could use conditionalCommand.selectedElementCount as the Conditions Key which returns a number derived from the command. You can then use this number to drive the Conditions Action operation selectedElementCount. If selectedElementCount >= 2, then in Edge Selection mode enable edge.loopSlice and if selectedElementCount < 2, then in Edge Selection mode enable edge.subdivide.
You can also edit the configuration file directly to create Conditional Commands. The config file location differs by OS:
• macOS: /Users/<username>/Library/Preferences/MODO<version>.CFG/ConditionalCommands.cfg
• Windows: C:\Users\<username>\AppData\Roaming\Luxology\MODO<version>.CFG\ConditionalCommands.cfg
• Linux: /home/<username>/.luxology/MODO<version>.CFG/ConditionalCommands.cfg
For example, to create a command to execute a conditional bevel or chamfer dependent on selection mode, a conditional cut, and automatically add MeshOps if the mesh is procedural, you could add:
<?xml version="1.0" encoding="UTF-8"?>
<configuration>
<atom type="ConditionalCommands">
<hash type="key" key="meshopBevel" val="meshopBevel">
<list type="vert">
<atom type="v_def">meshop.create vert.bevel.item</atom>
</list>
<list type="edge">
<atom type="e_def">meshop.create edge.chamfer.item</atom>
</list>
<list type="poly">
<atom type="p_def">meshop.create poly.bevel.item</atom>
</list>
</hash>
<hash type="key" key="bevel" val="bevel">
<list type="vert">
<atom type="v_def">tool.set vert.bevel on</atom>
</list>
<list type="edge">
<atom type="e_def">tool.set edge.chamfer on</atom>
</list>
<list type="poly">
<atom type="p_def">tool.set poly.bevel on</atom>
</list>
<atom type="def">tool.set poly.bevel on</atom>
</hash>
<hash type="key" key="cut" val="cut">
<list type="vert">
<atom type="v_more">poly.split</atom>
<atom type="v_def">tool.set edge.knife on</atom>
</list>
<list type="edge">
<atom type="e_one">edge.subdivide</atom>
<atom type="e_more">tool.set poly.loopSlice on</atom>
<atom type="e_def">tool.set edge.knife on</atom>
</list>
<list type="poly">
<atom type="p_more">tool.set poly.loopSlice on</atom>
<atom type="p_def">tool.set poly.knife on</atom>
</list>
</hash>
<hash type="key" key="megabevel" val="megabevel">
<list type="custom">
<hash type="command" key="proc" val="conditionalCommand.procMesh">
<list type="conditions">
<hash type="condition" key="true">conditionalCommand meshopBevel</hash>
<hash type="condition" key="false">conditionalCommand bevel</hash>
</list>
</hash>
</list>
</hash>
</atom>
</configuration>