![]()
The Actors, Actions, and Poses menus appear in a bar at the bottom of the Animation interface. This bar is under the keyframing and Timeline transport controls. You use these menus to animate items. An actor is a special type of Groups Viewport that acts as a container for storing items or channels. You can quickly assign keyframes for all associated channels, and then save the values as alternate layers with the Actions menu. Each action is an alternate of the entire Timeline. Additionally, the Poses menu stores specific keyframe values that you can then easily apply at any point along the Timeline.
An actor is a container that groups related items together. This could be an entire hierarchy of joints for a character, or it could be all the parts to a dump truck (an actor doesn't need to be a character). By creating an actor you can apply keyframes to all associated items easily. Before you create an actor, make sure to select all the target items to include, then click the Actors menu.
When you click Create a New Actor in the Actors menu, the New Actor dialog opens. This is where you create the actual actor group.
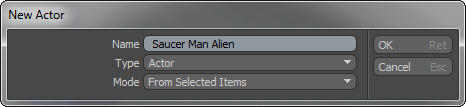
Name specifies the name of the resulting group that Modo creates. By default, Type is set to Actor (and should remain that way). This defines how Modo treats the group.
In the Mode list, select which items or channels should be added automatically to the new actor when Modo creates the actor. There are several options, which are dependent on the selection made before invoking the command. Empty creates an actor group with no automatically assigned items. From Selected Items/Channels automatically adds all the selected elements in the scene. From Item/Channel Edits adds any items or channels from the current selection that have been changed from their rest state (modified from the Setup action state). In most cases, use From Selected Items so that Modo adds all selected items automatically to the actor (group). Click OK to create the actor. If you need to add more items or channels to an actor or remove items or channels from an actor, use the Add and Remove commands in the Actors menu after selecting the target element.
With an actor defined, you can click the Key button to define keyframes for every animated channel belonging to each item in the actor. Define at least one keyframe for each channel. (For characters, this would typically be a position or rotation channel.) For information on creating keyframes, see the Working with the Timeline topic.
Actions store keyframes of the entire Timeline for each actor. Each separate action can be complete set of keyframes for the entire length of a given scene within a particular actor group. You can create each action either as a completely separate animation (such as a run cycle in one and a crouch action in another) or a subtle reworking of an existing animation (such as non-destructively modifying a character's motions). In movie terms, each action is its own take of the scene.
To create a new Action layer:
| 1. | Make sure the Actors menu shows the name of the actor for the new animation. |
| 2. | To open the Create a New Action pop-up, click the Actions menu. |
| 3. | Now, click the Create a New Action for the Actor button. |

| 4. | In the New Action dialog, type a name for the new action and click OK. |
Now, when animating items belonging to the current actor, Modo stores the current action in defined keyframes. You can create any number of alternate animations for an actor by repeating the above steps. If you select Transfer in the New Action dialog, Modo copies any keyframes assigned to the item at the scene level into the new action. You can choose which action to view or edit by clicking it in the Actions menu. You can edit actions with the functions in the menu by specifying the action and clicking the appropriate command.
WARNING: When animating a scene with multiple actors, the current actor switches automatically when you select any item belonging to another actor. That actor's last active action becomes the current action.
A pose stores a static snapshot of the values for the current keyframe of the active actor. You can then re-apply these values to the actor at another point in time. Poses don't need to be for the full character. They can be limited to just part of an actor or even a single joint. For example, you may want to create poses for a character's hand positions (such as a fist or a pointing finger). You can then apply these poses to the actor at any place in the Timeline.
To create a pose:
| 1. | First position the target elements as desired. |
| 2. | Define keyframes for the target elements. For example, with a hand, this could be making a fist by bending the fingers appropriately. |
| 3. | Select all the target items. (For example, double-clicking the wrist joint selects the item and all its children.) |
| 4. | Next, click the Poses menu. |
| 5. | In the Poses menu, click Store a New Pose for the Actor. |

| 6. | In the Store Pose dialog, type a Name for the pose. |
| 7. | Select Selected Actor Items in the Source Items list. |
| 8. | Click OK. |
Modo stores the pose for you to apply later. In the Store Pose dialog, you specify an item from the Source Items list to indicate which items belonging to the actor get stored in the pose: Actor Items stores values for all elements in the actor and disregards any current selection, and Selected Actor Items limits the values stored to the current item selection. The item that you select in the Source Channels list controls which channels from the source are stored: Edited stores channel values from the source elements only for channels that are different from their rest state (modified from the Setup action state), Animated stores only channels from the source elements that have keyframes applied to them, and All stores all related channels, animated or not, from the source elements in the pose. If you select the Transforms Only checkbox, Modo only stores transform-specific channels: Position, Rotation, and Scale.
TIP: When you create a pose, the items in the actor are not affected. Their channel values are copied (not cut). You can create more poses with the current values as a starting point.

To apply a stored pose:
| 1. | Go to the position on the Timeline where you want the pose. |
| 2. | Specify one of the stored poses from the list next to the Poses menu. |
| 3. | With the pose now active, click the Set button next to the pose to assign it. |
Modo assigns all the stored channel values for the elements within the pose as keyframes. Once the values are set, they can be treated like any other keyframe value.
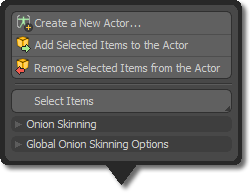
In the Actors menu there are additional options for working with actors.
• Create a New Actor: This opens the New Actor dialog for creating groupings of items.
• Add Selected Items to the Actor: This button adds additional items to the current actor. To use, first select the item(s) to add and then click this button. Modo adds the element to the actor.
• Remove Selected Items from the Actor: This button removes items associated with the current actor. To use, first select the item(s) to remove and then click this button. Modo removes the element from the actor.
• Select Items: Clicking this button selects all items related to the current actor.
• Select Channels: This button is the alternate button under the Select Items button. Right-click the button to open the pop-up window and then click the button to select all the animated channels related to all the items in the actor.
See below for information about Onion Skinning.
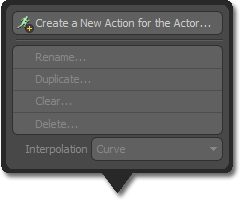
In the Actions menu there are additional commands for working with actions.
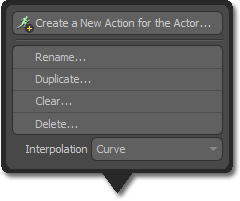
• Create a New Action for the Actor: This command opens the New Action dialog for creating alternate versions of the entire Timeline.
• Rename: Opens the Action Name dialog where you can edit the current name.
• Duplicate: Opens the Action Duplicate dialog where you can clone an existing action into a new one with a different name. You can make the new action the current, active action.
• Clear: Removes all keyframes from the current action, but retains the empty action itself. When used, Modo shows a confirmation dialog for you to verify that you want the keyframes removed.
• Delete: Removes the action from the scene entirely. Modo shows a confirmation dialog for you to verify the deletion.
• Interpolation: Defines the default method of interpolation between keyframes. You can select Curve, Linear, or Stepped to modify keyframes in the Graph Editor.
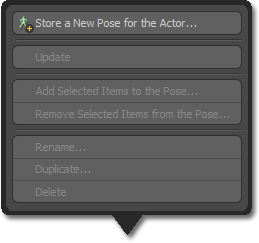
In the Poses menu there are additional commands for working with poses.
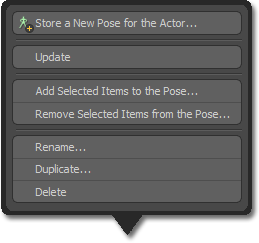
• Store a New Pose for the Actor: Opens the Store Pose dialog for saving collections of keyframe values to reuse.
• Update: Updates the keyframe values in an existing pose. Modo stores keyframe values when it creates a pose. With the target pose selected, make adjustments to the posed elements and then click this command to save the value in the current pose.
• Add Selected Items to the Pose: Opens the Edit Pose dialog for you to add additional items to those already included in a specific pose. The dialog also has options to control which channels from the added elements are stored in the pose when added. You can also limit the included channels to just the transform channels (Position, Scale, and Rotate).
• Remove Selected Items from the Pose: Opens the Edit Pose dialog, too, but defaults to Remove options, instead of Add options.
• Rename: Opens the Pose Name dialog where you can change the existing name.
• Duplicate: Opens the Pose Duplicate dialog where you can clone an existing pose to a new one with a different name.
• Delete: Removes the action from the scene entirely. Modo opens a confirmation dialog for you to verify the removal.
Onion skinning is a term related to traditional hand-drawn animation when the initial rough motion studies were drawn on thin, translucent paper for the artist to see the previous frames in a sequence through the paper. A drawing would seem more faded the lower it was in the stack. This way of working made it easier for the artist to visualize the overall motion of an action and adjust the timing as necessary. The onion skinning feature in Modo mimics this same method of working, but offers additional controls not available to paper-based artists.
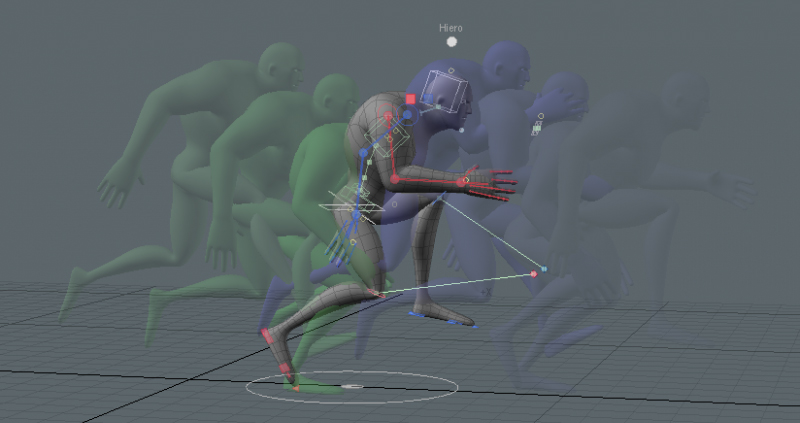
You find onion skinning options in the Actions menu. Actors determine the items that are drawn with onion skinning in the 3D Viewport, and Modo takes the animated motion from the active action for the actor. When you set the active action to (none), Modo does not display onion skinning. Also, Modo does not display onion skinning during playback or while scrubbing the Timeline. You use the onion skinning options to assign and modify common onion skinning settings for the current actor as well as general options for the onion skinning drawing. When you click the Actors menu, you can click Onion Skinning to view those options.
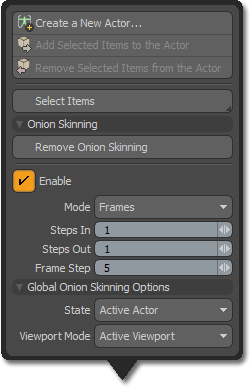
You must first create an actor to have something to assign the onion skinning options to. Have some animation applied to the elements in the actor to give the onion skinning function something to display. With the target actor selected, click Onion Skinning and select Enable, if necessary, to enable the function in the active viewport. Once activated, you can see the preceding and following frames from the current point in time with the current time position displayed most prominently. When opened, the Actors menu has the following options related to onion skinning:
• Add/Remove Onion Skinning: Turns onion skinning on or off for the currently selected actor.
• Enable: Use this to temporarily enable or disable onion skinning while retaining the existing settings.
• Mode: Determines the intervals used to display the onion skinning: Frames uses the whole frame values of the Timeline, Keys takes the displayed intervals based on defined keyframes for the selected actor, and Time Markers uses the time markers associated to the selected actor.
• Steps In: Controls the number of steps to show prior to the current time (maximum of 5).
• Steps Out: Controls the number of steps to show after the current time (maximum of 5).
• Frame Step: Controls the number of frames between each drawn step and only applies when the interval Mode is set to Frames
The following Global Onion Skinning Options are available:
• State: Provides choices to control globally how Modo displays the Onion Skinning function:
• Off - With onion skinning off, all settings remain intact for each actor. Modo only disables the display.
• Active - With onion skinning active, Modo only draws onion skinning for the current actor. This is the default setting.
• All - With onion skinning set to All, Modo draws onion skinning for all actors that have onion skinning assigned and enabled.
• Viewport Mode: Provides choices to control how Modo displays onion skinning:
• Active Viewport - When enabled, displays onion skinning only in the current active viewport.
• All Viewports - When enabled, displays onion skinning in all visible 3D Viewports.
TIP: You can also apply onion skinning to cameras and other locator-based items (such as lights) to include custom drawing features. To do so, create an actor that includes these types of items. (Locator items do not fade because of how Modo draws them in the viewport.)
When you select an actor, you can also activate Onion Skinning options in the Properties viewport. The Properties panel also has some additional options for controlling how Modo displays onion skinning.

• Add/Remove Onion Skinning: Enables or disables the Onion Skinning function for the currently selected actor.
• Enable: Use this to temporarily enable or disable onion skinning while retaining all the existing settings.
• Mode: Determines the intervals used to display the onion skinning: Frames uses the whole frame values of the Timeline, Keys takes the displayed intervals based on defined keyframes for the selected actor, and Time Markers uses the time markers associated to the selected actor.
• Draw Meshes: Provides fine control over what elements of the actor group are drawn as part of the onion skinning:
• None - Modo does not draw meshes that are members of the actor.
• Selected - Modo only draws selected meshes belonging to the actor.
• All - Modo draws all meshes belonging to the actor.
• Draw Locators: This option provides fine control over what locator-type elements (such as locators, cameras, and lights) of the actor group that Modo draws as part of the onion skinning:
• None - Modo does not draw any locator-type items belonging to the actor.
• Selected - Modo draws only selected locator-type items. (This is the default.)
• All - Modo draws all locator-type items belonging to the actor.
• Steps In: Controls the number of steps Modo draws prior to the current time (maximum of 5).
• Steps Out: Controls the number of steps Modo draws after the current time (maximum of 5).
• Frame Step: Controls the number of frames between each drawn step and only applies when the interval Mode is set to Frames.
• Color In: Defines the display colors for steps prior to the current frame.
• Color Out: Defines the display colors for steps following to the current frame.
• Alpha: Defines the transparency amount for the frames directly before and after the current frame.
• Alpha Steps: Defines the additional amount of transparency for subsequent steps.
• Lazy Update: When enabled, displays onion skinning only after you apply an edit. This is the default to increase the interactivity speed. For simple scenes, you can disable this option to preview all edits in real time.
NOTE: Sometimes it may not be desirable to have the mesh of a given character in the actor group along with rig control items. In this situation you can create a standard Groups Viewport with the character mesh and then parent it to the actor group (in the Groups viewport) to keep it separate. Modo applies the onion skinning settings to the actor as well as its child item.