The Pen Clone tool is useful for creating linear paths that have perfectly straight line segments between each user-defined point. You can clone geometry or items along this path based on the settings of the Clone effector. Modo duplicates each cloned item as a straight mesh and, thereby, increases the polygon count within the scene file. You can also clone items as instances or as Replicator Items, which do not increase scene geometry.
To activate the Pen Clone tool, choose Geometry > Duplicate > Pen Clone. You may also select the tool directly in the Duplicate sub-tab of the modeling toolbox in the Model and Model Quad interface tabs. If you click and hold the Curve Clone button, you can select the alternate tool options.
To use the tool, follow these steps:
| 1. | Click the Pen Clone tool icon. |
| 2. | Click in the 3D Viewport to create path points at the intersection of the viewport and the Work Plane. |
Modo creates lines between each path point as you add subsequent points.
You can edit selected path points by specifying different values in the Position fields.
| 1. | To select a particular path, move the pointer over the point until it becomes yellow. |
| 2. | Next, drag the point to change its position. |
You can also add points between existing positions by selecting a point and then clicking away from the selected point to add the intermediate point.
After pressing the Q key, the 'pen' feature drops and the 'clone' feature is in effect. When this occurs, you can no longer edit the path.
|
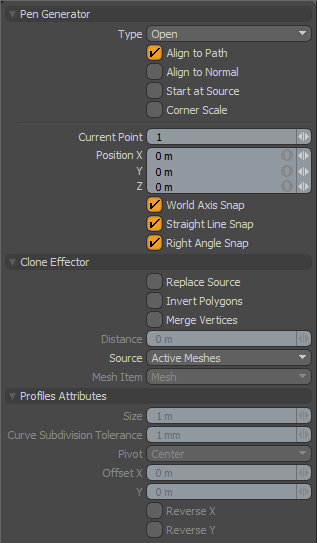
Pen Generator |
|
|---|---|
|
Type |
Determines the termination of the path.
• Open - Remains open as you create the path.
• Closed - Draws a line between the first and last points to make the path a closed loop. |
|
Align to Path |
When enabled, Modo rotates the cloned items to align along the path's directional vector. Modo rotates the objects to match the direction of the path at the clone's position. |
|
Align to Normal |
When enabled, Modo tries to align the direction of the source objects to a straight up position before cloning the source item(s). If the item is already upright when cloned, this option has no effect. |
|
Start at Source |
When enabled, Modo positions cloned items based on their center point. When disabled, attempts to place the base of the cloned geometry at each path point. This is useful when cloning items in the same layer. |
|
Corner Scale |
When enabled, Modo scales corners automatically to make the path have a consistent thickness. (This option is also available for cloning items should you want clones to match a path created previously with the Pen tool.) |
|
Current Point |
Displays a number for the currently selected path point. You can select any point along the path by clicking directly on the point's handle when yellow or specify a point manually by adjusting the number. |
|
Position X/Y/Z |
Determines the position in 3D space where the currently selected point is. To move the currently selected point, you can type a new position or drag the point in the 3D Viewport. |
|
World Axis Snap |
When enabled, attempts to snap a path's line segments to 90° angles relative to the World Axes. |
|
Straight Line Snap |
When enabled, attempts to snap a path's line segments to straight lines aligned with the previous two points in the path. |
|
Right Angle Snap |
When enabled, attempts to snap a path's line segments to 90° angles relative to the previous path segment. |
|
Clone Effector |
|
|
Replace Source |
When enabled, removes the source geometry and positions it at the first point in the path. |
|
Invert Polygons |
When enabled, inverts the normal direction of the cloned geometry. |
|
Merge Vertices |
When enabled, merges coinciding vertices into a single vertex. |
|
Distance |
Determines the maximum distance between vertices where merging occurs if you select Merge Vertices. Vertices outside this distance remain unchanged. |
|
Source |
Determines the mesh that Modo clones along the path. • Active Meshes - Uses the currently selected geometry as a clone source.
• Specific Mesh - Uses a specific Mesh Item as the clone source as indicated in the Mesh Item option.
• All BG - Combines all the currently visible background items and clones them as a single mesh.
• Random BG - Selects a random background item from all the currently visible background items at each clone position.
• Preset Shape - Clones a profile shape selected in the Preset Browser. Open the Preset Browser (by pressing F6) and select a profile before activating the tool. |
|
Mesh Item |
Specifies the mesh to be cloned. This is only relevant if you set Source to Specific mesh. |
|
Profile Attributes - When you define the Source as Preset Shape, the attributes become active for you to specify the size and position of the cloned preset shape. |
|
|
Size |
Determines the size of the cloned preset shape. |
|
Curve Subdivision Tolerance |
Determines the fidelity of how Modo converts the preset shape's curve into a polygon. |
|
Pivot |
Determines the position of the cloned preset shape in relation a point of the path. |
|
Offset X/Y |
Provides finer control over the preset shape's position in relation to the path itself. Modo adds this value to the Pivot position. |
|
Reverse X/Reverse Y |
Flips the preset shape in either the X or Y direction. |
This tool works like the Pen Clone tool: you can create a linear path with straight line segments between each user-defined point, and duplicate your geometry along the path. However, instead of producing actual geometry, the Pen Instance tool creates instances of the source item along the path.
You can activate the tool in the Model layout, under the Duplicate sub-tab. Click the Curve Clone icon and select Pen Instance from the list.
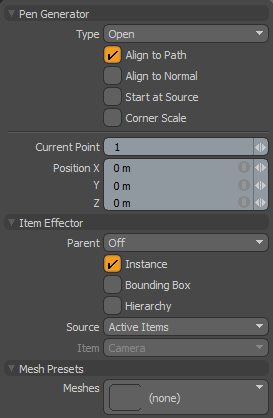
In addition to the Pen Generator properties described above, the following parameters are available for the Pen Instance tool.
|
Item Effector |
|
|---|---|
|
Parent |
Determines how Modo treats instanced items in the Item List. • Off - Clones source item as additional instanced layers in the Item List.
• Hierarchy - Creates a cascading array where each subsequent clone is a child of the previous clone.
• Root - Creates instances as child items of the source mesh.
• Primary - Creates Instances as children of a group locator that is parented to the source mesh. |
|
Instance |
When enabled, each cloned item is an instance of the source mesh. Instances contain no physical geometry, but they reference a source layer and are represented in 3D Viewports by pink wireframes. This is enabled by default. |
|
Bounding Box |
When enabled, the resulting instances display as bounding boxes rather than wireframe meshes. This may provide a 3D Viewport performance increase when Modo generates many instances. |
|
Hierarchy |
When enabled, Modo clones any child items of the source geometry and retains their hierarchy through each subsequent clone. |
|
Source |
Determines the source mesh that Modo clones along the path. • Active Items - Uses the currently selected item(s) as a clone source.
• Specific Item - Specifies a Mesh Item as the clone source based on the Mesh Item information.
• All BG - Combines all the currently visible background items and clones them as a single mesh.
• Random BG - Selects a random background item from all the currently visible background items at each clone position.
• Mesh Layer Preset - Clones a mesh preset selected in the Preset Browser. Open the Preset Browser (by pressing F6) and select a mesh preset before activating the tool. |
|
Item |
Specifies the item to be cloned. This is only relevant if you set Source to Specific Item. |
|
Mesh Presets |
|
|
Meshes |
Opens the Preset Browser, where you can select a mesh preset to use as the Source. |
This tool works like the Pen Clone tool, but instead of producing actual geometry, it creates replicas of the source item.
To activate the tool, click the Curve Clone icon and select Pen Replicate from the list.
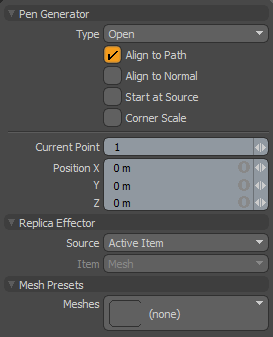
In addition to the Pen Generator properties described in the Pen Clone section, you can manipulate the following properties of the Pen Replicate tool.
|
Replica Effector |
|
|---|---|
|
Source |
Determines the source mesh that Modo clones along the path. • Active Items - Uses the currently selected item(s) as a clone source.
• Specific Item - Specifies a Mesh Item as the clone source based on the Mesh Item information.
• All BG - Combines all the currently visible background items and clones them as a single mesh.
• Random BG - Selects a random background item from all the currently visible background items at each clone position. • Mesh Layer Preset - Clones a mesh preset selected in the Preset Browser. Open the Preset Browser (by pressing F6) and select a mesh preset before activating the tool. |
|
Item |
Specifies the item to be cloned. This is only relevant if you set Source to Specific Item. |
|
Mesh Presets |
|
|
Meshes |
Opens the Preset Browser, where you can select a mesh preset to use as the Source. |
The Transform Pen tool allows you to edit the position of your existing items. For example, if you have multiple lights, you can distribute them in your scene with this tool.
To activate the tool, click the Curve Clone icon and select Transform Pen from the list.
To re-arrange your items using the Transform Pen, follow these steps.
| 1. | Select all the items that you would like to arrange. |
| 2. | Activate the Transform Pen tool. |
| 3. | In the 3D Viewport, click to the locations you would like to place your items. |
As you click, Modo relocates your items to the selected positions in the order they were initially selected.
| 4. | When you are ready with placing your items, press Q to drop the tool. |
![]()
The following properties are available for this tool.
|
Pen Generator |
|
|---|---|
|
Type |
Determines the termination of the path.
• Open - Remains open as you create the path.
• Closed - Draws a line between the first and last points to make the path a closed loop. |
|
Align to Path |
When enabled, Modo rotates the cloned items to align along the path's directional vector. Modo rotates the objects to match the direction of the path at the clone's position. |
|
Align to Normal |
When enabled, Modo tries to align the direction of the source objects to a straight up position before cloning the source item(s). If the item is already upright when cloned, this option has no effect. |
|
Start at Source |
When enabled, Modo positions cloned items based on their center point. When disabled, attempts to place the base of the cloned geometry at each path point. This is useful when cloning items in the same layer. |
|
Corner Scale |
When enabled, Modo scales corners automatically to make the path have a consistent thickness. (This option is also available for cloning items should you want clones to match a path created previously with the Pen tool.) |
|
Current Point |
Displays a number for the currently selected path point. You can select any point along the path by clicking directly on the point's handle when yellow or specify a point manually by adjusting the number. |
|
Position X/Y/Z |
Determines the position in 3D space where the currently selected point is. To move the currently selected point, you can type a new position or drag the point in the 3D Viewport. |