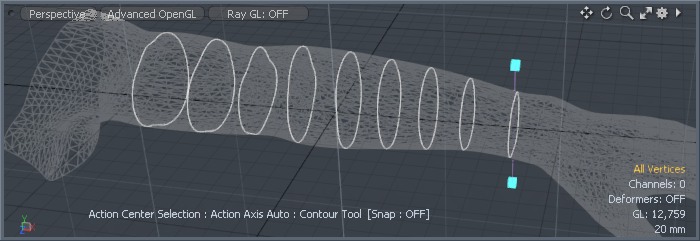
The Contour tool generates contours from user-defined slices across an existing polygon surface. The resulting contours can be curves, polygons, or lines. (In this case, lines are simple strings of two-point polygons.) The contours, themselves, represent the intersection of the slice across the target surface. You can use these contours combined with the Bridge tool for retopologizing a surface.
The Contour tool is in the Topo interface toolbox and the Mesh Edit sub-tab of the modeling toolbox. You can also choose Geometry > Slice > Contour. Prior to activating the tool, you need to have the target surface used to capture the contours from in the background (visible but unselected in the Item List). The target mesh for the contours needs to be a selected foreground layer. Clicking the Contour Tool icon (or choosing the command) activates the tool. With the tool active, dragging across an existing surface in the viewport generates the contour. The tool's handle is a lavender line with two cyan squares at each end. If you move the pointer over either square, it changes to yellow, and you can drag it to adjust the contour's position. (You can only edit the currently active contour slice.) Pressing Shift as you drag creates a new contour slice.
NOTE: Contour slices project through the target based on the current view angle and orientation. Therefore, when slicing in a perspective view, the resulting contours have perspective as well. Switching to an appropriate orthogonal viewport keeps the contour slices parallel.
Contour—
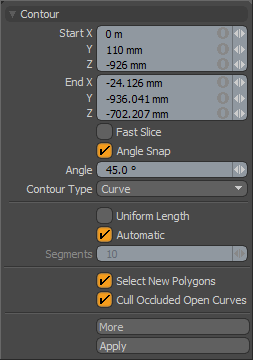
Start X/Y/Z: Specifies the beginning of the slicing handle that creates the contour. Generally, these display the current start position when you interactively draw in the 3D Viewport, but you can also enter specific values.
End X/Y/Z: Specifies the end of the slicing handle that creates the contour. Generally, these display the current end position when you interactively draw in the 3D Viewport, but you can also enter specific values.
Fast Slice: When enabled, creates the contour after you release the mouse button to increase the tool's performance. By default, Modo creates contours interactively as you draw the slice in the 3D Viewport. On dense meshes this may slow the tool down.
Angle Snap: When enabled, snaps the contour slice handle to a user-defined increment whenever the drawn line is close to the defined Angle value.
Angle: Determines the snapping angle when you enable Angle Snap.
Contour Type: Determines the type of contour generated.
Lines- Generates a chain of two-point polygons (lines). You can select these lines in either Edges or Polygons mode.
Curve- Generates a standard curve that closely represents the target surface.
Face- Produces a closed polygon face with edges that represent the target surface.
Uniform Length: When enabled, distributes the resulting vertex positions of the generated contour evenly along its length.
Automatic: When enabled, determines vertex positions by the contour slices' intersection with a polygon edge along the target surface. When disabled, Modo determines the vertex positions by the Segments value.
Segments: Determines the number of vertices along the contour for the selected contour type when you disable Automatic. By providing a value, you specify how to distribute the vertices.
Select New Polygons: When enabled, selects automatically any new geometry that Modo generates. When you deactivate the Contour tool, Modo retains the selection as you activate another tool (such as the Bridge) to connect the resulting curves.
Cull Occluded Open Curves: When enabled, eliminates automatically any open or incomplete contours for areas of geometry that face away from you (from the current viewport's perspective). For example, if Modo generated a contour for a cylinder but the contour didn't cross the entire shape, Modo generates a short curve to represent the front of the shape and another curve on the reverse side. Enabling Cull Occluded Open Curve eliminates the curve generated on the opposing face.
More: Generates automatically a new contour with an offset based on the two previous contours. By clicking More, you can produce a set of evenly-spaced contours after drawing the first two.