The Preset Browser is a visual reference to a library of pre-defined objects, surfaces, and settings that are included with Modo. You can also easily create your own presets and add them to the browser or download shared assets from the Foundry community website for streamlined application to their own scenes. The presets come organized and categorized for quick visual browsing. The Preset Browser is found in several of the layout workspaces, most predominantly in the Layout workspace. It can also be opened as a pop-up palette by pressing F6 in any layout workspace. Presets can be applied to the scene using a simple drag-and-drop operation or, in some cases, double-clicking the preset in the browser.
NOTE: Due to the large file size, the included preset library that ships with Modo is a separate download and installation. It can be found in your account on The Foundry community website, where the Modo installer was obtained. For instructions on installation and download content refer to the Installation and Licensing section. Once properly installed, Modo automatically finds the preset content, and it should look something like the image below:
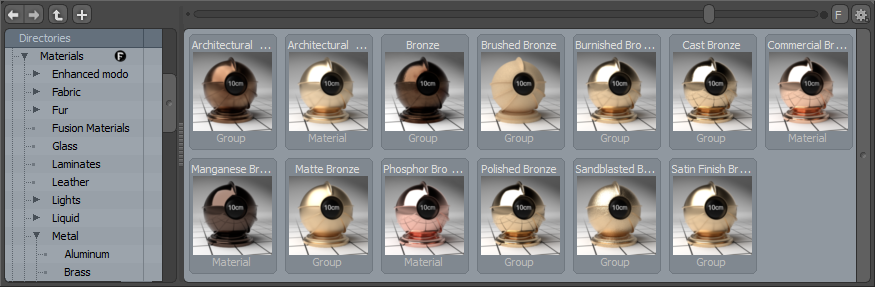
The Preset Browser uses a familiar tree structure of nested folders for organization and navigation. Depending on the amount of screen real estate you have, there are several methods for browsing the folders associated with presets. One is the Directories tree, the leftmost column in the above image. If it's not there, you can make it visible by left-clicking and dragging on the inside edge of the left side of the viewport (over the tiny row of stacked squares). You'll know you're on the correct spot when the cursor changes to a small arrow.
Once the Directories tree is opened there is a list of folder names organizing the associated presets. For instance, in the case of the Materials folder, there are a number of sub-folders that organize the material presets by finish. To the left of each folder name, there is a small triangle. Left-clicking the triangle expands/collapses any sub-folder within it, and clicking the folders themselves selects them with a highlight and displays their contents in the main browsing window. The column to the right of the folder names, with the X icon over it, allows you to remove entire directories from the tree by simply selecting a folder and pressing the X icon. A confirmation dialog opens to confirm the removal of the folder, which also removes its contents.
If you prefer not to use the Directories tree, you can collapse it by left-clicking the right-hand edge of it and dragging to the left until it disappears. When closed, navigating the window is accomplished with the icon buttons in the upper-left of the window: Forward, Back, Up to Parent, and Create New Folder respectively. The Forward and Back options are only available when folders have been navigated (much like a web browser). Right-click on either the Forward or Back buttons to get a context menu of available folder names. If the Directories tree browser is hidden and the viewport option Folders as Thumbnails is set to Never, then a menu pop-up containing the path hierarchy is displayed between the navigation buttons and the zoom slider.
The slider across the top-right of the viewport allows smoothly scaling the display size of the thumbnails. Left-click and drag the handle left or right to scale the thumbnails. When the number of items, or their size in the window exceeds the amount of space available, the scroll bar down the right side can be used to scroll through the available presets. The gear icon, directly to the right of the slider, opens the viewport options pop-up, which allows you to further customize the icon display in the viewport itself. Left-click to open the pop-up menu.

• Browser Mode - allows you to define different ways of displaying the preset contents within the browser:
• List - displays tiny icons next to the name of the preset, followed by any defined star rating and comment text.
• Thumbnails (Scroll Vertically) - the traditional large icon view that scrolls vertically.
• Thumbnails (Scroll Horizontally) - the traditional large icon view that scrolls horizontally.
• Grid - the Grid view is similar to the Thumbnail view, but only displays the image thumbnail, eliminating the preset name from the display.
• Folders as Thumbnails - controls whether the folders themselves, used to organize the presets, displays as thumbnails within the browser area. This is only active when either of the thumbnail options (above) are selected. Folders can be a helpful addition for navigation, more akin to regular OS file navigation.
• Show Multiple Directories As - control how multiple folder selections are displayed using this option (hold down Shift or Ctrl to select more than one folder in the Directories tree at a time):
• Single - displays the contents of single folders only (no multiple folder selections allowed).
• Multiple (Merged) - displays the contents of all selected folders simultaneously, as if they were a single folder.
• Multiple (Grouped) - same as above, but separates the contents of each folder with a named divider.
• Show Empty Groups - When this option is enabled empty folders will be displayed in the browser, when disabled empty folders will be hidden from view (Only available when the Show Multiple Directories option is enabled).
• List entire hierarchy in browser - when this option is enabled, all child folders in the hierarchy (subsequent nested folders) are also displayed in the browser without being explicitly selected.
• Sorting - controls the display order of the presets in the browser, based on the designated criteria:
• Alphabetically - by alphanumeric ordering.
• Manually - define the order by dragging and dropping within the browser (not available for Multiple Directories as Merged).
• Star Rating - define the order based on the number of stars assigned to preset.
• File Extension - define the order based first on the presets file type extension, then organized alphabetically.
• Modification Time - define the order based on the last time the file was saved (or modified), starting with the most-recent file or directory.
• File Size - define the order based on the actual size of the file as saved on the disc.
The Preset Browser allows you to add markup information to presets. Filtering is a different type of search that allows you to procedurally refine what is visible in the browser, based on specific information using a scripting-like connotation. The filter options take into account both the user-defined markup, as well as metadata (information intrinsic to the file, such as name and format).
• Use Filter String - toggles the filtering on (enabled) or off (disabled) for the browser.
• Apply filter string to directories - when this option is enabled, the filtering is applied to the directory folders as well, otherwise all directories are shown.
• Filter String - the actual data string that filters the elements within the Preset Browser.
• Client Identifier - allows a Preset Browser to have its own unique selection. This is most useful when configuring a Preset Browser to be used with a specific tool. For example, this is how the Polygon Bevel tool knows which of many possible Preset Browser viewports to use (in the case of Polygon Bevel, the browser viewport is embedded right in the Tool Properties viewport).
NOTE: Each tool must be specially coded to look for a specific client identifier, so this feature is only really useful to tool developers.
• Alternate Input Map - an advanced setting for developers that controls the number of mouse clicks used to assign a preset to a tool. When enabled, they assign with a single click, and when disabled they apply with a double-click (the default behavior).
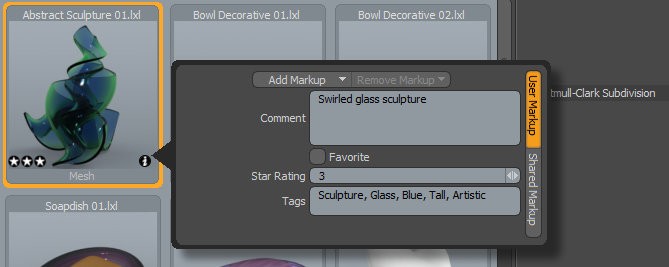
The Preset Browser allows you to manually add additional markup (metadata) to presets to aid in organization, and enhance filtering and searching of presets. This includes the ability to add keywords, comments, star ratings, and favorite presets. Depending on the size of the actual preset thumbnails, relative to the viewport, you should see these additional tagging attributes as overlay icons when the mouse is directly hovering over a preset (star ratings hide automatically on smaller-scaled thumbnails).
There are slightly different ways to view these attributes, depending on the mode of the browser. When the metadata icons are visible, you can left-click on them to set the attribute. Clicking the heart icon favorites that preset, clicking over a specific star icon rates the preset from 1 to 5 stars, or pressing the tiny x to remove the star rating takes off your rating. Clicking the tiny i icon opens the attribute pop-up panel, where you can then add the tags, keywords, and comments, as well as numerically define the ratings.
You can search for specific presets a couple different ways: through the use of sorting or by using the specific Search option. Search is located under the F button in the preset interface; clicking it opens the search string input field. You can type a term into the field and Modo hides all files that don't contain the defined term in either their file name or in their keyword tags.

On the right side of the input field is a small arrow you can click. This opens a menu with some additional options - a list of the most recent search terms used, a simple Search, which utilizes a single keyword search term at a time, Pattern Matching, which uses Advanced Filtering options, and Match Case, which forces Modo to recognize the upper- and lower-case characters when searching for a match.
• Materials - select a number of polygons and either click and drag onto the selection, or just double-click the material preset itself. The polygons are tagged with the appropriate surface name and applied in the Shader Tree. If you've already tagged all your surfaces using the M keyboard shortcut, that's even better - you can drag and drop any of the material presets onto the surface and the appropriate material is updated in the Shader Tree. For presets with associated image maps that require UVs, if no UVs are present, the material defaults to cubic projection. Presets can also be dragged and dropped directly onto Group Items in the Shader Tree itself. When hovering over the target surface in the 3D Viewport a drop actions menu will appear giving users a number of possible drop options associated to the surface it is hovering over.
• Environments - double-click the preset of your choice to add it to a scene. This automatically adds it to the Environment item of the Shader Tree. If you don't have a preview window visible, you may need to render the scene to see the effect of an environment preset.
• Meshes -drag a preset onto an empty part of the scene. It automatically positions itself appropriately in relation to the Work Plane, becoming its own Mesh Item layer. If the preset is dragged over geometry (for example, a light fixture onto a wall) the item aligns itself to the polygon it was dropped onto, and becomes part of the same layer. If one simply double-clicks the preset, the item is created at the origin (0,0,0 position). Once inserted, a mesh preset is just like any other geometry in a scene and becomes fully editable.
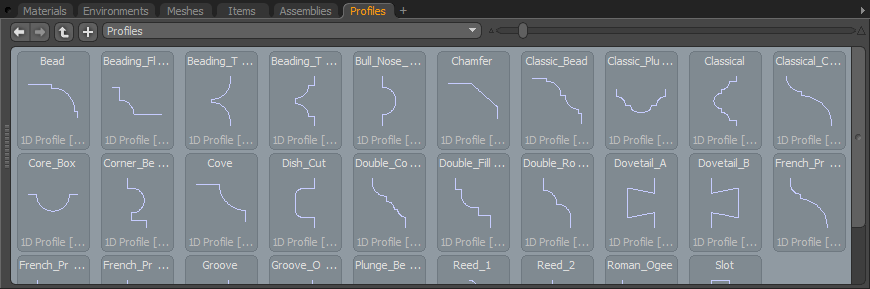
• Profiles - works with many modeling tools and can be applied by first selecting the profile you wish to use and then invoking the appropriate tool, for instance, the Bevel tool. With the tool in interactive mode, you can see the effects of the profile added to the bevel as you drag it out. Selecting any other profile updates the bevel profile instantly, allowing you to try out different settings before dropping the tool.
• Render Settings - Modo provides the ability to save the Render Item settings, such as Frame Size and Resolution, Antialiasing, and the Global Illumination settings as a Render Preset, making it easy for you to define commonly-used default values to apply them quickly to new scenes without the need for changing multiple settings manually. Camera items may also be included in these types of presets. To apply a Render Preset, you need double-click over the target preset in the viewport to apply it to the currently-active scene. Once applied, the render items update, reflecting the new values. An additional Camera item, defined by the preset may be added as well.
By right-clicking on a preset thumbnail, you are shown a contextual menu with several options for managing presets, as well as customizing the icon display.
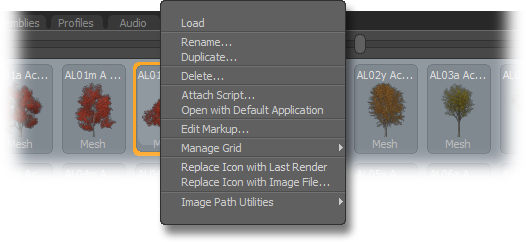
• Load - loads the currently-selected preset into the scene. For mesh presets, this creates a new item centered at Modo's origin. For materials, you need to select a material group in the Shader Tree before the material preset loads in this way.
• Rename - allows you to apply a new label to the preset, replacing any previous labels.
• Duplicate - open a dialog requesting a new file name for a new duplicate preset file.
• Delete - removes the currently-selected preset. Note that this also removes the file from the hard drive.
• Attach Script - opens an OS-specific dialog where you can specify a script - an .lxm macro file or a Python, Perl, or Lua script. Selecting the target script attaches it to the preset in a way that the next time the preset is added to the scene, by double-clicking or dragging and dropping it, the script runs the commands it contains. This is useful to script some automatic setup for assets added to a scene. Keep in mind the script needs to remain in the same disc location relative to the preset; it is not embedded into the preset itself and needs to be present in order to run.
• Open with Default Application - for non-Modo specific assets, such as image maps, this command uses the OS's default application to open the file for further editing.
• Edit Markup - opens the Preset Tagging dialog as a pop-up for editing.
• Manage Grid - when viewing the Preset Browser in Grid mode, you can easily organize the files in a specific order if the Sorting option is set to Manual. When set as such, you can then use these Manage Grid options to add grid spacing lanes - additional lanes with which to organize and sort the presets.
• Replace Icon with Last Render - embeds the last F9 render result into the currently-selected preset item.
• Replace Icon with Image File - opens an OS-specific dialog box used to select a saved image that is embedded into the currently-selected preset item.
• Image Path Utilities - The Image Path Utilities offer user a way to locate and repair presets with broken image file links (such as might occur when reorganizing the assets).
• Fix Broken Image Paths - allows fixing of any broken image paths in the currently selected presets.
• List Broken Image Paths (selected) - produces a text report listing just broken image paths found in the selected presets.
• List Broken Image Paths (folder) - produces a text report listing just broken image paths found under a folder hierarchy.
• Image Use Report (selected) - produces a text report listing all image paths found in the selected presets.
• Image Use Report (folder) - produces a text report listing all image paths found under a folder hierarchy.
If you want to further customize the tabbed Presets Browser to your personal workflow, such as creating a repository for project specific presets, adding your own Preset tab to the workspace is a relatively easy task:
| 1. | Navigate to the Preset Browser itself. |
| 2. | Click the + (plus) sign to the right of the Profiles tab, in the default configuration, to add additional tabs. |
| 3. | Within the pop-up, select Data Lists > Presets Browser. |
A new tab is added to the right side of the existing tabs.
| 4. | Right-click on the tab where it says Preset Browser and in that pop-up, select Viewport Controls > Rename Tab. |
| 5. | Type the name you'd like to use in the window. |
| 6. | From there you can display a custom folder of presets by navigating with the standard controls to your preferred directory. |
Mesh presets are fully compatible with Replicators, though they are not automatically applied as such. To use a preset mesh as a Replicator:
| 1. | Double-click the mesh object in the Preset Browser viewport, so it is created as its own Mesh Item at the origin. |
| 2. | In Item mode, select the Point Source and the newly created preset item mesh. |
| 3. | Create the Replicator by clicking Item > Add Replicator. |
Please refer to Replicator topic for more information on working with Replicators.