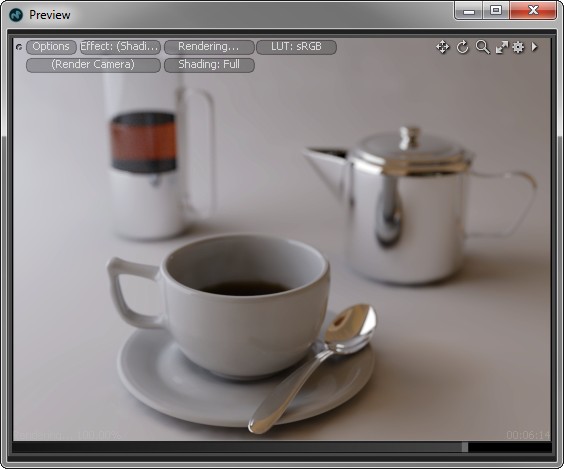
The Preview viewport uses the Modo render engine in a progressive refinement mode that allows you to see all changes in a scene as a fully rendered image. This viewport is thread-aware so that when it's not the current viewport it doesn't interrupt interactivity from other views. This allows you to work on your project without performance degradation, yet anytime there are "free cycles" the Preview viewport begins a progressive render, starting at low quality and filling it in to higher quality as time permits. In the Preview viewport you can view changes to the geometry, materials, textures, cameras, lights, and even render settings, such as ray tracing and global illumination.
In traditional systems, the OpenGL viewport gives a proxy view of the project in real-time and a separate offline render engine (if available) is summoned periodically to generate a full quality image. This offline rendering is a modal effect, which requires the artist to completely turn over control of the system to the render engine until the image is complete. This "start and stop" process is a complete workflow killer. Even waiting several seconds to review a change can take an artist out of their creative flow. The Preview window enables the artist to simply pause to glance at the progress of their project and then continue the process of refining their vision resulting in a much more fluid and art-conducive process.
The main advantage to using the Preview viewport is the fast display of the rendered scene. Navigating the camera around in the Preview window works just like any other 3D (OpenGL) Viewport set to camera, where dragging with the standard modifier keys changes the position of the camera with the additional ability to define a rectangular area by pressing Ctrl+Alt+right-click to define a box area to zoom in.
NOTE: Navigation only works when the Full Resolution option is disabled; when it is enabled, you are only able to pan around the rendered image itself.
You may also wish to zoom in for a closer look without affecting the camera's position. It's only possible with a middle scroll wheel mouse. To zoom in this way, first press and hold the Shift key on the keyboard, then place the cursor over the center point of the zoom target and roll the mouse wheel in and out to zoom. To reset the view, use the Reset Render command in the options menu available in the top left of the viewport.
The buttons at the top of the viewport also offer additional useful functionality. You can click any of them to open pop-up menus or enable/disable specific functions. The Options button opens a menu with controls to customize the Preview windows' rendering engine for additional optimization.
Below the Preview Options button is a camera pop-up selector, allowing you to easily select the current camera for rendering, without the need to specify it specifically in the render item. Directly next to the Options is an Effect Button that allows you to define a specific rendering channel for previewing, allowing for a number of diagnostic possibilities such as previewing the amount of Fresnel reflectivity on a surface. Additionally, you can drag and drop any render output from the Shader Tree onto the Preview window automatically, switching it to view that Effect. The Current Layer Overlay option allows you to toggle the visibility of a selected layer's contribution to a scene, visualized as a semi-transparent overlay, by enabling that option. Once enabled, it displays the current texture as an overlay on top of the render, visualizing the raw value unaffected by things like Blending Mode, Opacity, or shading. So, if you have an image map on the Subsurface Color channel, it displays the raw color of the map. For Groups, it displays the group mask opacity. This is very handy to resolve texturing issues and see what each layer is contributing to the final render.
The Heat Map option displays the diagnostic values for progressive rendering. The Number of Samples option indicates the number of samples per pixel so that you can see how much work is needed in various parts of the image to clean the noise. This is a useful information for shading in general as you can see which parts of the image are most expensive evaluation wise. The Convergence option indicates the converged pixels; those that are identical to the same pixel evaluated in a previous pass. Converged pixels show as blue, other (non-converged) pixels are red when they are still very noisy and normal color when they get close to the converged state.
The next button is a status update of sorts that gives you useful feedback of the Preview window's current state - you can click this button to pause preview rendering temporarily. When pressed again, the Preview window refreshes the image, starting a new render.
The LUT button allows you to choose the colorspace of the monitor. Unless there is a specific need, you should just leave this setting on the default sRGB setting. For more information, see Color Management. The Rendering Camera pop-up allows you to select any alternate camera from the scene. The Shading Full button works as a quick Preview optimizer, giving you a choice between Shading Full and Shading Fast. When set to Shading Full the entire Shader Tree is evaluated each Preview update, when set to Preview Fast, only the associated surface that is changed in the Shader Tree is updated which in many cases can really speed up Preview.
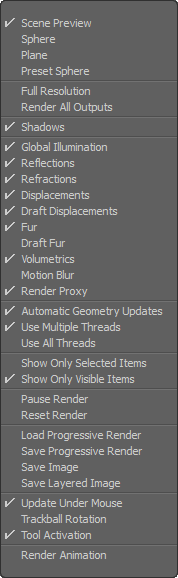
The Preview options provide extensive opportunities to optimize the performance of the viewport by limiting or focusing the rendered data. These controls are found under the Options menu, or alternately in the Options popup (under the small gear icon) . Users can click it like a button to open the Options menu, and then enable or disable certain functions with a mouse click. The check mark means the feature is enabled; no check mark means it's disabled.
General—
• Preview Type - you can select from different display types for the Preview window. The Scene Preview option renders the active scene, based on the settings of the Shader Tree. When used as such, it also works as an interactive view of any changes made to the scene, updating as the changes are made. The Sphere, Plane, and Preset Sphere options are useful to adjust settings of individual materials in the Shader Tree, providing a way to see adjustments made interactively away from the surface the material might be applied to. The top-most Shader Tree layer always takes precedence in this mode. The three primitive options use the current scene environment and lighting.
• Full Resolution - when enabled, the Preview window renders at the resolution defined by the render item Frame settings, regardless of the window size; when disabled, the render resolution is defined by the actual window itself.
• Render All Outputs - when enabled, the Preview window renders all the visible Render Output Items from the Shader Tree simultaneously, allowing you to switch between the various layers (using the Effect menu) while the scene is rendering. Selecting between the different outputs does not trigger a preview refresh, though picking any of the other alternate Effect types does.
• Shadows - The Shadows option toggles the evaluation of direct light source shadows. These are lights such as Point and Spot Lights. When disabled, shadows are not evaluated in the Preview window, providing a speed boost dependent on the number of lights in the scene and their contribution. When enabled, all active direct light shadows are evaluated, as defined by each light's Shadow settings.
• Individual Evaluation Toggles - contains a number of individual functions that can be toggled, controlling whether or not they are evaluated. Most should be apparent from the function name. For example, draft options, when enabled, automatically halves the associated value, providing a faster preview evaluation.
• Automatic Geometry Updates - preview can be useful to see a fully-rendered view of geometry, as it's created and tweaked. Each time the mouse is released on a modeling action, such as a bevel, the geometry cache is updated to reflect the change. This causes a new, full evaluation of the scene by the Preview window. By disabling the Automatic Geometry Updates, you can go into a manual mode where preview resets the geometry cache only when the Reset Render option is invoked, or the preview itself is paused and then re-activated.
• Use Multiple Threads - intelligently uses available CPU cores, interactively adjusting the number, based on the current needs of the system. This helps to keep the system interactive, while still keeping the preview fast.
• Use All Threads - when enabled, uses all CPU cores, same as a full render would. This option maximizes preview speed but it can also result in sluggish performance when working outside of the Preview window. This is best to enable when the extended refinement passes option is selected and the system won't be used for other purposes for a while.
• Show Only Selected Items - when enabled, only items that are selected in the Item List are evaluated in the Preview viewport. When disabled, all items set to render are evaluated. The Render toggle is defined in the item's Properties panel.
• Show Only Visible Items - when enabled, an item's contribution to the Preview window is determined by the visibility column of the Item List, where toggling the eye icon on or off changes the target item's preview visibility.
• Pause Render - when enabled, the Pause Render option stops the preview, at its current state with no further evaluations. When disabled, the preview render resets itself and begins evaluating a new image.
• Reset Render - does exactly as it states, resetting the Preview window, and refreshing the geometry cache and the GI cache if necessary, starting a new image.
• Progressive Render - Using these Progressive Render controls, you can Save the current state of the progressive render to disc for further evaluation at a later time.
WARNING: Files may be quite large depending on the scene.
The Load option loads any previously-saved progressive render states, and allows the continuation of the render when loaded. However, when reloading a progressive render state, the same scene must be loaded and active, and be in an identical state as to when the progressive render was saved. Even with these limitations, it can be quite useful when you need to stop a render in order to use the computer for another purpose but want to continue the rendering once the task is complete.
• Save Image - the Save Image command saves to disc the current state of the Preview window image to a variety of image formats.
• Save Layered Image - when enabled, you can simultaneously save all of the outputs in their current state into a single layered file in either the .psd or .exr formats. Each layer is named after the render output it represents.
• Update Under Mouse - concentrates the Preview window evaluations to the area under the mouse when it's moving, allowing you to control, in a way, what areas update first in any given preview. When the pointer is not moving or not over the Preview viewport, the standard random evaluation pattern is used, evenly spreading the CPU calculations across the image.
• Trackball Rotation - when the Full Resolution option is disabled, you can navigate a Preview window like any other standard 3D Viewport. Toggling the Trackball Rotation option enables/disables the function when navigating. Keep in mind that any navigation of the Preview viewport actually move the camera itself in 3D space.
• Tool Activation - allows you to toggle tool visibility in the Preview viewport. When the option is enabled, you are able to see tool handles directly in the viewport, which can be used to transform objects interactively. When disabled, tool handles are invisible and you aren't able to modify items interactively.
• Render Animation - opens a special animation saver called the Preview Animation Saver that allows you to leverage the Preview window rendering system to render out animations. You should note that it cannot be used to Render Passes, only the current pass is rendered. Otherwise, all the current settings of the Preview window are respected when rendering animations. Once started, a progressive render can only be aborted by pressing the Abort button in the progress bar, or by pressing Esc. The dialog has a few options:
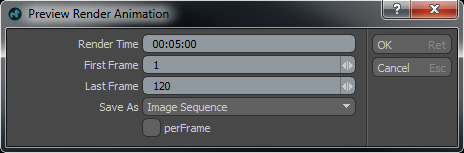
• Render Time - controls how long it takes to render an entire sequence and it evenly slices up the time between all frames, and progressively refines each frame until time is up (or the frame finishes, which can definitely happen if you're in Final or Draft mode). Instead of fiddling with settings to get a frame rendered within a specific time limit, specify in hours:minutes:seconds how long for Modo to spend rendering the entire sequence. So, if you have a 120-frame animation and you tell Modo you need a preview in 4 hours to show the director, then Modo spends 2 minutes on each frame doing the best it can in that amount of time.
• First/Last Frame - determines the frame range that is rendered.
• Save As - you can specify if the preview is saved as a Movie file or as individual frames in an Image Sequence.
• perFrame - with this option checked, the render time you specify refers to how much time Modo spends on rendering one frame.
To make it easier to find a particular surface, you may right-click over any area of the preview image itself, opening a pop-over menu, displaying all Shader Tree layers that contributed to the pixel directly under the mouse pointer when the right mouse button was pressed. Clicking on any of the layers in the dialog selects them in the Shader Tree.
![]()