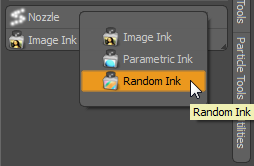
The Ink functions in Modo allow you to modulate brush strokes as they are applied, and are located in the Paint layout's Paint Tools and Sculpt Tools toolboxes. Image, Parametric, and Random Inks can affect colors when painting or the strength of sculpting tools. All three Ink modes can be utilized individually, or simultaneously in combination, to create interesting effects. To use, click and hold the Image Ink button in the interface, select the required Ink mode, and then adjust the settings in the viewport or properties panel as necessary.
![]() The Image Ink function allows you to place a bitmap image in the viewport (sort of like a floating window), and then using the brush to control the application, paint through the image, applying strokes to object surfaces. When Image Ink is first enabled, left-click in the viewport to activate the tool's widget.
The Image Ink function allows you to place a bitmap image in the viewport (sort of like a floating window), and then using the brush to control the application, paint through the image, applying strokes to object surfaces. When Image Ink is first enabled, left-click in the viewport to activate the tool's widget.
If an image was selected before this action, its height fills the viewport with the image. The widget has a number of handles represented as small circles that allow you to adjust the projection plane directly in the viewport. The center handle positions it, the right handle scales the widget, and the top handle rotates it. Left-click on a handle and drag to modify.
You can also use the keyboard shortcut E to rotate clockwise, and R to rotate counter-clockwise. Scaling is done by pressing D to go down and F to go up. Interactive scaling within the viewport is achieved with the Auto Scale option, retaining the scale of the widget over the geometry as the viewport scale itself is modified.
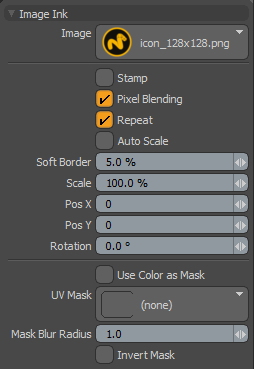
Image Ink also allows you to adjust standard controls for Scale, Rotate, and Position as well as a Soft Border percentage and other options, by selecting the options found in the tool properties viewport. You can gain quick access to tool properties by pressing K on the keyboard to activate the properties window.
|
Option |
Description |
|---|---|
|
Image |
Use the image loader to select and load images for use with the Image Ink function. |
|
Stamp |
When enabled, apply the entire selected Image in one quick stamp. This option requires the use of Projection Paint. This can be a very useful method for applying decal textures in very precise positions on a 3D mesh, as well as for stamping down texture elements such as scars. The stamp option can even be useful for quickly stamping down an image repeatedly to texture a model completely. By using some Soft Border and changing the rotation of the image, you can create very interesting texture effects quite quickly. |
|
Pixel Blending |
When enabled, smooth the image when it is scaled beyond its maximum native resolution, which can reduce visibly pixelated edged. |
|
Repeat |
When enabled, the image ink repeats continually once painting has extended beyond the image boundary. |
|
Auto Scale |
When enabled, scale the Image Ink frame relative to the viewport being scaled. Useful for applying a consistent texture across the surface of the model. Whenever you zoom in and out of the object, Auto Scale makes sure that relationship remains the same. |
|
Soft Border |
The Soft Border option is a percentage that creates an opacity ramp from the center of the Image Ink to the edges. As you paint through the image plane (Projection Mode), the Soft Border amount causes the edges to feather, creating a soft blend from the edge of the ink boundary. This is also very useful when working in Stamp mode. With a tiling image as your ink and a Soft Border value of approximately 50%, you can repeatedly stamp down a texture across the surface of the mesh to create very quick detail mapping. |
|
Scale |
Allows you to change the size of the image relative to the object in your viewport. Reducing the value results in the image appearing smaller relative to the model and increasing the value increases the relative scale of the image. When using Projection Paint, the scale handle is the square handle on the right-hand side of the image plane. |
|
Pos X/Y |
These two values represent the position of the center of the Image Ink frame within the viewport. Values are pixel coordinates, with 0,0 being the upper left corner. Each time the Image Ink function is activated, your image frame is centered within the viewport. You can also interactively position the image ink frame using the circle in the center. |
|
Rotation |
The Rotate value tilts the image. In the case of standard Fast UV painting, this is essentially rotating the image in UV space. With Projection Painting the image plane is rotated in screen space. The circle handle at the top of the image plane can be dragged right and left to adjust rotation interactively. |
|
Use Color as Mask |
When enabled, use the brightness (Luminosity) of the current Image Ink image as an alpha mask when painting onto the object. So instead of painting the image itself onto your object, the image becomes like a virtual silkscreen allowing the color of the brush to only go through the dark areas of the image. |
|
UV Mask |
Allows you to use a secondary image as a painting mask. The only requirement is that the masking image must use the same UV Map as the image being painted. For example, this allows you to bake an Occlusion map image and then use that as a mask to paint rust into the crevices of an old vehicle. |
|
Mask Blur Radius |
This option allows you to blur or soften the image applied as a UV Mask. The greater the value the softer the mask transition between light and dark. |
|
Invert Mask |
When enabled, invert the RGB or Gray values of the mask, reversing the application of the mask. Areas that were masked become paintable, and areas that were paintable become masked. |
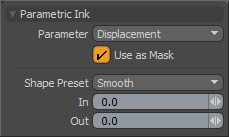
![]() The Parametric Ink function provides a method to modulate the ink between the foreground (FG) and background (BG) values based on parameters including Slope, Altitude, Incidence Angle, Pressure, and Tangent Pressure. The first four parameters are attributes of the surface on which you are painting and the last two are based on tablet input device feedback.
The Parametric Ink function provides a method to modulate the ink between the foreground (FG) and background (BG) values based on parameters including Slope, Altitude, Incidence Angle, Pressure, and Tangent Pressure. The first four parameters are attributes of the surface on which you are painting and the last two are based on tablet input device feedback.
|
Option |
Description |
|---|---|
|
Parameter |
The various parameter options allow you to choose how Parametric Ink modulates the painted brush stroke: • Displacement - Allows you to modulate between the foreground and background color based on the amount of displacement applied to a surface, providing you a means to paint in the cavities of surfaces. NOTE: When working with procedural texture displacement, you need to convert the procedural to an Image Map, using Modo's baking functions, to produce results with this option. • Slope - Changes the ink from the FG value to the BG value as the geometric normals change. If we look at a sphere in World Coordinates, the top of the sphere has normals that point directly upward, the bottom points directly down, and at the equator normals point straight out. These normals range from 0 to 90. • Altitude - Based on the bounding area of the mesh, the colors change using the FG color at the very bottom of the model and the BG color as you reach the top of the mesh. • Incidence Angle - This is the angle of the surface of the model as it relates to the viewport in which you are painting. Polygons that face the view shade using the FG color, where as polygon normals that are perpendicular to the view shade with the BG ink color. • Pressure - When painting with a tablet, 100% pressure uses the FG color for the ink. As you use less pressure, it fades to the BG color. • Tangent Pressure - This allows you to change between FG and BG colors by rotating the tablet stylus. |
|
Use as Mask |
When this option is enabled, a mask is generated and the Parameter control modulates the mask amount between masked and unmasked. |
|
Shape Preset |
Similar to the Smooth Brush option, Shape Preset allows you to fine tune the application of strokes when using the Parametric Ink function. You can select from the various presets, or adjust the In and Out values to further customize the brush shape. |
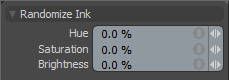
![]() The Random Ink option allows the paint tools ink color to randomly vary as you paint on the mesh. There are three input fields: Hue, Saturation, and Brightness. The default values of 0% result in no random variation to the ink. By increasing any of the values you can randomize the ink in one or more inputs. Setting any of these values to 100% causes the ink to randomly swing plus or minus 100% from its original value. Setting Brightness and Saturation 10-30% can be very useful when creating noise maps to rough up a surface.
The Random Ink option allows the paint tools ink color to randomly vary as you paint on the mesh. There are three input fields: Hue, Saturation, and Brightness. The default values of 0% result in no random variation to the ink. By increasing any of the values you can randomize the ink in one or more inputs. Setting any of these values to 100% causes the ink to randomly swing plus or minus 100% from its original value. Setting Brightness and Saturation 10-30% can be very useful when creating noise maps to rough up a surface.
|
Option |
Description |
|---|---|
|
Hue |
Modifying this value results in variations of color for the individual paint dabs when stamped onto the surface. 0% effectively disables this setting, ramping toward 100% with the maximum amount of Hue variation in the stroke. |
|
Saturation |
Modifying this value results in variations of color intensity for the individual paint dabs when stamped onto the surface. 0% effectively disables this setting, ramping toward 100% with the maximum amount of Saturation variation in the stroke. |
|
Brightness |
Modifying this value results in variations of luminosity for the individual paint dabs when stamped onto the surface. 0% effectively disables this setting, ramping toward 100% with the maximum amount of Brightness variation in the stroke. |