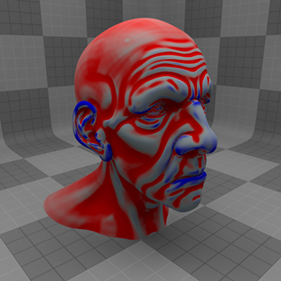
The RT Curvature shader is a fast and robust method of shading surface discontinuity. This type of shading is most useful in enhancing surfacing details, both modeled and that which is added by displacement. The shading can be enhanced further when used to modulate other types of shading effects. The produced result is similar to a dirt or an accumulation shader that limits shading to recessed (concave) or exposed (convex) areas of a surface, and its really fast. It works by analyzing the surface in screen-space (whats visible to the viewer) recovering the normal information and then building the shading sample off the defined thresholds. This method of calculation is much faster than fully three dimensional solutions and more robust than strictly 2D solutions.
The RT Curvature shader works by applying the gradient values designated in the shader's properties. The outside ends of the gradient terminate in the concave and convex areas of the surfaces topology. The degree of its application can be modified with the Support Size and Magnitude controls. For best results, the shader should be applied to surfaces with visible details, plain, smooth surfaces, especially those of the basic primitives offer too little topology changes for interesting shading results. Also, the shader is extremely sensitive to surface normal changes and may reveal the individual polygons, this can be reduced or eliminated by increasing the subdivision level of the geometry, or by increasing the Coefficient Antialiasing value of the shader.
Curvature can be used to apply color directly, but it is more often used as a mask for other shading layers.
NOTE: For information about adding and working with Shader Tree item layers, see the Shader Tree topic.

|
Option |
Description |
|---|---|
|
Layer |
|
|
Enable |
Toggles the effect of the layer on and off to duplicate the functionality of toggling visibility in the Shader Tree. When disabled, the layer has no effect on the shading of the scene. However, Modo saves disabled layers with the scene, and they are persistent across Modo sessions. |
|
Invert |
Inverts the colors (RGB values) for the layer to produce a photonegative effect. |
|
Blend Mode |
Affects the blending between different layers of the same effect type. With this, you can stack several layers for different effects. For more about blending, see the Layer Blend Modes topic. |
|
Opacity |
Changes the transparency of the current layer. Reducing this value increasingly reveals lower layers in the Shader Tree, if present, or dims the effect of the layer, itself, on the surface. |
|
Locator |
Sets the association for the Texture Locator. Most texture layers have a Texture Locator that Modo automatically creates in the Item List. This defines the mapping of the texture (how Modo applies the texture) to the surface. You can specify alternate locators, but the need to do so is rare. Still, you may want multiple texture items to share a single locator. |
|
RT Curvature |
|
|
Antialiasing |
Used to multi-sample the curvature shading results, producing a smoother blending between the contours, especially useful for surfaces where the shader tends to highlight the polygons of the underlying geometry. When enabled, the antialiasing is sampled based on the Coefficient Antialiasing setting. When disabled, no antialiasing is calculated. |
|
Coeff Antialiasing |
Determines the scale of the antialiasing when enabled. Larger values produce smoother shading results. |
|
Support Size |
Determines the rough scale of the maximum surface features size used to calculate the curvature shading. You should set this setting to the same approximate scale as the size of the surface details that you need to highlight. |
|
Magnitude |
The absolute maximum curvature value used to compute the curvature amount. Higher values produce sharper contrasts across the shading of opposing surface details, while lower values produce smoother, broader shading. |
|
Edit Gradient |
Opens a full-sized Gradient Editor for creating or refining the target gradient at a larger size. With a default Gradient view, you need to create the target values in between the 0.0 and 1.0, with the 0.0 position terminating on the outermost convex area attenuating toward the 1.0 position terminating at the innermost concave areas. |
|
Gradient Value/Color |
Inline mini gradient editors allowing you to define gradient value keys easily without having to leave the basic Modo interface. Much in the same way as a keyframe stores transform values for items, gradient keys store colors or values and softly attenuate between the defined key positions. You can add keys by middle-clicking along the gradient and then click and drag the key up or down, adjusting the value at that position. The gradient bar directly underneath provides a visual reference to the values being generated by the gradient itself. In the Color gradient, clicking the color wheel icon allows precise input of color values using the standard Modo color picker. The left side of the gradient editor terminates on the outermost convex area attenuating toward the right-hand side of the gradient terminating at the innermost concave areas. |