The Tension texture is a special case gradient that changes a surface's colorization or value based on the amount of deformation applied to it. This is done by either calculating the difference of angle between each polygon's deformed and undeformed states, or its difference in area. The color or value amount that is applied depends on the degree of change, correlating the computed value to a position along the defined gradient. You can add a number of interesting effects to deformed meshes, most obviously applying wrinkles to the interior areas of a deformed joint. You can add the texture to the surface in the Shader Tree under Add Layer > Processing > Tension Texture menu. Once added, you can modify its effect, directing how the tension shading is applied.
NOTE: For information regarding adding and working with Shader Tree item layers, see the Shader Tree topic.
It's not possible to cover every conceivable use case for the Tension texture, however there are a couple of compelling and common uses that may not be directly obvious as to how to set them up. The first case controlling displacements using the Tension texture in the Shader Tree to mask off a displacement layer. This is accomplished by following these steps:
| 1. | First add a new Material Group Item and place it inside the same material group as the surface it is meant to displace. |
| 2. | Within that new material group, place the Tension texture and the displacement texture. The displacement layer can be a procedural texture, or a sculpted displacement or a vector displacement map. |
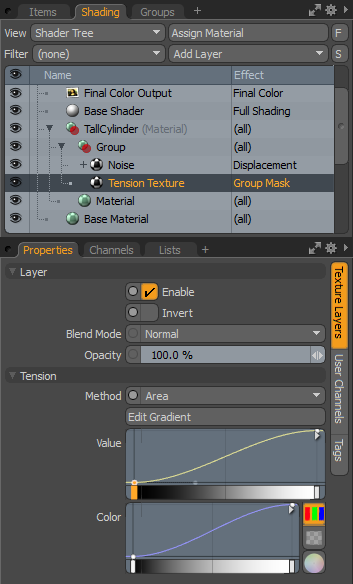
| 3. | Next, change the Effect column of the Tension texture to Group Mask, meaning that any and all layers inside that specific material group are further limited by the masking of the Tension layer. |
| 4. | The next step is setting keys on the Tension texture layer. Since the Group Mask effect is looking for a value, and not a color, the input gradient that needs to be modified. Middle-click the Value input gradient to define a key, then drag the resulting key up or down with the left mouse button to set its value. |
Dragging all the way downward sets its value to zero. Now deforming the target surface with a deformer (it can't be a modeling deformation applied in one of the component modes) shows the displacement effect only in the created areas of the deformation. You may need to adjust the defined key position to produce the desired results.
TIP: A useful troubleshooting tip is to change the Tension layer's Effect to something more easily visible in the Preview window to adjust its values more easily, such as Diffuse Amount, and then switch back to Group Mask for the finalized effect.
Another compelling use is to mask a multiresolution sculpting layer, but this requires a little more Modo knowledge as it is setup using the Schematic viewport. Follow the steps below:
| 1. | In the Sculpt viewport (found in the Paint workspace layout), select the sculpting layer that is masked by the Tension texture and right-click to open the contextual menu and then select the Add Modifier option. This adds a Channel Modifier item to the Mesh Item that can be used to drive its application using falloffs, or in this case a Shader Tree layer. |
| 2. | Next the Tension texture is added to the Shader Tree within the material group for the surface it is going to be affecting. |
| 3. | Both of these items, the resulting Channel Modifier (found under the Item in the Items list) named after the sculpting layer it originated from, and the Tension textures need to be added to the Schematic viewport. |
You also need to add in the Opacity channel for the Channel Modifier if it isn't added automatically.
| 4. | Now connect the Texture Value output on the Tension texture to the newly added Opacity channel input on the modifier. |
| 5. | Set the key on the Tension texture layer in the Shader Tree. The Channel Modifier input is looking for a Value input, so that is the input gradient that needs to be modified. You can middle-click in the middle of its Value input gradient to define a key then drag the resulting key up or down with the left mouse button to set its value. |
Dragging all the way downward sets its value to zero. Now deforming the target surface with a deformer (it can't be a modeling deformation applied in one of the component modes) should show the sculpting layer only in the creased areas of the deformation. You may need to adjust the texture's key positions to produce the desired results.
TIP: A useful troubleshooting tip is to change the Tension layer's Effect to something more easily visible in the Preview window to adjust its values more easily, such as Diffuse Amount.
|
Option |
Description |
|---|---|
|
Layer |
|
|
Enable |
Toggles the effect of the layer on and off to duplicate the functionality of toggling visibility in the Shader Tree. When disabled, the layer has no effect on the shading of the scene. However, Modo saves disabled layers with the scene, and they are persistent across Modo sessions. |
|
Invert |
Inverts the colors (RGB values) for the layer to produce a photonegative effect. |
|
Blend Mode |
Affects the blending between different layers of the same effect type. With this, you can stack several layers for different effects. For more about blending, see the Layer Blend Modes topic. |
|
Opacity |
Changes the transparency of the current layer. Reducing this value increasingly reveals lower layers in the Shader Tree, if present, or dims the effect of the layer, itself, on the surface. |
|
Locator |
Most texture layers also have an associated Texture Locator that is automatically created in the Items list. This defines the mapping of the texture to the surface. The Locator option sets that association. You can choose alternate locators, however, the need to do so is very rare; still, there are some possible instances where you may want multiple texture items to share a single locator. |
|
Tension |
|
|
Method |
Determines the way the polygon deformations are evaluated. The Angle option bases the shading by the amount of shearing, the rotational difference between the deformed and undeformed states. The Area option is based on the change in size between the deformed and undeformed states, which allows for both negative and positive value inputs with negative evaluations for getting smaller and positive for getting larger. |
|
Value/Color |
Inline mini gradient editors allowing you to define gradient value keys easily without having to leave the basic Modo interface. Much in the same way a keyframe stores transform values for items, gradient keys store colors or values and softly attenuate between the defined key positions. You can add keys by middle-clicking along the gradient and then clicking and dragging the key up or down, adjusting the value at that position. The gradient bar directly underneath provides a visual reference to the values generated by the gradient. In the color gradient, pressing the color wheel icon allows you to input precise color values using the standard Modo color picker. The evaluated amount of difference between the deformed and undeformed polygons is correlated to a position along the gradient and that correlated point is applied as shading to the surface. |