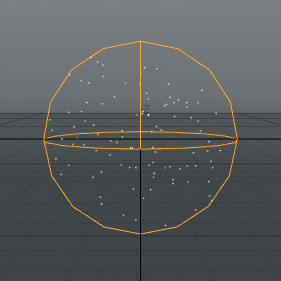
The Particle Cloud item generates a randomized array of single vertices. Points won't render by themselves, however, they can be used as a point source for a variety of items, such as for Blobs, Sprites and Volumes, or when working with Replicators. Animation can be added to the particles within the cloud by adding gradient controls over times (keyframes) with the Scattering function.
You can add a Particle Cloud item simply by using the Add Item function in the Items list. Left-click on the button to open the menu, then select the Particles > Point Clouds > Particle Cloud option. Once added, you can then specify the item from the Point Source, or Particle Source options from within the appropriate properties panel of the related function.
|
Option |
Description |
|---|---|
|
Name |
This data field displays the current item name. Users may easily change it by left-clicking within the field and typing the new name. |
|
Transform |
|
|
Position |
An Item transform that allows the user to numerically position the item in XYZ space. |
|
Rotation |
An Item transform that allows the user to numerically set the rotation of the item. Rotation transforms originate from the Position value. |
|
Order |
Allows the user to set the order that rotations are applied to the camera item. Changing the order that rotations are applied can sometimes help to reduce or eliminate gimbal lock. |
|
Scale |
An Item transform that allows the user to numerically set the size of the item. Scale transforms originate from the Position value. |
|
Reset |
Resets the selected transform values to (0,0,0) returning the items back to their default state. |
|
Zero |
Resets the chosen transform property values to '0', leaving the Center position and Mesh position intact. This is done by adding a negative transform item to the Mesh items channels. |
|
Add |
Transform Items are the channel groups associated to an item that store its transform values, controlling its position, rotation and/or scale. By default, new items do not have any transform items associated with them (even though they are visible here within the Properties panel). This is useful as an optimization as only the necessary transforms are added on an as-needed basis, reducing scene overhead. There are several ways to add them. One is by simply transforming the target item with one of the various transform tools (or by editing the values input fields). This action causes the particular transform item to be added automatically to the 'Channels' viewport list. The 'Add' function here can also be used to add the selected set of transforms to the Channel list while keeping the default 0,0,0 values (a necessary step for 'Referencing', in order to override the channels, they must first exist). |
|
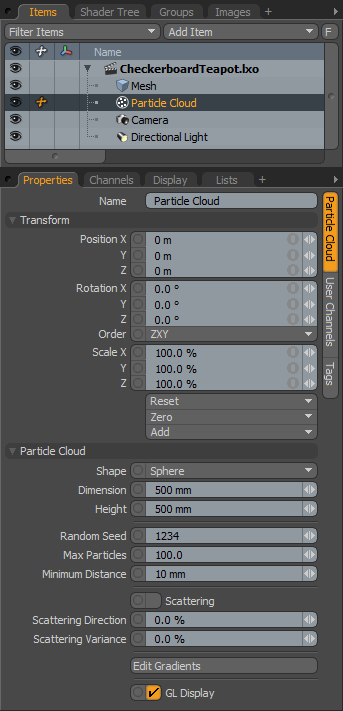
Particle Cloud |
|
|
Shape |
Determines the overall shape of the containing volume for the particles, either a Sphere, Cube, or Cylinder. |
|
Dimension |
Determines the size of the volume as a radius, so a 500 mm Dimension would produce a 1m wide container volume for the particles. |
|
Height |
When the Cylinder option is selected, the Height value determines the overall length of the cylinder shape. |
|
Random Seed |
The Random Seed value is the initial number used when generating the random procedural values. Each Seed produces different random results. |
|
Max Particles |
Determines the maximum number of total particles generated within the volume. |
|
Minimum Distance |
Determines the minimum amount of distance between two particles within the volume. |
|
Scattering |
The Scattering option is provided to allow for simple animation of the particles. When enabled each individual particle is scattered in a random direction, based on the Scattering Direction and Scattering Variance values. In order to see any changes in the 3D Viewports, it is necessary to keyframe some values using the Edit Gradients option. |
|
Scattering Direction |
The Scattering Direction option provides some additional control of the overall random distribution of the particles. |
|
Scattering Variance |
The Scattering Variance option controls how much variation there is in distance when the particles are scattered. Higher values move some particles further from the volume than others, while smaller values tend to scatter particles in more uniform distances. |
|
Edit Gradients |
Clicking the Edit Gradients button opens a Gradient Editor window, allowing you to set up gradient controllers for Particle density within the cloud as well as the Scattering Distance. |
|
GL Display |
Toggles the visibility of the 3D Viewport proxy representation. Enabled (visible) by default. |