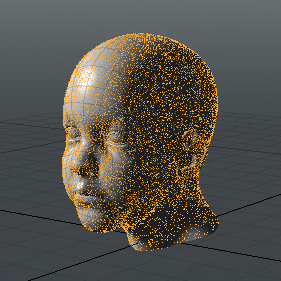
The surface particle generator produces similar results to the Shader Tree Surface Generator, in that it is used to scatter vertices (particles) across a specific item or surface. However, the particle generator is evaluated at the scene level making it more flexible and faster. The resulting particles can then be used as a point source for Blobs, Sprites, Volumes,Replicators and when working with Texture Locator items.
NOTE: Since the surface particle generator is scene-evaluated, it doesn't take rendering effects, such as displacements applied to the surface into consideration; in that case you need to apply a surface generator.
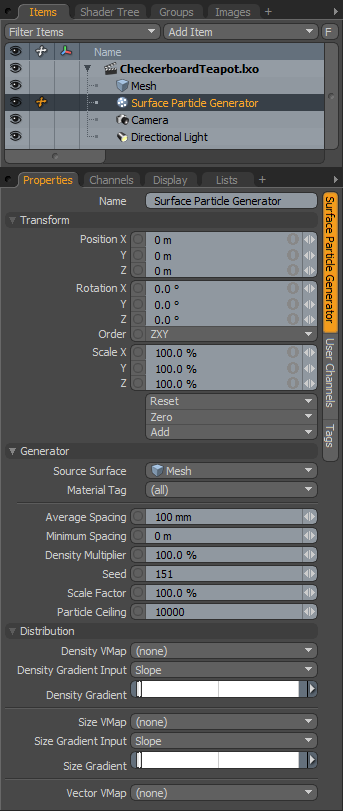
You can add a surface particle generator item in the Items list, by clicking Add Item > Particles > Surface Particle Generator. Once added, you can specify the target geometry using the Source Surface option. The Material Tag option further limits the particles to specific areas of a Mesh Item.
|
Option |
Description |
|---|---|
|
Name |
Displays the current force item name. To change it, click on the field and type in the new name. |
|
Transform |
|
|
Position |
An item transform that allows you to numerically position the item in XYZ space. |
|
Rotation |
An item transform that allows you to numerically set the rotation of the item. Rotation transforms originate from the Position value. |
|
Order |
Allows you to set the order that rotations are applied to the item. Changing the order that rotations are applied can sometimes help to reduce or eliminate gimbal lock. |
|
Scale |
An item transform that allows you to numerically set the size of the item. Scale transforms originate from the Position value. |
|
Reset |
Resets the selected transform values to (0,0,0) returning the items to their default state. |
|
Zero |
Resets the chosen transform property values to 0, leaving the center position and mesh position intact. This is done by adding a negative transform item to the Mesh Item's channels. |
|
Add |
Transform items are the channel groups associated with an item that store its transform values, controlling its position, rotation and/or scale. By default, new items do not have any transform items associated with them (even though they are visible here within the Properties panel). This is useful as an optimization, as only the necessary transforms are added on an as-needed basis, reducing scene overhead. There are several ways to add them. One is by simply transforming the target item with one of the various transform tools (or by editing the values input fields). This action causes the particular transform item to be added automatically to the Channels viewport. The Add function can also be used to add the selected set of transforms to the Channel viewport while keeping the default 0,0,0 values (a necessary step for referencing, in order to override the channels, they must first exist). |
|
Generator |
|
|
Source Surface |
Specifies an item within the scene to apply the particles over its surface. This is the equivalent of an item mask in the Shader Tree. |
|
Material Tag |
This option allows you to further limit the application of the particles by specifying a surface definition from the drop-down menu. This is the equivalent of a material mask in the Shader Tree. |
|
Average Spacing |
Specifies the average distance between particles. |
|
Minimum Spacing |
Specifies the minimum amount of space between replicated items, especially useful in eliminating overlaps for neighboring replicas when used as a Replicator source. |
|
Density Multiplier |
Offers simplified control over the overall density of replicated items. Lower values reduce the overall number of replicas while higher values increase the overall number of replicas up to the Particle Ceiling value. |
|
Seed |
An initial setting used when random numbers are generated. Different Seed values produce different random variations, in this case, initial particle positions. However, you can use the same Seed value when it is necessary that items retain the same variations. |
|
Scale Factor |
Controls the scale of replicated objects, eliminating the need to manually scale the base prototype item. With a value of 100%, replicated items are generated at the identical size of the prototype, smaller values decrease each replica's size, while larger values increase each replica's size. |
|
Particle Ceiling |
A maximum for the total number of generated particles. |
|
Distribution |
|
|
Density Vmap |
You can create an embedded Weight Map on the target surface and use its values to control the density of the particle distribution, eliminating the need to create custom image maps to do so. Any available Weight Maps can be selected from this drop-down, assigning it to control the density as a multiplier over the regular density. A weight value of 1 (100%) is the normal density, attenuating toward a weight value of 0 at 0% density. Weight values can also go above 1 for added density control. |
|
Density Gradient Input |
Defines an input criterion that is used to additionally control the density of the resulting particles. With the input defined, the actual Density Gradient defines the density amount. |
|
Density Gradient |
Using a mini-gradient input, the density can be modified with gradient keys that represent a percentage of the original density. Much like how a keyframe defines a value in time, these keys represent a value across the selected input parameter (such as over the angle of Slope). You can add keys by middle-clicking along the length of the gradient input and then clicking and dragging the key icon up or down, adjusting the value. The grayscale bar directly below gives visual feedback as to how the values fade from one key to the next; white produces 100% density attenuating toward black at 0% density. Opening the Gradient Editor allows you to go above 100%. |
|
Size Vmap |
You can create an embedded Weight Map on the target surface and use its values to control the scale of the elements connected to the generated particles, eliminating the need to create custom image maps to do so. Any available Weight Maps can be selected from this drop-down, assigning it to control the scale as a multiplier over the regular sizing. A weight value of 1 (100%) is the normal scale, attenuating toward a weight value of 0 at 0% scale. Weight values can also go above 1 for greater than 100% scale control. |
|
Size Gradient Input |
Defines an input criterion that is used to additionally control the scale of the elements connected to the generated particles. With the input defined, the actual Size Gradient defines the scaling amount. |
|
Size Gradient |
Using a mini-gradient input, the scale can be modified with gradient keys that represent a percentage of the original scale. Much like how a keyframe defines a value in time, these keys represent a value across the selected input parameter (such as over the angle of Slope). You can add keys by middle-clicking along the length of the gradient input and then clicking and dragging the key icon up or down, adjusting the value. The grayscale bar directly below gives visual feedback as to how the values fade from one key to the next; white produces 100% scale attenuating toward black at 0% scale. |
|
Vector Vmap |
You can create an embedded vertex vector map on the target surface and use its values to control the orientation and scale of the elements connected to the generated particles, eliminating the need to create custom image maps to do so. This allows you to use the sculpting tools, like with hair guides, to intuitively control the replicated elements. NOTE: Elements controlled by vector Vertex Maps automatically adapt to surface deformations, as the vector maps are defined in tangent space. |