Effectors are a means to affect a target item, generally a mesh layer, to deform it in specific ways. The Slack Effector, when assigned to an item, deforms the target as if it were suspended between two points. As the two points move closer together, the deforming element in between sags and droops but retains its overall initial length. For example, consider a rope holding a boat to a dock. As the boat drifts back and forth the rope droops and stretches between the boat and the dock, but it always retains its overall length.
You can add an Effector by using the Item List's Add Items command, but it won't produce the intended result because it only places the Effector in the Items list. For proper results, you must connect the Effector to the mesh layer by way of a General Influence. The General Influence acts upon the mesh, and the Effector, itself, produces the instructions on how the Influence should modify its target.
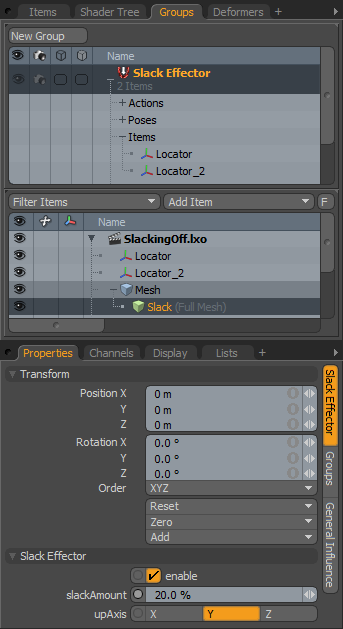
To deform items with a Slack Effector, you need to set it up properly beforehand to produce the intended result. First, the target item should be long and skinny in nature (such as a rope, a bar, or a chain with links) and be a single Mesh Item layer aligned with one of the three axes (X, Y, or Z). Second, position two additional Locator Items at each end to represent the start and end of the mesh. To automatically connect the Effector to the target, select it in the Items list and then right-click and choose Add Deformer > Effectors > Slack Effector. Modo creates the Effector as a special group (not as an Item in the Items list). Next, select the Slack Effector Group and the two previously created Locators. right-click the Slack Effector Group name and choose Add Items. Once you add the Locators to the Group, the Slack Effector immediately affects the target mesh. You can adjust the attributes in the Properties viewport panel.
Name: Displays the current item's name. You may change the name by clicking the current name and typing a new name.
Position XYZ: Indicates the numerical position of the Effector item in XYZ space. These have no effect upon the resulting deformations.
Rotation XYZ: Indicates the rotation of the Effector item numerically. These have no affect upon the resulting deformations.
Order: Indicates the order that Modo applies rotations to the Effector item.
Scale XYZ: Sets the size of the item's representation in the 3D Viewport numerically. These have no affect upon the resulting deformations.
Reset: Resets the selected transform values to (0,0,0) and returns the item to its default state.
Zero: Resets the selected transform property values to 0 but leaves the item's position and the mesh position intact. Modo does this by adding a negative transform item to the Mesh Item's channels.
Add: Adds a Transform item to control an item's position, rotation, or scale. By default, new items do not have any transform items associated with them (although they are visible within the Properties panel). Only add the necessary transforms on an as-needed basis to reduce scene overhead. You can also use this Add function to add a selected set of transforms to the Channel list while keeping the default 0,0,0 values, which is necessary for Referencing. (To override channels, they must exist.)
Enable: Toggles the effect of the layer on or off. When clear, the layer has no influence on the scene. However, Modo saves disabled layers with the scene and their values are persistent across Modo sessions.
Slack Amount: Determines the amount of droop or sagging between the two Locators. You can move the end Locators to increase or reduce the amount of drooping or sagging.
Up Axis: Specifies which axis (and direction) that Modo should use to apply the deformations. Gravity always pulls downward in the real world (the Y axis in Modo space), but not all scenes are meant to simulate the real world.