Command regions allow you to execute commands or scripts and to select other items in the scene by clicking on areas of a mesh. Command regions are defined from a selection of polygons on a Mesh Item and can be assigned a color to help identify them in the 3D views.
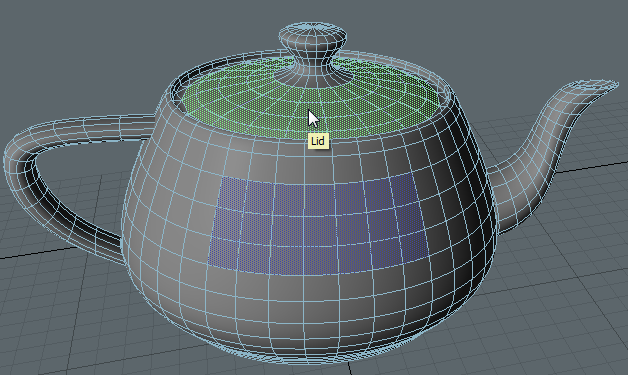
Command regions are always visible in Polygon Selection mode, but in Item Selection mode, they are only drawn when the pointer moves over the mesh they belong to. Holding the pointer over a region in Item Selection mode displays the command region's name in a tooltip.
|
|
|
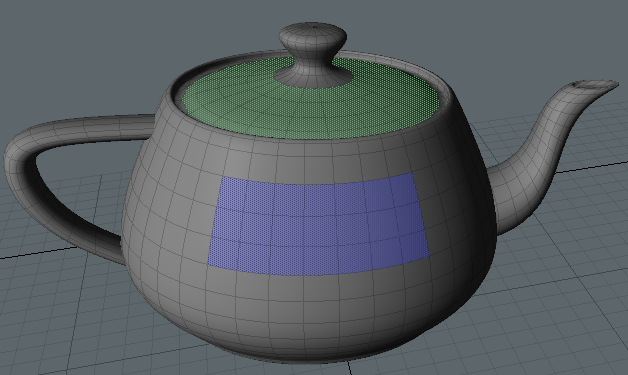
| Command regions in Polygon Selection mode. | Command regions in Item Selection mode. |
The first step is to select the polygons to include in the region in Polygon Selection mode:
| 1. | Make sure you're in the Setup layout, so that the Command Regions controls are displayed on the left of the viewport. |
| 2. | Enable Polygon Selection mode in the viewport by navigating to Select > Polygon in the menu bar, clicking the Polygon Selection mode icon, or pressing 3 on your keyboard. |
| 3. | Select the polygons you intend to assign as a command region. |
TIP: Don't worry if you miss a few polygons, you can add them to the command region once it has been created. See Editing Command Regions for more information.
| 4. | In the Command Regions tab, click Assign Command Region. |
The Assign Command Region dialog displays.
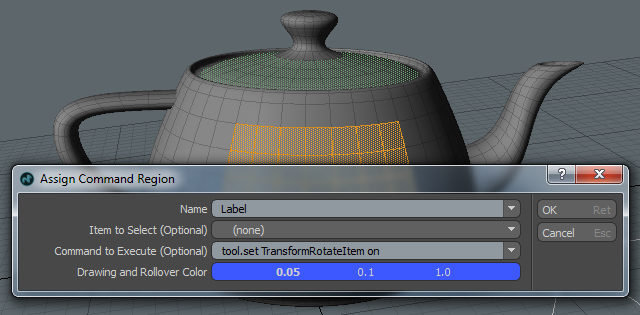
| 5. | Enter the required information into the dialog: |
NOTE: Although Item to Select and Command to Execute are optional, you must use one or the other to successfully create a Command Region.
• Name - Enter a descriptive name for the new command region. The name must be unique on the Mesh Item that the polygons belong to. A dropdown to the right of the Name field lists all the names currently assigned to command regions on the mesh - if a name is chosen from this menu, you must edit it so that it is unique.
• Item to Select - An optional item to select can be chosen from the dropdown. This item is then selected before any command or script is executed. There are a few restrictions on which items can be selected by command regions:
• The item must have a unique name. The automatic names given to items by Modo are not allowed, including numeric suffixes added by Modo.
• The Mesh Item the polygons belong to cannot be used. This item may be displayed in the dropdown menu as it's impractical to exclude it, but an error is displayed if it is selected.
• Command to Execute - Specifies an optional command or script. The dropdown to the right of the field lists a few common commands followed by all the commands currently assigned to command regions on the mesh.
TIP: To run a script, rather than a command, prefix the script name with @.
• Drawing and Rollover Color - Select a color to draw the command region and its rollover highlight. Clicking on the color control opens a color picker.
| 6. | Click OK to assign the selected polygons to the command region. |
A confirmation dialog displays.
| 7. | Take a moment to confirm your choices and then click Yes to create the command region. |
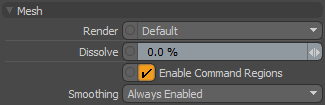
Command regions are enabled by default, but you can disable a mesh's regions using the Properties > Enable Command Regions control.
Once you have assigned one or more command regions, you can edit them using the controls in the Command Regions tab to the left of the viewport.
You can select regions manually in the viewport or, by selecting the Mesh in the Items tab to the right of the viewport, you can use the Select by Name button in the Command Regions controls to automatically select, deselect, or invert a selection within a region.
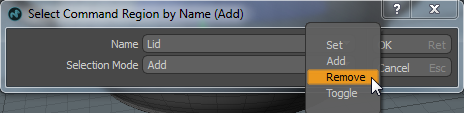
The buttons under Select by Name provide the same options:
|
Icon |
Name |
Description |
|---|---|---|
|
|
Select Set |
Selects all polygons belonging to command regions that have polygons in the current selection. Those that were not assigned to a command region are dropped from the selection. |
|
|
Select Add |
Selects all polygons belonging to command regions that have polygons in the current selection, keeping any other polygon selections. |
|
|
Select Remove |
Removes all polygons from the selection that are assigned to command regions. |
|
|
Select Toggle/Invert |
Selects all polygons belonging to command regions that have polygons in the current selection, dropping the original selection. Selected polygons which do not belong to a command region are not affected. |
Polygons can be added to existing command regions or reassigned to a different region by clicking Add from Selection.
| 1. | Select the polygons that you want to add or reassign along with one or more polygons belonging to the target command region. |
| 2. | Click Add from Selection. |
The new polygons are added to the target region.
If there are polygons in the selection belonging to multiple regions, the polygons are added to the first region selected and a dialog displays, asking if the other polygons should be overwritten.

| 3. | Click OK to proceed or Cancel to abort the operation. |
Polygons can be removed from a region by manual selection or by region name:
• Select the required polygons from all regions and click Clear from Selection, or
• Click Clear by Name and select the region name to remove.
NOTE: Clear by Name removes the entire region, rather than a subset of polygons from within the region.