The Tube primitive provides a simple method for creating spline curve-based tubes. Using the Tube primitive you can quickly click down a number of control points and Modo creates a tube, based on the spline curve interpolated through them.
The following Tube options are available for editing the primitive created:
|
Tube |
|
|---|---|
|
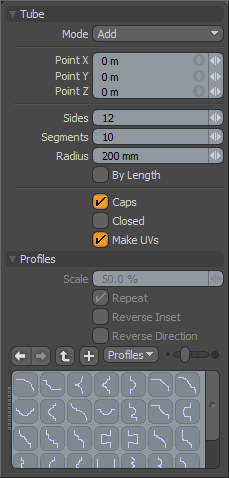
Mode |
In Add mode (default), each click on the 3D Viewport creates a new control point in the tube. Clicking on an existing control point allows you to move it freely in space. To add a new control point between two existing points, select the first point of the desired pair, then click between them. Edit mode disables the ability to create new control points, so that existing control points can be edited quickly without the concern of accidentally adding a new control point. The Delete mode removes control points when directly clicked on. |
|
Point X, Y, Z |
This value triplet is set interactively as you drag a control point in the 3D Viewport. If you wish to set a control point to a very specific location you can also use the tool property sheet to enter the X, Y, and Z coordinates directly. |
|
Sides |
This value determines how many polygons (sides) are used to make the ring of the tube. If you use a low number such as 3, you would create a triangular tube, whereas a higher number such as the default 12, would create a very round tube. If you plan to use subdivision surfaces on the tube, once it is created, you can lower the number of sides to 4 or 5, and the resulting mesh is still very smooth (once subdivision surfaces are active). |
|
Segments |
This value determines the number of polygons that are used to span the gap between each control point. If you set this value to one, you may see that the tube looks very linear, as there are not enough connecting polygons to interpolate a smooth curve. Lower numbers, such as one or two, can work if you plan to use subdivision surfaces after creating the tube. Using larger numbers creates a smooth flowing tube, at the expense of additional geometry. |
|
Radius |
This value sets the thickness of the tube. It's important to keep in mind that if you plan to use subdivision surfaces, the resulting mesh is somewhat smaller than the original cage polygons. In this case, you may wish to increase the radius prior to completing the tube, so that when you activate subdivision surfaces, the resulting mesh maintains your intended thickness. |
|
By Length |
When enabled, tube sections are recomputed as equal lengths across the curve, rather than by the control point locations. |
|
Caps |
Determines whether or not the ends of the tube are closed. By default, this setting is turned on so that the tube is closed on both ends. You can remove the caps by turning this button off. |
|
Closed |
Activating the Closed flag creates a curve loop, rather than a curve line, so that the resulting tube has its first and last points connected together using another set of segments. |
|
Make UVs |
When this button is active, a UV map is automatically generated for the geometry created with the tool. This is a very useful option if you plan to UV map the model you are creating from the primitive, as it provides a baseline UV map that you can massage later in the modeling process. In many cases, this can reduce the amount of work required to map the model. |
|
Profiles - Additionally, there is a mini-Preset Browser for viewing various profiles. It works the same as the Preset Browser. Profiles, when selected, apply themselves along the length of the tube. The following Profiles options are available: |
|
|
Scale |
With this setting, you can adjust the size of the profile applied to the tube primitive. |
|
Repeat |
When this option is toggled, it enables/disables the repeating of the profile between each curve point. |
|
Reverse Inset |
This option toggles the inset direction of the profile, reversing it horizontally. Areas that were initially pushed in, when activated, are pushed out. |
|
Reverse Direction |
This option toggles the direction of the profile, reversing it vertically, providing a flipped orientation for the profile. |