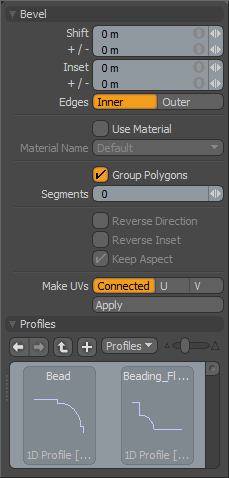
The Bevel tool performs a shift and inset on the selected polygons. Shift pushes the polygons away from their starting positions, and Inset scales the polygons. New polygons are created to bridge the gaps that would be left by moving the original polygons from their starting positions.
|
Option |
Description |
|---|---|
|
Bevel |
|
|
Shift/Inset |
Both Shift and Inset accept positive or negative values. When the values are positive Shift and Inset work as described above. When the values are negative, Shift moves the original polygons back behind their original location and Inset scales the polygons to be larger than their original size. Each of the Shift and Inset values can be edited by hauling in the 3D Viewport, dragging tool handles, or by using the HUD sliders (HUD sliders require advanced handle viewing to be active). You can also edit these values numerically on the tool properties sheet. |
|
+/- |
Under Shift and Inset this field allows you to set a random value range for the Shift and Inset value. If you have a Shift value of 1 meter and a +/1 value of .5 meters, the resulting bevel(s) are between .5 and 1.5 meters. This can be useful when beveling many polygons simultaneously. |
|
Edges (Inner/Outer) |
This toggle option determines whether the resulting polygons are created in such a way as to allow them to fall inside the original polygons boundaries, or so that they are outside the original polygon. The default, Inner, is the preferred choice for most bevel scenarios. The Outer option is very useful when beveling polygons that are not attached to other polygons. The classic example of using the Outer option is for beveling text. In this case you may want the original text polygons to maintain their scale, but would like to bevel an edge outside the original polygons. |
|
Use Material |
This option also enables the Material Name field. When this option is active, any new polygons created by the bevel tool have this Material Name assigned to them. |
|
Group Polygons |
This simple toggle provides a quick method for beveling contiguous polygon selections essentially treating the entire selection as a single polygon. This is incredibly useful for adding fine fillets around selections by creating a series of bevels. |
|
Segments |
This specifies the number of edge segment along the bevels shift direction. If it is 0 and a 1D profile is selected, the bevel tool automatically decides the best adaptive segments for the profile. |
|
Reverse Inset |
If this option is enabled, Inset is reversed. |
|
Keep Aspect |
When enabled, Keep Aspect automatically sets the Inset value based on the aspect ratio of the profile. |
|
Make UVs |
This control allows you to choose three UV creation methods. The default, None, creates the UVs for the new faces inside the existing UV coordinates attempting to bevel the UV data along with the mesh. The U and V options create a completely new set of UV data in the negative UV coordinates with the newly created polygons fanned out in the user selected axis (U or V). These options can be tremendously useful when beveling the geometry results in overlapping UV data, as it creates a more manageable starting point for the UV set. |
|
Profiles |
|
|
Mini Preset browser for viewing various profiles. Works the same as the standard Preset Browser. |
|