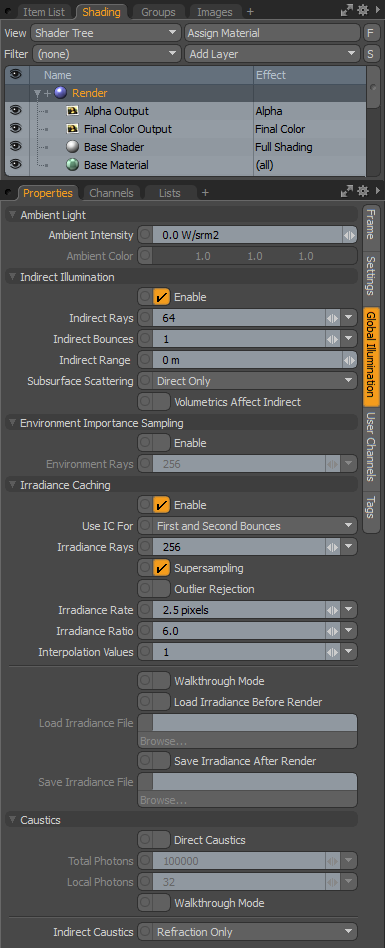
The Render item's Global illumination tab allows you to adjust render settings specific to global illumination, a rendering technique that utilizes bounced light to produce incredibly realistic rendered images.

The following Ambient Light options are available:
• Ambient Intensity: Adds an even illumination globally to all diffuse surfaces in a scene. This is most useful for simulating additional bounces of light. Some 3D artists recommend driving this value very low or off altogether and favor adding more complex lighting scenarios or using actual global illumination bounces to achieve adequate light fill. However, using a little ambient light can be a very useful optimization to any scene; if setup properly, it can look very natural and at very little cost in render time. Especially when compared to additional lights and indirect illumination bounces.
The ambient intensity control is a real world radiance value for lighting simulation, and simply acts as a multiplier for the ambient color. You can change it to show luminance units (candela per square meter) in the Drop Mappings. Start with the default value of .05 W/srm and then work the value up or down until the desired lighting result is achieved.
• Ambient Color - This function allows you to specify a color value for the global light added by the Ambient Intensity setting. Choosing a good ambient color and intensity is very important when using the Ambient Intensity feature. If you consider that this setting is trying to simulate the effect of the accumulation of all the scattered light rays in a project, it is easier to imagine how to choose the color and intensity. To assist the color selection, you can decrease the Ambient Intensity to zero and render your image. Look at all the pixels and their brightness and think about what the average overall tone or color is. That color is what you should choose for the Ambient Color control.
The next section contains the Indirect Illumination options.
Traditionally, 3D rendering applications have used direct light sources to illuminate a scene, various virtual lights would be defined, such as spot light or a point light, and rays could be traced from their origin. Based on their position, it was simple to calculate if a surface was illuminated or in shadow. This rendering method was fast and accurate but didn't produce the most realistic results. Light in the real world isn't static, but actually bounces around in an environment, absorbing and reflecting the colors each ray encounters. A green ball placed next to a white wall picks up some subtle color bleeding between the two surfaces when illuminated; the brighter the light, the more pronounced the bleeding effect is. Global illumination is a means with which to simulate this behavior of light producing far more realistic results more easily than could ever be obtained with direct light sources only.
Modo allows you to use both direct and indirect lighting sources in any scene. These two models are computed separately, and their respective products are added together to give the final shaded result. Each model has specific advantages (and disadvantages). When used together wisely, you can optimize both the speed and quality of rendered images with an incredible amount of control.
To fully understand the indirect illumination settings, it is critical to first understand the technical process of indirect illumination. While it is intuitive to imagine light coming from a 3D light or a luminous surface and traveling to reach the surfaces then bouncing around a room, the actual process of rendering with indirect illumination is quite the opposite. As the surface is evaluated, rays are cast outward from the surface randomly and evaluated when they strike other surfaces in the scene. The sum of those evaluations is what contributes to the color and brightness of the original surface.
To get a more precise idea of how indirect illumination is estimated at a point on a surface, imagine the top half of a transparent globe resting on the surface, so that the point's surface normal is poking through its north pole. Rays are fired from the surface point through random positions within each cell formed by the latitude and longitude grid lines, with one ray per cell. These rays go out and hit either other surfaces or the distant environment, and the average color that they see is the indirect irradiance estimate (irradiance being the technical term for incoming light).
Now imagine we need to shade a surface on a moonlit night; the environment is practically all black except for one concentrated bright region, the moon. Each shading point on the surface sends rays as described above. For some points, maybe two of their rays hit the bright region, while only one ray hits other points, and the rest of the rays see black. With some points getting twice the irradiance of others, you can predict that the surface may look quite splotchy if irradiance caching is on (or grainy if it's off). However if we subdivide the transparent hemispheres more finely (that is, use more rays), the number of hits and misses become much more consistent between neighboring surface points, smoothing out the shading.
While indirect illumination in Modo is based on this hemispheric sampling technique, there are two very different approaches to the use of these samples. The default method utilizes a technique called irradiance caching (IC). The concept behind this technique is that by leveraging a smaller number of more accurate samples and blending between them, you can achieve an image of perceived quality in a shorter amount of time than sampling every pixel with lesser quality, which often results in grainy or noisy images. When irradiance caching is disabled, Modo falls back to generating a hemispherical shading sample for every pixel in the image (Monte Carlo method). As a result, you must be careful about the number of rays you use as this number is multiplied by the millions of pixels in your image. With irradiance caching active, Modo intelligently samples the scene at strategic locations and then interpolates between them for a smoother overall final frame.
The simplest way to think about Monte Carlo and irradiance caching is that the Monte Carlo method uses a lower quality (fewer rays) sample at every single pixel location, whereas IC uses fewer, much higher quality (more rays) samples and blends them together. As a result, when the samples are not accurate enough in Monte Carlo, there is be significant variance between neighboring pixels, which appears visually as grain. When using IC, the variance is spread across from sample to sample which yields splotches visually. With Monte Carlo, there is one remedy which is to simply increase the number of rays per pixel. This can cause render times to increase dramatically. IC provides several approaches to reducing artifacts, including increasing the number of rays, adding super sampling, and increasing the number of samples required to create a blend called Interpolation Values.
Now that you have an overview of the basic concept, the following definitions have more context and enable you to more effectively balance your scene in performance/quality when working with indirect illumination.
• Indirect Illumination Enable Toggle - Activating this toggle enables Modo to calculate global illumination.
• Indirect Rays - This value represents the number of samples taken for each pixel in the image when using the Monte Carlo indirect illumination model (irradiance caching disabled). Increasing this value results in higher quality at the expense of longer render times.
|
(default) 64 Indirect Rays -12s |
1024 Indirect Rays -3m 13s |
4096 Indirect Rays -13m 22s |
16384 Indirect Rays -51m 40s |
• Indirect Bounces - The default value of 1 means that a single bounce is used to calculate how a surface's environment affects it. This is less accurate than a multi-bounce solution since in the real world, photons bounce all over when illuminating an environment. However, the sacrifice in quality using fewer bounces is rewarded by increased performance. By increasing the number of indirect bounces, the indirect rays are fired from the initial surface and bounce off the first surface they hit, then continue traveling and hitting surfaces until the maximum number of bounces is met.
NOTE: As you add bounces, the number of calculations and render time increases and while the result is technically more accurate, there are naturally occurring diminishing returns with each additional bounce. We recommend that you adjust your scene with a single bounce and then add additional bounces to see how great an impact they have on the end result. If a scene is mostly illuminated by a single small area of light, adding bounces can dramatically improve the overall brightness and look of the render.
|
(default) 1 Bounce -30s |
2 Bounces -57s |
3 Bounces -1m 5s |
4 Bounces -1m 14s |
TIP: To reduce the number of bounces required, you can increase the Ambient Intensity value. Since the effect of multiple bounced illumination rays is to boost the overall lighting by some averaged color, you can reduce the number of bounces and set the Ambient Color and Intensity to mimic those final bounces. This saves time and yields similarly realistic results.
• Indirect Range - This value determines how far an indirect ray can travel before it is terminated. In the case of a ray being terminated due to the indirect range value, it is assumed that the ray eventually hits the environment background, so this value is returned to the shading engine. This is a very useful way to optimize render times. Reducing the indirect range generally improves render speed.
NOTE: Setting this value too low creates unnatural lighting effects, as many rays that otherwise would have ultimately hit a geometric surface resulting in a shadow may get cut off early, illuminating the surface with the backdrop color, rather than shading it with the surrounding geometry. A setting of 0 disables indirect range, utilizing the full scale of your scene.
The following images show Indirect Range (IC enabled inside a 1m cube w/ default Environment), Ray Threshold 0%:
|
200mm Range -29s |
400mm Range -36s |
800mm Range -48s |
1.6m Range -57s |
• Subsurface Scattering - When rendering surfaces that employ subsurface scattering (SSS), you can choose how the indirect lighting in the scene affects those surfaces. When selecting Direct Only, Modo doesn't use any indirect (bounced) lighting, but only calculate SSS based on the direct lighting within the scene, that is, distant lights, spotlights, point lights, and so on. This mode is useful in many cases as global illumination's effect on SSS is usually fairly subtle. However, in instances where there are no direct lights in your scene, such as those lit entirely by image-based lighting (HDRI), you need to choose either Indirect Affects SSS or Both to see the effects of SSS for any given surface.
Indirect Affects SSS - When selecting this option, Modo uses any global illumination in your scene, as well as the direct lighting to calculate the subsurface scattering effects on your object's surface.
SSS Affects Indirect - When selecting this option, Modo calculates bounced indirect light, taking in to consideration the subsurface scattering effects of any given surface.
Both- This setting allows global illumination to affect subsurface scattering, as well as for the subsurface scattering to affect the indirect illumination calculations. This setting is the most render-intensive.
• Volumetrics Affect Indirect Toggle - Enabling this checkbox directs Modo to consider volumetric lighting effects when calculating global illumination.
The following Environment Importance Sampling options are available:
• Enable - Importance sampling is a feature that takes into account the brightness of HDR images used for Image Based Lighting. Brighter areas of the image have a greater effect on the lighting result, so when enabled, samples concentrate around these brighter areas producing a more accurate, smoother result with fewer IC rays (which means faster rendering). This feature essentially makes the process of applying a blurred low-resolution copy of the Environment HDRI unnecessary.
NOTE: Importance sampling slightly changes the look of the final rendered image, most obviously producing more accurate shadows which may or may not be a desirable result.
• Environment Rays - Determines the number of samples taken of the environment used for global illumination. More detailed environments benefit from additional samples, increasing the accuracy of the final render, but also increasing render time. On low resolution or low detail environments, this value can be kept low to reduce render time.
|
|
|
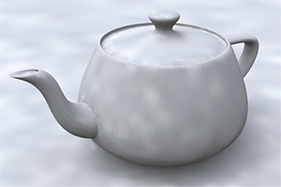
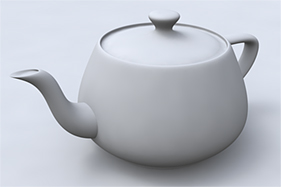
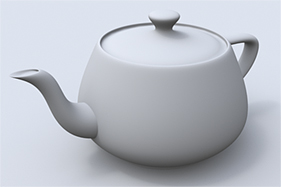
The image on the left has importance sampling disabled and uses an HDR image for environment lighting with a bright spot (sun). With 128 IC rays undesirable splotches are visible that are eliminated in the middle image by increasing the IC rays 8 times to 1024 rays. The third image enables 'Importance Sampling' at default values and resets the IC rays back to 128 rays. Note the crispness of the shadow and the complete lack of any splotches, producing superior result with only a slightly longer render than the left image.
The following Irradiance Caching options are available:
• Irradiance Caching Enable Toggle - When rendering indirect illumination in Modo, irradiance caching is the default method. Disabling this toggle directs Modo to use the more intensive Monte Carlo method to calculate global illumination.
• Use IC For - Modo offers two ways to calculate global illumination. By default, there is the very fast irradiance caching option that saves values and refers to them when needed. The second way is to disable IC, Modo then uses Monte Carlo path tracing. There is no caching of Monte Carlo values, so results can be slow and noisy, however, with enough rays and time, it is possible to produce very clean and accurate results. The way ray evaluation works in Modo can be thought of like layers. When lighting with multiple bounces (having more than a single bounce defined in the Indirect Bounces control), each bounce is its own layer. The Use IC For option allows you to control what layer of rays use irradiance caching during a render and which use Monte Carlo. The reasons for these options are to allow the strongest influencing rays (the first bounce) to use the more accurate
Monte Carlo Method and blend that with the faster and smoother results of the subsequent IC evaluation. To mimic the results of Modo 701 and earlier, use the First and Second Bounce option.
First Bounce Only - When this option is selected, only the first outward bounce from the camera uses IC, any subsequent bounces use Monte Carlo.
Second Bounce Only - When this option is selected, the first outward bounce from the camera uses Monte Carlo and then IC for the second bounce and back to Monte Carlo for any subsequent bounces.
First and Second Bounce- When this option is selected, both the first and second bounces use IC and subsequent bounces use Monte Carlo.
|
Irradiance Cache 1m 02s |
Monte Carlo 4m 24s |
Hybrid 1m 16s |
• Irradiance Rays - Irradiance rays are technically the same as indirect rays in that they are the rays fired out from the surface in order to sample indirect illumination. As a matter of convenience Modo has both irradiance and indirect rays settings since the two forms of indirect illumination typically require vastly different numbers of samples. Irradiance caching relies on much higher quality samples distributed sparsely across the project whereas indirect illumination without irradiance caching uses lower quality samples at every pixel. Having two values allows you to easily switch between irradiance caching and traditional indirect illumination without constantly adjusting the number of rays for each sample.
The following images show Irradiance Rays, Ray Threshold 0%:
|
64 Rays -3.1s |
256 Rays -4.1s |
1024 Rays -6.7s |
4096 Rays -12.4s |
• Supersampling Toggle - After all rays have been fired for a particular irradiance evaluation, this feature looks at the resulting ray color of each hemisphere cell and then sends additional rays through those cells that differ a lot from their neighbors, getting a more detailed look at high contrast areas of the environment and therefore a more accurate estimate. Currently about 25% more rays are fired, so for a setting of 100 rays you really get 125, but the results are better than if you had just used a setting of 125 without supersampling, because the rays are going in the more important directions. It is recommended to leave this option on all the time. It generally improves your render quality with minimal performance impact.
• Outlier Rejection - This option specifies whether to disregard rays that are much brighter or darker than the average values in a particular direction when irradiance cache values are being computed and Supersampling is enabled. It can be useful for smoothing of indirect illumination in some cases and help to eliminate noise produced from very small, very bright illumination in a given scene.
• Irradiance Rate - As irradiance caching smoothly blends between neighboring IC values, a little breathing room is necessary between samples to provide space for that blend to occur. The Irradiance Rate provides that space as it sets a minimum distance between IC samples, calculated by pixels. So a setting of 2.5 means the minimum distance between two samples is 2.5 pixels away. Increasing this value causes IC values further away from each other to blend together, providing a smoother result, however increasing the value too high may result in reduced accuracy in areas of high detail.
• Irradiance Ratio - Where the irradiance rate sets the minimum distance between IC values, the irradiance ratio sets the maximum distance. The ratio is a multiplier of the rate, so a setting of 6 multiplied by a rate 2.5 returns a value of 15, meaning that IC values are no closer than 2.5 pixels and no further apart than 15 pixels. The ratio ultimately reduces the number of samples necessary across smooth surfaces where shading changes are minimal.
• Interpolation Values - This setting specifies a minimum for how many nearby values to interpolate. Let's say it's set to 3. If we're shading a point and can only find two nearby previously computed values in the cache, then it forces the computation of a new value at the current point, and the final irradiance at that point is a blend of all three values. So it tends to smooth out the shading. Increasing this value generally improves render quality at the expense of render time.
• Walkthrough Mode - When rendering an animation where only the camera is moving in the scene, such as for architectural walkthroughs (hence the name), enabling the Walkthrough option tells Modo to never delete any irradiance cache values. Each frame continues to calculate pre-passes, generating new values when necessary and reusing existing values when available. Since Modo never needs to generate a new (possibly different) value, this can help to eliminate jittery shading sometimes evident on pristine architectural surfaces. However, for longer sequences it can create a large number of IC values, which may slow down rendering of later frames.
• Save Irradiance After Render/Load Irradiance Before Render - Using the Save and Load Irradiance functions allow you to save an irradiance cache solution to disc and then load it at a later time for reuse. The typical workflow is to enable the Save Irradiance After Render option, render a frame to generate the values and then disable the option. Next, enable the Load Irradiance Before Render option to load and reuse the generated values for subsequent renders. There are several reasons for doing this, but the main one is to reduce the overhead of calculating the IC values at each render, for scenes where lighting and position are not changing.
To use it, enable the Save Irradiance After Render checkbox and click the Browse button to define a filename and location. Click Save to continue. The next time a full render is generated the irradiance cache saves to disc upon completion of the render. When the render is complete, disable the Save Irradiance After Render option and enable the Load Irradiance Before Render option. With the Browse button, locate the saved irradiance cache .lxi file defined earlier and press OK. Subsequent renders then reuse the values in the saved file.
Saving and Loading of irradiance cache files when combined with Walkthrough Mode rendering of animated sequences may produce a very large file which has the potential to slow down rendering due to the amount of time required to locate and read the target IC values.
When light refracts through or reflects off of a surface, these bent rays are focused together, creating a bright pattern referred to as a caustic. Think of the light dancing on the swimming pool's floor, or the bright flash you see from a car's windshield on a sunny day and you'll know what it is. Simulating this effect in Modo is quite easy with global illumination as caustics are a natural rendering byproduct of image-based lighting. Caustics from direct light sources, such as area lights, distant lights, spot lights and such, require the use of photons map tracing to calculate the effect, enabled with the following Caustics settings.
• Direct Caustics Toggle - This checkbox tells Modo to calculate caustics for all reflective and transparent surfaces.
• Total Photons - The total photons control sets a ceiling on the total number of photons fired in the scene. The photon count is divided amongst all active 3D lights in a scene with a bias based on the power of the light, ensuring energy conservation.
• Local Photons - Local photons indicate the number of photons required for each pixel sampled. When the pixel is rendered a search along the surface locates the nearest photons up to the local photon count. The default setting of 32 indicates that 32 photons are used for each pixel rendered. Increasing this value creates a smoother overall caustic effect at the expense of detail, while decreasing the value results in a sharper caustic effect with increasing graininess.
|
(default) 32 Local Photons |
64 Local Photons |
128 Local Photons |
256 Local Photons |
• Walkthrough Mode - When rendering animations containing caustics, where the camera is the only item moving in the scene, it is helpful to enable the Walthrough Mode option. This tells Modo to cache the caustic calculations, frame to frame, reusing the initial calculations, thus ensuring each subsequent frame matches precisely producing a smoother rendered result.
• Indirect Caustics: Indirect caustics are a natural rendering byproduct of image based lighting, in instances where you wish to control their creation, you have several choices to do so.
None - Disables all indirect caustics within a scene.
Reflection Only - Caustics are only calculated off of reflective surfaces.
Refraction only - Indirect caustics are only calculated though refractive surfaces.
Both - Indirect caustics are calculated for both reflective and refractive surfaces.

When modeling overlapping transparent surfaces such as glasses or bottles containing liquids, it is recommended that the liquid layer overlap the glass layer by a small amount. In no case should there be a gap between the two surfaces. This image illustrates a cutaway view of a shot glass, the black outline, filled with a liquid, the red shading. Note how the red object extends beyond the interior surface of the glass, this is necessary to obtain the desired results.