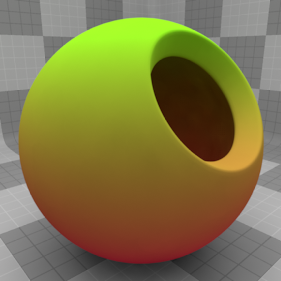
The Gradient Fill Image layer is a hybrid texture, as it is procedurally-generated gradient but it is based on a dynamically created bitmap image. As a procedurally-created image, it won't be required to be saved independent of the scene, as it is generated automatically at run-time as needed. As a bitmap, all the different ways a texture layer can be applied can also be assigned to the gradient layer including projection types and UV maps, modified in its associated Texture Locator. There are several types of Gradient Styles that can be generated: Linear, Radial, Angular, and Diamond. These basic styles specify the appearance on the image tile and the Start and End positions its position and orientation. The gradient itself is user-defined in the Gradient Editor.
The Gradient Fill Image is added to the Shader Tree using the Add Layer option, found under Add Layer > Image Map > image > Gradient Fill. Once created, the layer itself can be positions and its Effect defined in the Shader Tree. For information regarding adding and working with Shader Tree Items Layers, please refer to the Shader Tree Item Layers topic. With the layer selected, all its various properties are available in the Properties viewport panel.
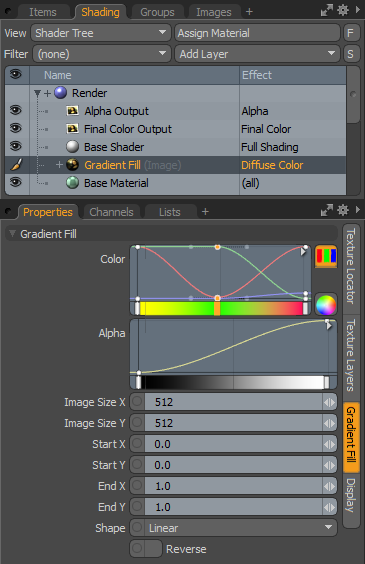
The following Gradient Fill options are available for Gradient Fill Image:
• Color - allows you to quickly define basic gradients directly within the main interface. The gradient values are defined by keys, like keyframes in a Timeline. Gradient keys define specific color values at the defined locations that smoothly attenuate between the keys. Keys are defined in the editor by middle-clicking within the gradient window or, for Mac users, Ctrl+Alt+clicking.
This sets a key location, then you can click on the color bars or wheel, and then define a Color for that location. New key positions are added and updated in the same way. Defined keys can also be edited by clicking and dragging the points up and down or left and right. Below the gradient key window is a graduated bar that represents the gradient itself. The window is limited to just the 0%-100% range on either axis. For further refinement, it may be desirable to edit the gradient in the full sized Gradient Editor available in the menu found under the small arrow in the upper-right hand corner of the window.
• Alpha - this works in exactly the same way as the Color mini gradient editor, but defines a single value that determines the transparency amount for the Color gradient.
• Image Size X/Y - determines the vertical and horizontal resolution of the resulting canvas that the gradient is generated into.
• Start/End X/Y - determine both the position and, indirectly, the direction of the resulting gradient, where start represents the starting position and end represents the termination point. The gradient is then generated between these two locations. The values are represented as a floating point value across the generated canvas (acting as a percentage), with the '0, 0' origin at the lower-left corner, and '1,1' position in the upper-right corner (identical to how a normalized UV field value is defined). A value of '0.5' would put the position in the center of the canvas, regardless of its resolution and aspect ratio.
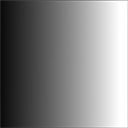
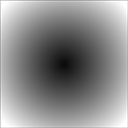
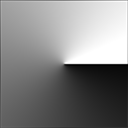
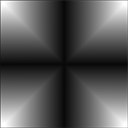
• Shape - controls the appearance of the resulting gradient. There are four possible options (pictured below): Linear, Radial, Angular, and Diamond respectively.
|
|
|
|
|
• Reverse - swaps the Start and End positions, resulting in a mirrored gradient.