Curve Constraint Effector
The Curve Constraint Effector is a special kind of deformer that will attract nearby vertices, constraining them to the nearest position along the defined curve. The points that are constrained are determined by the Threshold distance value, defining an area of influence around the curve, and the strength of that attraction outward from the curve is controlled by the Falloff by Distance gradient. Using the default gradient as vertices are further away from the curves influence core, the less they are pulled toward that curve itself.
Applying an Effector
The Curve Constraint Effector can be created directly from the Setup layouts tool palette under the Deformers subtab. Select the Mesh Item you wish to constrain and the left mouse click the Curve Constraint button in the tool palette to open the setup dialog asking for a Curve. Select the appropriate curve item and click OK to create the constraint, with all the graph connections being automatically wired up. Selecting the newly created Curve Constraint Effector item in the Items to display its attributes in the Properties panel.
Name: Displays the current item's name. You may change the name by left-clicking the current name and typing a new name.
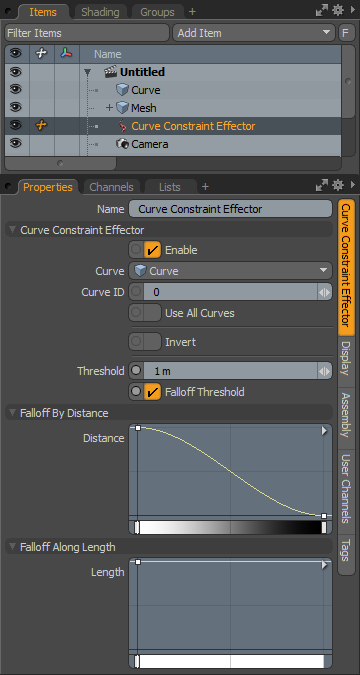
Curve Constraint Effector-
Enable: Toggles the effect of the layer on or off. When clear, the layer has no influence on the scene. However, Modo saves disabled layers with the scene and their values are persistent across Modo sessions.
Curve: This menu option allows you to select the particular curve layer that will constrain the associated Mesh Item, allowing alternate curve selection after the constraint has been created.
Curve ID: In defined Mesh Items where there are more than a single curve within the same layer, this option allows users to define specific curves within the layer by their Curve ID, an automatically generated identifier based on the order of curve creation.
Use All Curves: This option, when enabled will use all curve contained in the specified layer as a constraint source. Falloffs Along Length will still be applied independently to each individual curve.
Invert: This option, when enabled will invert the influence of the Curve Constraint, pushing nearby vertices away from the curve, rather than pulling them toward it.
Threshold: The Threshold defines a circular area of influence around the curve generated at each position along the curve outward.
Falloff Threshold: The Falloff Threshold option allows the threshold to be modulated based on the distance from the curve. For example, if the element being deformed already exists on the curve, then it will be given a weight of 1.0, if the element being deformed is at a distance that is greater than or equal to the threshold channel, then it will be given a weight of 0.0. Any elements between 0.0 and the threshold distance, will be given a smoothed value between 0.0 and 1.0. The offset vector that is applied to the element position, is scaled by this weight value. The result is a deformation that falls off, the further away from the curve the element is positioned.
Falloff by Distance: This mini gradient editor controls the falloff outward from the curve along its defined Threshold distance. By using the mini-gradient editor, you can modify the falloff with gradient keys that represent the strength of influence. The mini gradient width represents the Falloff Distance with the left side representing the interior curve position and the right side the outer most limit of the Threshold. You can add keys by middle-clicking along the length of the gradient input and then dragging the key icon up or down to adjust its value. The grayscale bar gives visual feedback as to how the values fade from one key to the next. Black has no influence attenuating toward white with maximum influence.
Falloff Along Length: This mini gradient editor controls the total influence of the curve along its length, with the left side of the gradient representing the base position of the curve (the first vertex when created). To invert the base and tip positions of the curve, select it in Polygons mode and press the 'F' key to flip its orientation. By using the mini-gradient editor, you can modify the falloff with gradient keys that represent the strength of influence. The gradient input's width represents the curves overall length with the base on the left side. You can add keys by middle-clicking along the length of the gradient input and then dragging the key icon up or down to adjust its value. The grayscale bar gives visual feedback as to how the values fade from one key to the next. Black has no strength attenuating toward white with maximum strength.