Dynamic Parenting
When you parent an item to another, the child inherits that parent's position, rotation, and scale. Any transforms of its own are added to the those of its parent. Normally, this parent/child hierarchy is a fixed relationship. Parenting this way cannot be animated, and the relationship remains in effect for the duration of the scene. (For more information about setting up hierarchies, see the Hierarchy topic.)
There are many situations where being able to change the parent of an item is very useful. For example, a robotic arm on an assembly line picks up a component, attaches to it, and does something to a product on a conveyor belt. Once the robotic arm completes the task, the product moves off for the next stage of assembly. You could animate this process by having multiple versions of the component: one in the parts bin, one parented to the robot arm, and another parented to the product on the conveyor. By animating the visibility of each of these copies, you could give the impression of the component being picked up and attached to the product being assembled, but this is tedious to implement and difficult to manage.
Ideally, you'd want to specify an item is parented to one item and, then at another point in time, it's parented to another item, and so on. With Dynamic Parenting you can do that.
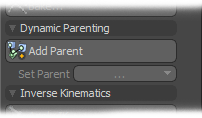
To define a Dynamic Parent relationship, first select the child item. (In the robotic arm example, this would be the component.) Then select the acting parent item (for example, the robotic arm). Once you have selected both items in order, make sure that Compensation is on for the child item to remain in its current relative location. Then, click the Add Parent button to define the relationship.
Below the Add Parent button, the Set Parent list becomes active after you apply Dynamic Parenting. With this list, you specify the current parent for the item. If you open the list, you should see at least two entries: one for the parent that you just assigned and one for the World, which effectively means no parent. If you specify the new parent for the child and move the parent, the constrained item follows along just as if it were parented by conventional means. To add more parents, select the constrained item and then the item that is to be the parent. Click the Add Parent button again. You can add as many parent items as you wish at any time.
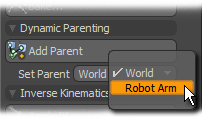
To change the current parent, select the constrained item (the child item) and select the new parent from the Set Parent list in the Properties viewport for the Dynamic Parent Channel Modifier item. (You may need to click the + next to the constrained item in the Items (Scenes) List to select the child item.) You can also specify the parent in the tool bar. Once you define all the parent items, you can apply different ones over time with keyframes. If you enable Auto Key, then by just moving the Timeline to a new position and specifying a new parent, Modo changes the child item dynamically to the new parent. You can also manually apply keyframes on the Parent Channel under the Dynamic Parent modifiers channels. You specify the keyframes numerically but represent the items in the list top down. In the robotic arm example, 0 equals World, 1 equals Robot Arm, 2 equals Component, and so on.
Note: You must enable Compensation when dynamically parenting items to ensure that items don't jump around when parented.