Playblast
The Playblast tool allows you to get a quick preview of your animation, providing you with a realistic idea of your final render result without requiring the time needed for a formal render. Use this tool to quickly check for character and prop positioning and lighting placement. Curved surfaces are rendered as surfaces with a low face count (faceted).
Use this tool to:
• Open a dedicated viewport
• Use the scene frame size as the base resolution
• Set the Resolution Multiplier value to set different viewport sizes for output
• Set video Video Format, Codec, and Quality values
• Select any camera defined in the scene
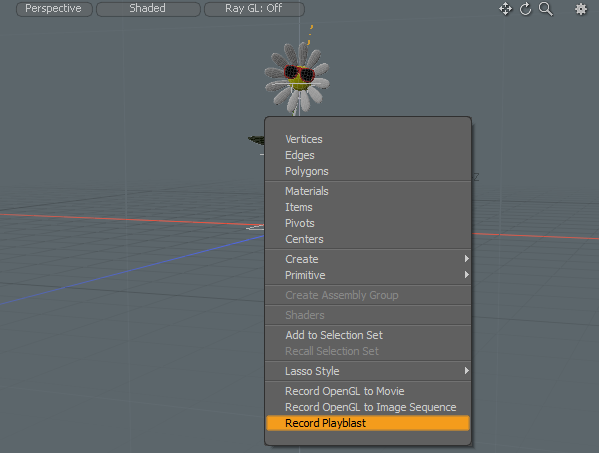
The Playblast tool is available from the 3D Viewport contextual menu. Right-click in the 3D Viewport to view the contextual menu and select Record Playblast.
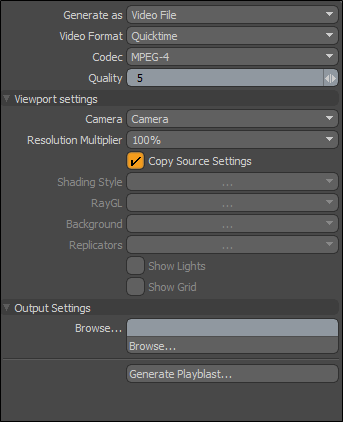
To create a Playblast, enter the desired Playblast Settings and click Generate Playblast. A new viewport displays, using the scene's render size, resolution, and other specified settings.
Playblast Settings
The following Playback Video File settings are available:
| Option |
Description |
|---|---|
| Generate as |
Selects the type of output. The following options are available: • Video Format - Stores digital video data on your computer system. • Image Sequence - Stores a collection of .tga images related by time, such as frames in a movie. For more information about Image Sequence properties, see Image Sequence. Note: Video Format, Codec, and Quality options are not available when Image Sequence is selected. |
| Video Format |
Selects the video format. The following options are available: • QuickTime • AVI • Mpeg4 • Flash Video |
| Codec |
Selects the encoding and decoding digital data stream method. The following options are available: • Mpeg4 • Microsoft MPEG-4 • Microsoft video 1 • Sorensen Video • MJPEG • Animation Note: Available options vary depending on the Video Format option selected. |
| Quality | Sets the quality value for your output. The default value is 5. |
| Viewport Settings | |
| Camera | Sets the camera in your scene that you would like to use in the output. |
| Resolution Multiplier |
Sets the resolution multiplier value for your output. The following options are available: • 25% • 50% • 100% |
| Copy Source Settings | When enabled, copies the settings from the 3D Viewport. The remaining settings in the Playblast Settings dialog override those copied from the source. This setting is enabled by default. |
| Shading Style |
When Copy Source Settings is disabled, the Shading Style sets to Shaded by default. The following options are available: • Wireframe • Solid • Vertex Map • Texture • Shaded Texture • Default • Advanced • Gooch Tone • Cell Shading • Reflection For more information, see 3D Viewport Styles. |
| RayGL | Enables the 3D viewport rendering Ray-GL, giving you a fast, fully rendered representation of the scene. Choose from the Fast or Full options to maximize workflow efficiency. |
| Background |
Allows you to set the background to Environment. The following options are available: • Environment - Displays the settings as determined by the Environment item of the Shader Tree, simulating the rendered output. • None - Displays the default 3D Viewport background. This option is set to None by default. |
| Replicators | Enables the replicators in your scene at render time. Replicators control how duplicates of the item are copied onto the target point source. For more information, see Replicators. |
|
Show Lights |
When enabled, displays lights in the 3D viewport. |
| Show Grid | When enabled, displays the grid in the 3D viewport. For more information, see Grid and Workplane Settings. |
| Output Settings | |
| Browse | Allows you to specify where to save your Playblast file to. |
| Generate Playblast | Generates your Playblast output. A new viewport automatically displays the output. |
Creating Higher Quality Playblasts with AVP
If your viewport is set to advanced, you can set your playblast to wait for iterations to finish before moving to the next frame.
Enabling Progressive Rendering
To enable progressive rendering in your playblast:
- Open the 3D Viewport Properties window
- Navigate to the Advanced Options tab, and turn Progressive DOF Mode on
- Set Progressive to the number of times you want your scene to be redrawn
- Once AVP has been set up in the 3D Viewport Properties Window, open the Playblast Settings window and enable Use Camera Override
Alternatively, press O to open the 3D Viewport Properties window
The higher the number, the more anti-aliasing that occurs, but this will increase render time
Right-click within the 3D viewport and select Record Playblast to open the Playblast Settings window.
Once set up, you can continue to adjust your playblast settings as you would normally.