Specifying Action Centers and Falloffs
Learn about how to define action centers and falloffs.
Activating Action Centers
Action centers are a definable origin position for modeling and transform actions in Modo. While other 3D software programs use the fixed mesh geometry pivot point as the center for most actions, Modo separates the Action Center into an independent dynamically definable component. This provides a means to easily change the positions from where the action of any tool originates. You can activate action centers in the Action Center dropdown menu, or in the menu bar, under Edit > Action Center. You can also break an action center further into its center and axis components for even greater control.
Generally, you can't see anything happen in the 3D viewport when selecting an action center until a tool is made active, as action centers themselves are represented by the positions of an active tool's handle. When you select a new action center, the position and orientation of the handle updates to reflect the new axis and center. To move your object in the 3rd dimension (forward and backward) in the 3D Viewport press Shift + Ctrl/Cmd + right-mouse-button and drag.
Action Center Types
The following table lists the available action center types.
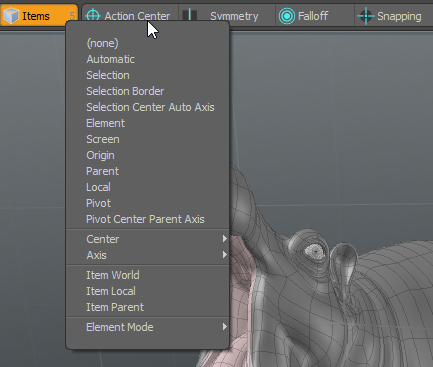
|
Type |
Description |
|---|---|
|
None |
When no action center is selected, Modo defaults to None, which is similar to Automatic, except there is no ability to explicitly define the axis. |
|
Automatic |
When a tool is activated, the Automatic action center positions the tool's handle at the center of the current selection (or on all active geometry in the case of no selection) with the axis aligned to the World or Work Plane axes. You can explicitly select the axis in the properties panel and interactively modify it by adjusting the orientation handle, the thin blue line with the yellow dot. The Automatic action center is not fixed, like others action centers are. You can define a new center by clicking away from the tool handle, setting the positions at the intersection of where the pointer clicked in the viewport and the Work Plane. |
|
Selection |
Bases the action center on the average vertex position of the selection in the 3D Model View, effectively centering the action center to whatever is selected. Setting the action center to Selection changes the tool's handles to have the center and axis aligned to the current selection. |
|
Selection Border |
Combines the selection border center with the selection-based axis. This combination centers all tool handles around the border of the selected elements with the orientation of the tool derived from the average normals of all selected elements. The border of selection is defined by the open edge area where the selection stops. This is extremely useful for posing character type operations. For example, you can select a loop of polygons on an elbow, then select the rest of the arm using the Select > Close loop command, and activate Selection Border, which positions a rotate transform handle aligned to the initial loop selection making it easy to bend the arm. |
|
Selection Center Auto Axis |
Keeps the center of the tool handles centered on the geometry, but re-aligns the tool handles to the major axes. It provides an axis field in the Tool Properties Action Axis Auto section, so you can easily change from one axis to another by clicking the appropriate button. |
|
Element |
Allows you to click on any element in the 3D model to set the action center. If you click on a polygon, Modo realigns the tool's handles to its normal. If you click on an edge, or a vertex, Modo aligns the tool handle to the normal of those elements. For example, if you want to stretch an entire model along the normal of any particular polygon, you simply activate the stretch tool, click on the polygon and now you can scale along that axis. Element action center does not require the element that is selected to be the element that is used for the action center. Once you have a polygon selected, you can choose Element in the Action Center field, then click on a different polygon. That polygon is the reference action center for transforming the original selected polygon. |
|
Screen |
Allows the action center and axis to be based on the frame of the viewport, or screen space. When Screen Center and Axis is chosen for any transform, the tool handles realign themselves to the screen and the transform becomes in relation to the picture plane rather than to any world or local coordinate system. |
|
Origin |
Uses the world coordinates 0,0,0 for the center of any transform, regardless of item or element position. While less useful with the Move transform, this is handy for Rotate or Stretch if you are building something off the origin. You can easily rotate around the center of the 3D view using this setting. It also makes it easy to accurately set functions like Mirror, which happens across the origin's planar axes. |
|
Parent |
Uses the pivot position of the parented item, as opposed to the center position. This is useful for transforming items in a hierarchy when you wish to keep items in proper relationship to their parents. |
|
Local |
Uses the center of individual element clusters for the operation center, like having a separate axis and center for each selection group. This lets you select multiple elements and have them each rotate around their own local axis. When using the Move tool, the handles are axis-aligned to the last selected polygon. This is particularly useful when working with edges, as you can use the stretch tool to scale several edges simultaneously along each one's individual local axis. |
|
Pivot |
Uses the pivot position of the item as the center of any transform. This is especially useful for animated items that might not be near the origin center. |
|
Pivot Center Parent Axis |
Uses the current items pivot position as the center, but adjusts the axis to match the parent item. |