Radial Array
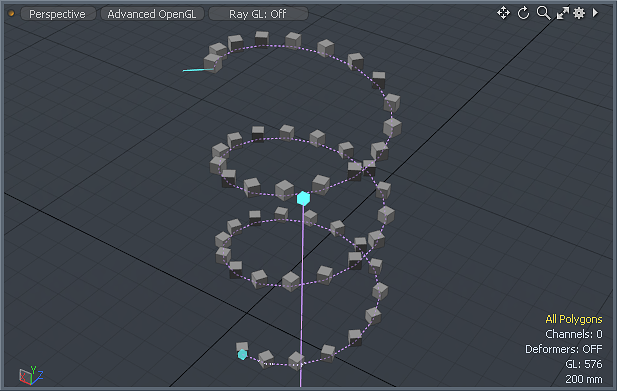
The Radial Array tool recursively clones any selected geometry into a circular or helical pattern. With the tool's Properties panel, you have precise control over the count, placement, angles, and spiral offset distance.
Usage
Before creating the array, select the target geometry for duplication. Component selections (such as vertices, edges, or polygons) clone into their own respective layers; item selections generate multiple additional item layers with their transform values set appropriately.
To activate the tool, with an item selected, click the Radial Array button in the modeling layout toolbox in the Duplication sub-tab. In this state, you can enter values in the tool's Properties panel and click Apply to generate the array. Additionally, when the tool is active, you can click in the 3D viewport to interactively adjust the values. The first click defines the center of rotation, which is at the intersection of the pointer and the current Work Plane. Alternatively, to add a procedural Radial Array, in the Mesh Operations list, click the Add Operator button, and navigate to Mesh Operations > Duplicate > Radical Array, or enter its name in the search bar. For more information, see Radial Array in the Procedural.
The helix angle control surrounds the center line that defines the Axis angle. Drag over the blue cube handle to adjust the Start Angle and drag to adjust the End Angle. You can use the blue cubes at the end of the line to adjust the axis angle for arrays that don't align with any of the three axes. You can also click again away from the handles to reposition the center location. While the tool is active, you can manually enter values in the Properties panel and see the changes in the 3D viewport.
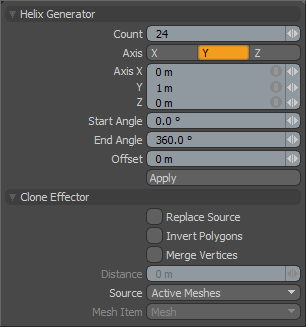
Radial Array Properties
|
Helix Generator |
|
|---|---|
|
Count |
Determines the total number of clones created. |
|
Axis |
Determines along which axis Modo creates the circular array. |
|
Axis X/Y/Z |
Determines the location of the tool's Axis control handles. If you set all the values to 1 m, Modo sets one end at (-1,-1,-1) and the other end at (1,1,1) to create an skewed-off axis plane for the array. |
|
Start Angle |
Determines the rotation placement for the first cloned geometry as a number of degrees offset from the initial 0 degrees. |
|
End Angle |
Determines the rotation placement for the last cloned element as a number of degrees offset from 0 degrees. Note: By default, the Start Angle and End Angle are 0 to 360 degrees. This creates an array that completes a full circle. By changing these two values, you can create an array that revolves many times or one that leaves one side of the circle open. You may want to set the End Angle value greater than 360 degrees when combined with a non-zero Offset value to create a spiral. |
|
Offset |
Moves each successive clone a user-defined distance from the previous clone along the tools defined Axis. This is useful when combined with an End Angle greater than 360 degrees to create a spiral. |
|
Replace Source |
When enabled, replaces the original mesh element(s) being cloned by the tool with an additional clone at the 0-degree position. |
Instance Radial Array
This tool is similar to the Radial Array tool, but rather than creating geometry, it creates instances of the source in a circular or helical pattern. You can activate the tool by right-clicking on the Radial Array icon and selecting Instance Radial Array from the list.
Instance Radial Array Properties
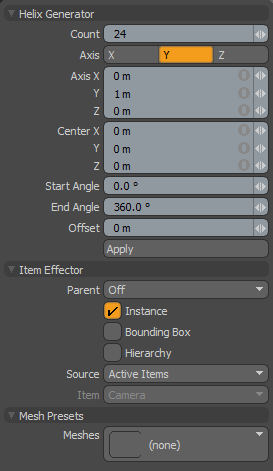
In addition to the Helix Generator properties described above, the following parameters are available for the Instance Radial Array tool.
|
Item Effector |
|
|---|---|
|
Parent |
Determines how Modo treats instanced items in the Item List.
• Off - Clones source item as additional instanced layers in the Item List.
• Hierarchy - Creates a cascading array where each subsequent clone is a child of the previous clone.
• Root - Creates instances as child items of the source mesh.
• Primary - Creates Instances as children of a group locator that is parented to the source mesh. |
|
Instance |
When enabled, each cloned item is an instance of the source mesh. Instances contain no physical geometry, but they reference a source layer and are represented in 3D Viewports by pink wireframes. (This is enabled by default.) |
|
Bounding Box |
When enabled, the resulting instances display as bounding boxes rather than wireframe meshes. This may provide a 3D viewport performance increase when Modo generates many instances. |
|
Hierarchy |
When enabled, clones any child items of the source geometry and retains their hierarchy through each subsequent clone. |
|
Source |
Determines the source mesh that Modo clones into the array. • Active Items - Uses the currently selected item(s) as a clone source.
• Specific Item - Specifies a Mesh Item as the clone source based on the Mesh Item information.
• All BG - Combines all the currently visible background items and clones them as a single mesh.
• Random BG - Selects a random background item from all the currently visible background items at each clone position.
• Mesh Layer Preset - Clones a mesh preset selected in the Preset Browser. Open the Preset Browser (by pressing F6) and select a mesh preset before activating the tool. |
|
Item |
Specifies the item to be cloned. This is only relevant if you set Source to Specific Item. |
|
Mesh Presets |
|
|
Meshes |
Opens the Preset Browser, where you can select a mesh preset to use as the Source. |
Replica Radial Array
This tool is similar to the Radial Array tool, but rather than creating geometry, it creates replicas of the source in a circular or helical pattern. You can activate the tool by right-clicking on the Radial Array icon and selecting Replica Radial Array from the list.
Replica Radial Array Properties
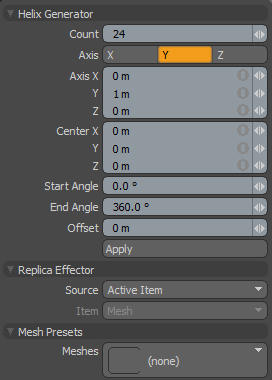
In addition to the Helix Generator properties described above, the following parameters are available for the Replica Radial Array tool.
|
Replica Effector |
|
|---|---|
|
Source |
Determines the source mesh that Modo clones into the array.
• Active Item - Use the currently selected geometry as the clone source.
• Specific Item - Specifies a Mesh Item as the clone source based on the Mesh Item information.
• All BG - Combines all the currently visible background items and clones them as a single mesh.
• Preset Shape - Clones a profile shape selected in the Preset Browser. Open the Preset Browser (by pressing F6) and select a profile before activating the tool. |
|
Item |
Specifies the item to be cloned. This is only relevant if you set Source to Specific Item. |
|
Mesh Presets |
|
|
Meshes |
Opens the Preset Browser, where you can select a mesh preset to use as the Source. |
Transform Radial Array
The Transform Radial Array tool creates arrays of existing items in a circular or helical pattern. You can activate the tool by right-clicking on the Radial Array icon and selecting Transform Radial Array from the list.
Transform Radial Array Properties
![]()
|
Helix Generator |
|
|---|---|
|
Count |
Determines the total number of clones created. |
|
Axis |
Determines along which axis Modo creates the circular array. |
|
Axis X/Y/Z |
Determines the location of the tool's Axis control handles. If you set all the values to 1 m, Modo sets one end at (-1,-1,-1) and the other end at (1,1,1) to create an skewed-off axis plane for the array. |
|
Start Angle |
Determines the rotation placement for the first cloned geometry as a number of degrees offset from the initial 0 degrees. |
|
End Angle |
Determines the rotation placement for the last cloned element as a number of degrees offset from 0 degrees. Note: By default, the Start Angle and End Angle are 0 to 360 degrees. This creates an array that completes a full circle. By changing these two values, you can create an array that revolves many times or one that leaves one side of the circle open. You may want to set the End Angle value greater than 360 degrees when combined with a non-zero Offset value to create a spiral. |
|
Offset |
Moves each successive clone a user-defined distance from the previous clone along the tools defined Axis. This is useful when combined with an End Angle greater than 360 degrees to create a spiral. |
Radial Array in the Procedural
Radial Array is also available as a procedural mesh operation. It is a combination of the Clone Effector and the Helix Generator sub-tools. You can find the tool in the Mesh Ops tab, on the right-side of the Model layout.
Here's how you can add the Radial Array mesh operation:
| 1. | In the Mesh Ops tab, click the Add Operator button, and navigate to Mesh Operations > Duplicate > Radial Array, or enter its name in the search bar. |
| 2. | Double-click it to add it to the Mesh Operations list. |
The Radial Array mesh operation duplicates the geometry below it in the list. You can adjust the operation using its Properties panel in the lower-right.
You can expand the Radial Array item in the list by clicking the small arrow in front of it. This reveals the inputs the operation uses.
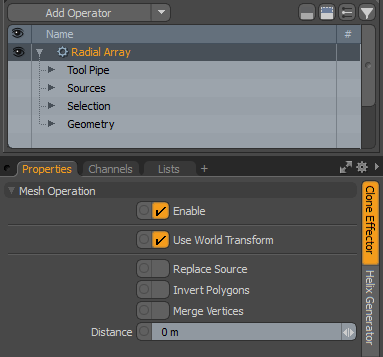
Radial Array can use the following inputs:
• Tool Pipe - Allows you to add sub-tools to the operation. For the Radial Array tool, a Helix Generator is added by default and the options are displayed in the Properties tab.
• Sources - Allows you to specify the geometry you want to duplicate.
• Geometry - This lists any geometry that is affected by the tool. Meshes are connected automatically if they are below the tool in the Mesh Operations list. You can connect additional meshes by clicking (Add Geometry) to open the Preset Browser. From there you can select an existing mesh or add a new, empty mesh.
• Selection - Allows you to select the elements to which you want to apply the tool.
Note: The Geometry input is only visible when the list is not in Solo mode. For more information, see Solo Mode.
The Radial Array mesh operation has the same properties as the traditional Radial Array tool. See Radial Array Properties.