Loop Slice
Loop Slice is a powerful tool that lets you slice additional edge loops into your geometry. Loop Slice is found in the Model layout Toolbox, under the Edit sub-tab. It is also found in the Topology layout, under the Tools sub-tab. In addition, you can also activate it by choosing Geometry > Slice > Loop.
Direct Loop Slice
To use Loop Slice in direct modeling:
| 1. | To define the loop, select two adjoining polygons or an edge shared by the polygons on your mesh. |
| 2. | Go to the Editsub-tab and click the Loop Slice button to activate the tool. |
A purple bar appears at the top of the viewport, which you can manipulate to modify the slicing.
| 3. | Drag the small yellow triangle to adjust the currently-active slice position. The far end dots can be dragged to change the size of the input bar. In addition, you can enable the Select New Polygon option for better visibility of the polygons, which you are manipulating. |
Click the image below to view the animation.
Direct Loop Slice Properties
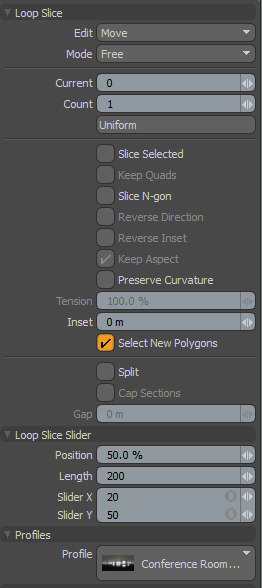
Click the Tool Properties button to open the following options.
|
Edit |
Defines what function the mouse plays: Move repositions the slice within the loop by hauling in the viewport or dragging on the slice indicator, Add creates additional slices when clicking on the indicator bar, and Remove deletes them. |
|
Mode |
Defines how Modo creates and positions slices: Free allows any position along the indicator bar, Uniform evenly spaces the slices within the loop, and Symmetry mirrors the loop slices over the 50% position. |
|
Current |
Denotes which slice is the active slice for editing. Slices are numbered sequentially left to right in the input bar. |
|
Count |
The total number of slices added to the loop. |
|
Uniform |
Clicking this button automatically repositions Freely spaced spans evenly across the width of the loop. |
|
Position |
Slice position expressed as a spacing percentage in relation to the loop width. 50% is the center. |
|
Length |
Controls the length in pixels of the purple slice input bar in the viewport. |
|
Slider X/Y |
Controls the position of the input bar in the viewport. |
|
Slice Selected |
Restricts the slice to only the selected portion of the mesh, rather than using the selection to simply determine the loop to cut. This setting respects corners as well. |
|
Keep Quads |
Forces all new polys to be quadrangular inside the sliced area. |
|
Slice N-gon |
When this option is enabled, Modo attempts to continue a loop slice across polygons with more than four sides. For better control over how Loop Slice slices across the N-gon, select the loop as you wish it to be sliced and enable the Slice Selected option. |
|
Reverse Direction |
If this option is enabled, the 1D profile is evaluated from top to bottom. |
|
Reverse Inset |
If this option is enabled, Inset is reversed. |
|
Keep Aspect |
Automatically sets the Inset value based on the aspect ratio of the profile. |
|
Preserve Curvature |
The new position is computed along a curve through the edges to maintain the overall curvature or surface continuity. Once enabled, the Tension setting becomes available, controlling the tightness of the curvature preservation. |
|
Tension |
Determines the strength of the curvature preservation. The default value of 100% calculates the curvature similar to a spline generated along the edge's length, placing the new vertex appropriately, where a value of 0% would be like disabling the Preserve Curvature option. Negative values inset the curvature and higher values further offset the vertex out from the curve's position. |
|
Inset |
Specifies the offset amount of X direction of 1D profile. |
|
When enabled, provides better visibility to see the selected polygons. A guide color is displayed for the slicing edges of the selected polygons. |
|
|
Split |
When the Split option is enabled the resulting 'loop' split the surface, producing two distinct overlapping edges, rather than a single connected edge. |
|
Cap Sections |
When using the Split option, the Cap Sections option can be added to create a single polygon "cap" connected to the two resulting edge loops, in effect closing off the two new edges. |
|
Gap |
When splitting surfaces, the Gap option defines a width around the split line, in effect thickening the width of the resulting cut by the defined value. |
|
Profiles |
|
|
Profile |
A mini Preset Browser for viewing various profiles. Works the same as the standard Preset Browser. You can simply click on a profile to load that particular shape as a Loop Slice cutter. Has the effect of what a router does when cutting in to and engraving a wood panel. |
Procedural Loop Slice
The procedural version of Loop Slice evenly slices polygon loops by specific Count, much like the Uniform mode of the direct version. Instead of setting the slice position interactively, the procedural version uses an Array modifier in its input channel for the Slice Position.
To use Loop Slice in procedural modeling:
| 1. | To define the loop, select two adjoining polygons or an edge shared by the polygons on your mesh. |
| 2. | In the Mesh Ops tab, click Add Operator> Mesh Operations > Edit > Loop Slice. |
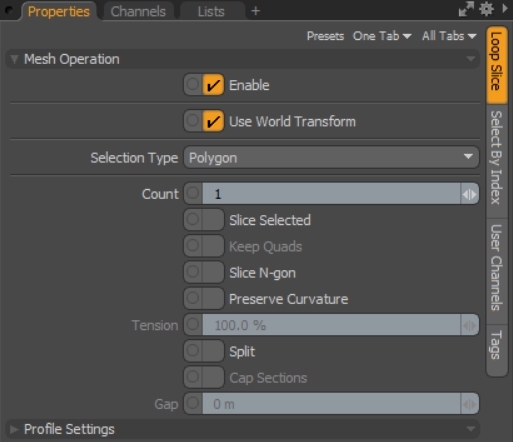
| 3. | Go to the Properties tab to modify the Loop Slice operation. |
Procedural Loop Slice Properties
|
Selection Type |
Seed mesh element (Polygon or Edge). |
|
Count |
The total number of slices added to the loop. |
|
Slice Selected |
Restricts the slice to only the selected portion of the mesh, rather than using the selection to simply determine the loop to cut. This setting respects corners as well. |
|
Keep Quads |
Forces all new polys to be quadrangular inside the sliced area. |
|
Slice N-gon |
When this option is enabled, Modo attempts to continue a loop slice across polygons with more than four sides. For better control over how Loop Slice slices across the N-gon, select the loop as you wish it to be sliced and enable the Slice Selected option. |
|
Preserve Curvature |
The new position is computed along a curve through the edges to maintain the overall curvature or surface continuity. Once enabled, the Tension setting becomes available, controlling the tightness of the curvature preservation. |
|
Tension |
Determines the strength of the curvature preservation. The default value of 100% calculates the curvature similar to a spline generated along the edge's length, placing the new vertex appropriately, where a value of 0% would be like disabling the Preserve Curvature option. Negative values inset the curvature and higher values further offset the vertex out from the curve's position. |
|
Split |
When the Split option is enabled the resulting 'loop' splits the surface, producing two distinct overlapping edges, rather than a single connected edge. |
|
Cap Sections |
When using the Split option, the Cap Sections option can be added to create a single polygon "cap" connected to the two resulting edge loops, in effect closing off the two new edges. |
|
Gap |
When splitting surfaces, the Gap option defines a width around the split line, in effect thickening the width of the resulting cut by the defined value. |
|
Profile Settings |
|
|
Inset |
Specifies the amount of offset on the X axis for a 1D profile. |
|
Reverse Direction |
If this option is enabled, the 1D profile is evaluated from top to bottom. |
|
Reverse Inset |
If this option is enabled, Inset is reversed. |
|
Keep Aspect |
Automatically sets the Inset value based on the aspect ratio of the profile. |
Working with the Array Channel Modifier
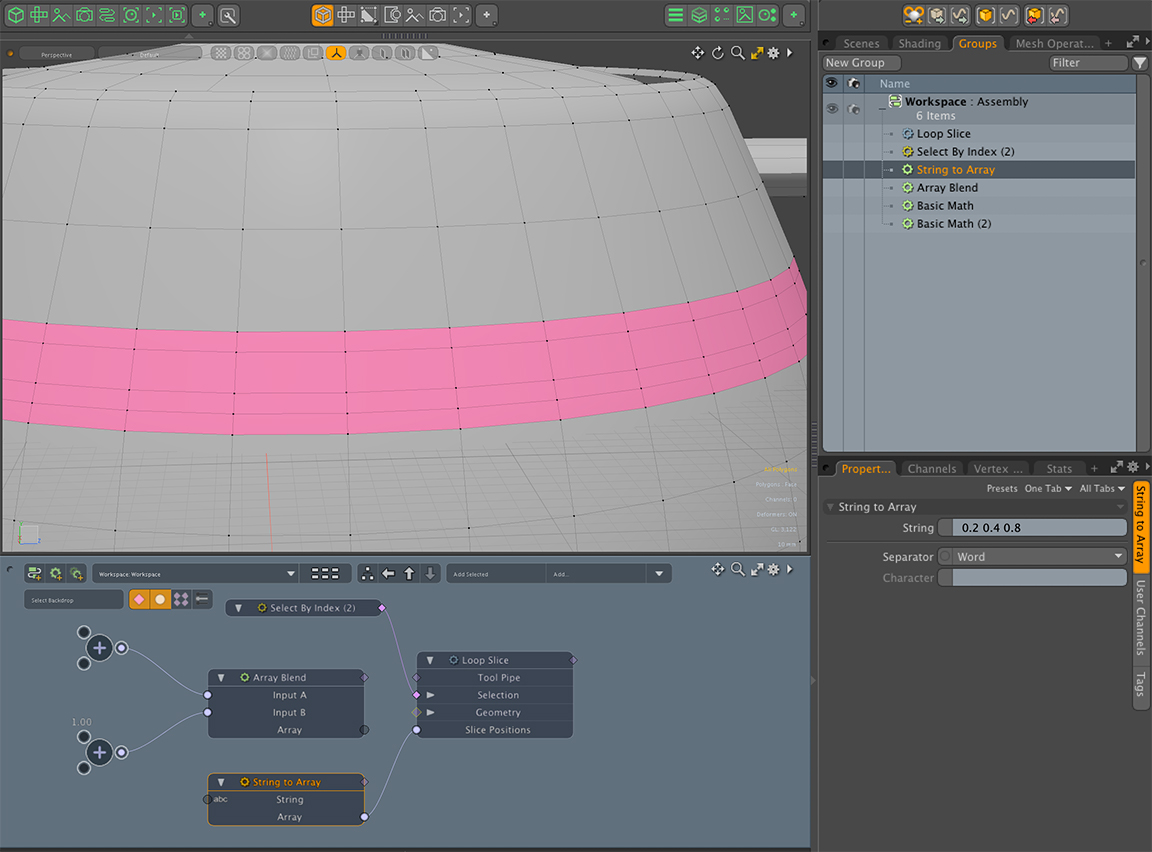
String to Array is a simple way to set multiple slice positions by text. The loop slice decodes the numeric words to slice positions. When an Array channel is connected to the Slice Positions input on a Loop Slice node, the Count channel of the Loop Slice node is overwritten with the number set in the array size.
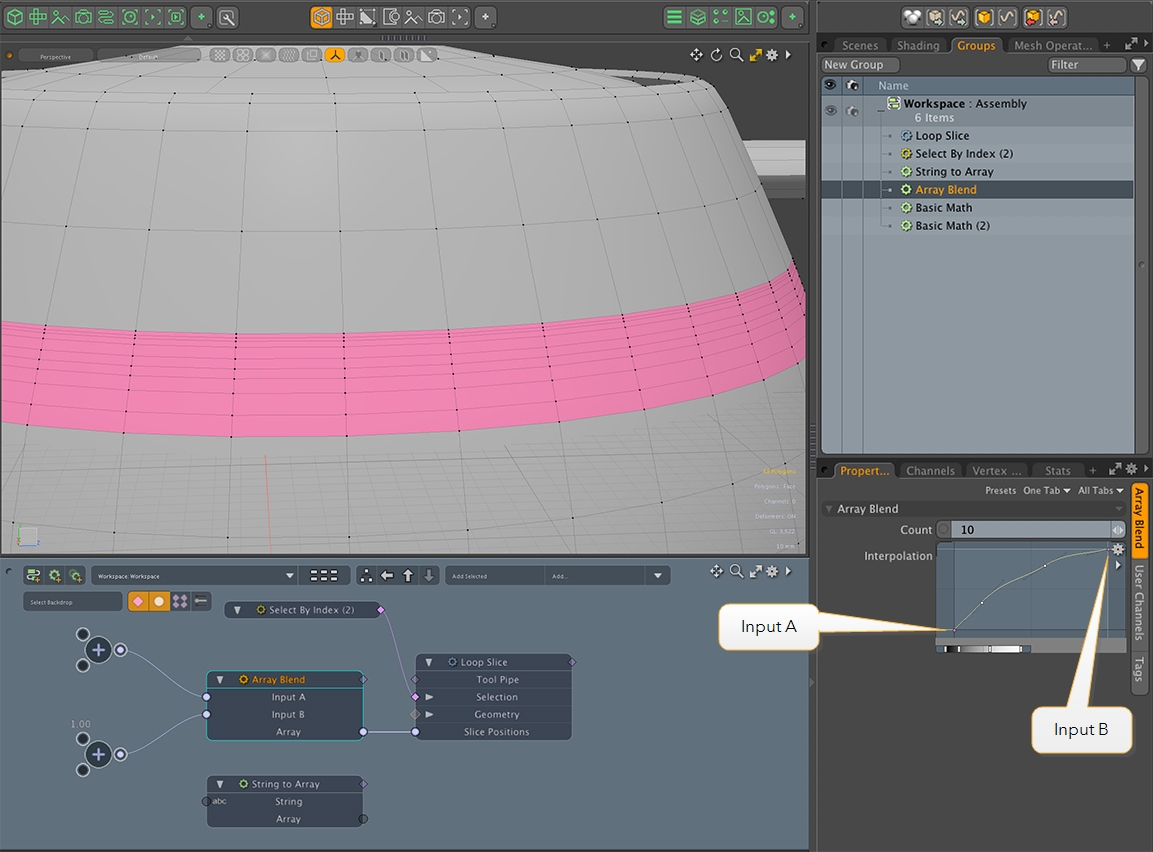
The Array Blend operator sets slice positions by Count between InputA and InputB. The slice positions are interpolated by the gradient curve of the Array Blend operator.
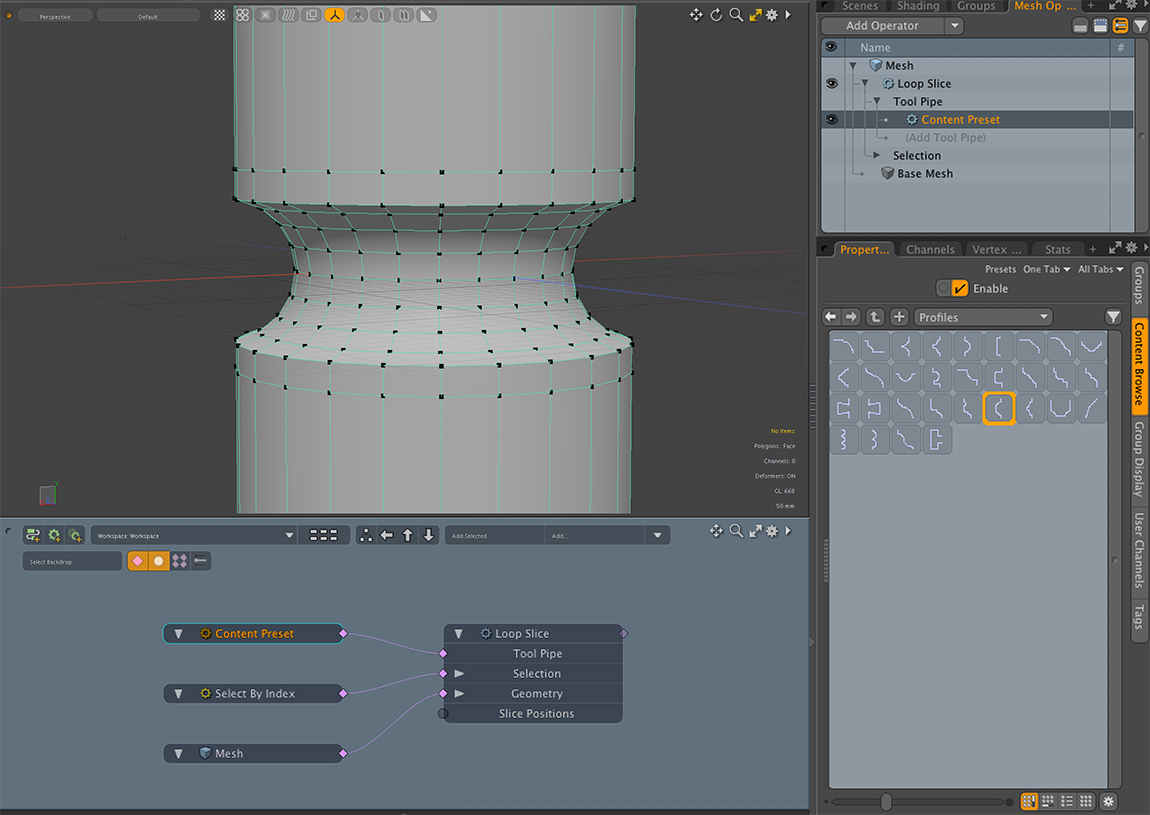
Working with 1D Profile Presets
The loop slice supports 1D Profiles from Content Preset operator. When the Content Preset operator is set to the tool pipe of the Loop Slice operator, the Loop Slice tool applies the shape of the selected 1D profile. The example below shows a simple vertical curve applied. Both slice position and depth are set along the 1D profile curve.