Subdivide
Subdividing polygons recursively splits the selected polygons into smaller polygons. A single subdivision increases the polygon count by a factor of four; Modo divides each quad polygon into four smaller polygons.
To subdivide:
• select Subdivide from the Mesh Edit subtab, or
• press D while in Polygons component mode, or
• press Shift+D to open the Subdivide Polygons dialog, or
• choose Geometry > Polygon > Subdivide.
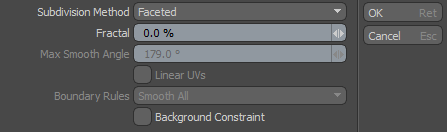
Subdivide Polygons Properties
• Subdivision Method: The type of subdivision to apply to the geometry.
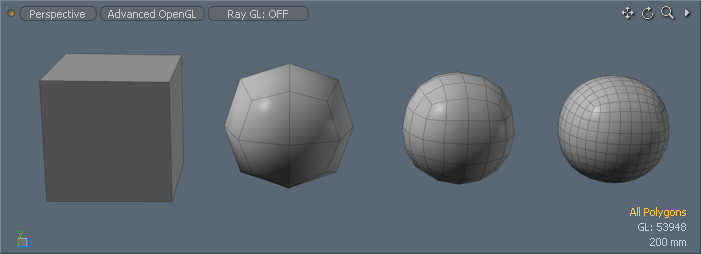
• Faceted - Creates new polygons with vertices that are perfectly aligned with the plane of the original polygon. Visually, there is no significant change to the shape of the model (unless these polygons are Subdivision Surface polygons) other than added vertices (increased resolution) for further deformation.
• Smooth - Uses the Max Smoothing Angle value to determine where there are edges in the model that are beyond the sharpness threshold and should not be smoothed. Modo breaks all other polygons that meet with edges below the Max Smooth Angle not only into 4 additional polygons, but Modo moves the resulting vertices slightly to round out (or smooth) the surface of the mesh. To see what this option does, create a sphere with few sides and segments, and then apply Subdivide Polygons with the Smooth option.
• SDS Subdivide - Moves all points in the mesh, including the original points, towards the limit surface that Modo derives by using the original mesh as the control points. This is similar to the Smooth option, and it gives a similar result to activating Subdivision Surfaces with a subdivision level of 1 and then freezing the geometry. This adds uniform density to an entire mesh when working with subdivision surfaces.
• Catmull-Clark - Provides smoothing of the selected limit surface, although this algorithm has slightly different results than Modo's SDS Subdivide option. Developed by Pixar's Ed Catmull and Jim Clark, this subdivision type provides some benefits in that it distorts the UV map much less and you can apply Edge Creasing.
• Fractal: Adds some randomization to the position of points after Modo subdivides them. This can be useful when creating organic objects such as rough terrains or rocks.
• Max Smoothing Angle: Determines when the Smooth option should move the newly created vertices. If the angle between the original vertices is greater than the Max Smoothing Angle, the new vertices fall in the same plane as the original vertices. For example, with a cube that has right angles, if the Max Smoothing Angle is less than 90 degrees, the new vertices are in the same plane without any rounding effect.
• Linear UVs: When enabled, interpolates new values by retaining the initial UV positions without smoothing. Use with baked maps (such as a normal map or a diffuse color map for a game character) that require fixed polygon positions. When disabled, the additional, newly created vertices from subdividing polygons require UV values (to not break the existing UVs maps), which are smoothly interpolated based on existing neighboring values. This provides the best, most pleasing results (except for baked maps).
• Boundary Rules: Determines how to move the points on the boundaries of a mesh. Creasing produces a sharper transition between surfaces; smoothing produces smooth surface transitions.
• Smooth All- Moves all positions on the boundary based on the smooth rule of Pixar Subdivision Surfaces.
• Crease All- Moves the points that have two incident edges (valence = 2) based on the crease rule. Modo smooths other positions on the boundary by the two boundary edges.
• Crease Edges- Moves the points that have two incident edges (valence = 2) based on the smooth rule. Modo smooths other positions on the boundary by two boundary edges.
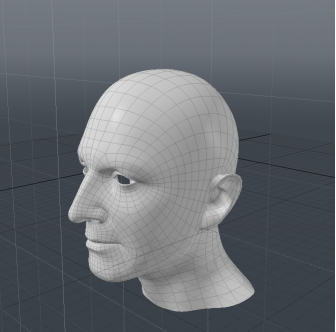
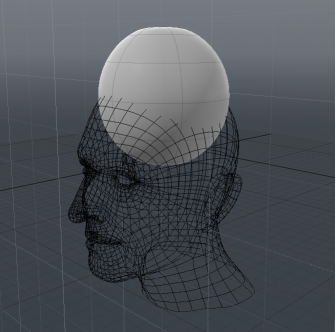
• Background Constraint: Select this to use a background mesh to constrain the subdivision. When subdivided, the mesh will attempt to mold itself to the contours of the background mesh. This is useful if you already have a mesh and you want another mesh to fit it.
Note: The effect is similar to molding over a background mesh by constraining to the background when transforming. For more information, see Constrain to Background.
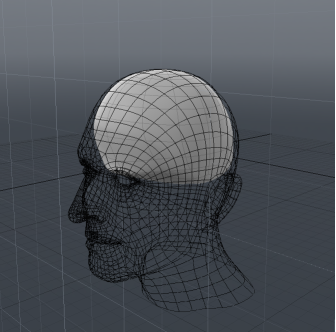
The images below show an example.
|
|
|
| A head mesh. | A sphere is added to the layer above the head. | The sphere is subdivided with Background Constraint checked, |
Subdivide in the Procedural
Modo has a procedural Subdivide mesh operation available in the Mesh Operations list. In the Model layout, you can find the stack in the lower half of the Mesh Ops tab on the right side of the interface.
Note: For information on how to use the Mesh Ops tab, see Using the Mesh Ops Tab.
You can add the tool by clicking the Add Item button above the Mesh Operations list. Under Mesh Operations > Polygon, double-click Subdivide.
You can expand the Subdivide item in the stack by clicking the small arrow in front of it. This reveals the inputs the operation uses. Subdivide requires the following inputs:
• Selection - Allows you to select the polygons you want to subdivide.
• Tool Pipe - Allows you to add falloffs and sub-tools to the operation.
The procedural Subdivide mesh operation has the same properties as the traditional tool. You can find the properties in the Properties panel below the Mesh Operations list when the item is selected.
UnSubdivide
The UnSubdivide command reconstructs subdivided polygons using the Catmull-Clark algorithm in reverse. This operation locates four quadrangle pairs from the source subdivided mesh, then merges them and repositions the corner points to their original positions before subdividing. UnSubdivide can be applied both in direct modeling and procedurally as a Polygon Mesh Operation.
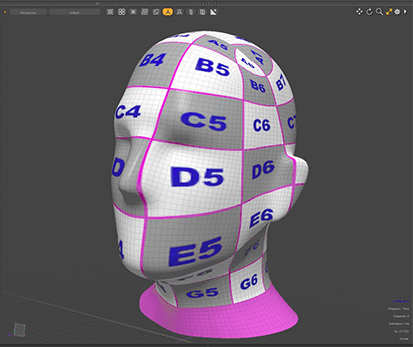
|
|
| Subdivided. |
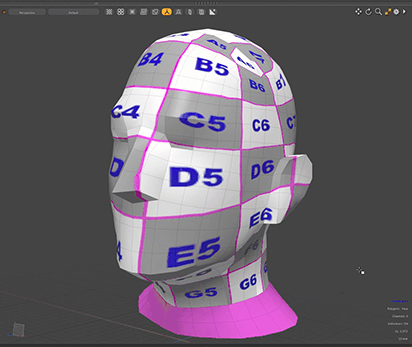
UnSubdivided using 2 Iterations. |
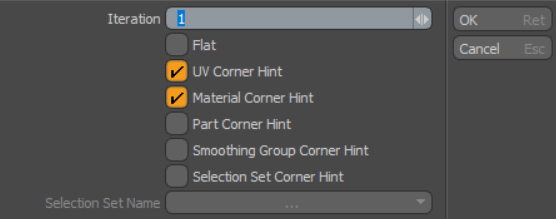
Iteration sets the number of times the operation is repeated.
To recreate the original cage mesh, UnSubdivide expands quad pairs of polygons starting from initial pairs. The UnSubdivide Polygon menu offers additional options to find the first 4 quadrangle pairs.
Flat - Disable to move vertex positions.
UV Corner Hint - Use UV corner to locate 4 quadrangle pairs at root level.
Material Corner Hint - Use Material corner to locate 4 quadrangle pairs at root level.
Part Corner Hint - Use Part corner to locate root quadrangles.
Smoothing Group Corner Hint - Use Smoothing Group Corner to locate 4 quadrangle pairs at root level.
Selection Set Corner Hint - Use Polygon Selection Set corner to locate 4 quadrangle pairs at root level.
Selection Set Name - Select a named polygon Selection Set.
Note: Gaps may appear in cases where some polygons are not merged in quad pairs.