Using Sculpting Masks

You can use masking in Modo to limit sculpting to specific areas of a surface. Think of masks as sculpting shields. You define these areas by using the same brush-based tools used for other Modo painting and sculpting functions. When brushing over the surface with a mask tool, the masked areas change to a bright red color to denote their masked state. You cannot sculpt these areas until you erase or clear the mask. Masks are not simply on or off, but can fade across the surface to have a soft border between the masked and sculpted areas. Modo provides specific tools to control how soft- or hard-edged the masks are when you create them.
Usage
You apply masking with the mask brushes in the Sculpt Tools sub-tab of the toolbox in the Paint and Sculpt interface. Modo supports masking only with multiresolution sculpting. Therefore, the mesh must be in Catmull Clark subdivision mode and have the Multiresolution option enabled. For more information on how to set up multiresolution meshes for sculpting, see Multi-Res Sculpting. You can apply masking at any time while sculpting or prior to sculpting to keep certain areas from being affected at all. You can mask sculpted areas to shield them from, for example, having high-frequency surface details added.
To create a mask, locate the masking tool icons in the toolbox. Click the Mask Paint tool to activate it. Right-click and drag directly in the 3D viewport to set the brush size. Then drag over the target surface to create the mask, which shows as a bright red color on the surface. The red coloring temporarily overwrites any texture applied to the surface, but the texture returns when you remove the mask. Mask tools also respond to pressure sensitivity if you apply the mask with a tablet and stylus. Once you create the mask, press the spacebar to deactivate the current tool. Now, you can select and apply any of the sculpting tools to the target surface. Masked areas remain unaffected by sculpting until you modify, disable, or clear the mask, itself. To clear a mask, click the Clear Mask button under the toolbox. You can also temporarily disable, invert, or adjust the mask's opacity. You can control the overall visibility of masks per viewport by clicking the gear icon in the upper-right corner to adjust the viewport options. To show or hide masks, select or clear the Psub Mask checkbox in the Active Mesh sub-tab.
Sculpting masks are convenient and easy to apply, but there are some details you should know. Modo determines the resolution of the mask by the subdivision level of the target surface. Also, Modo does not save sculpting masks with the mesh. Only one mask is available at any time and you cannot save masks separately. To create a mask that can be saved, use a falloff. (Sculpting tools also adhere to the application of falloffs.) You also cannot save falloffs directly, but Modo derives Vertex Map- or image-based falloffs from sources that can be saved.
Mask: Paint
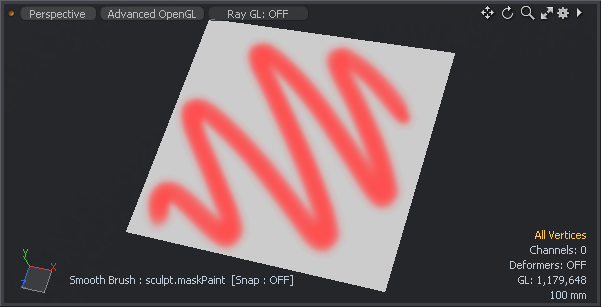
The Mask Paint tool adds masking to the target surface. Modo determines how to add the mask by the brush tip. You can combine the Mask Paint tool with the Customizing Inks and Tablet Nozzles to customize brush strokes. While the Mask Paint tool is active, you can right-click and drag in the 3D viewport to set the size of the brush. Dragging over the target surface paints the mask into the surface additively for each stroke. Pressing Ctrl while dragging over the surface inverts the brush's effect to act like an eraser.
![]()
Value: Determines the strength of the mask applied. If you use a pressure-sensitive stylus and tablet, this option specifies the maximum strength.
Mask: Smooth
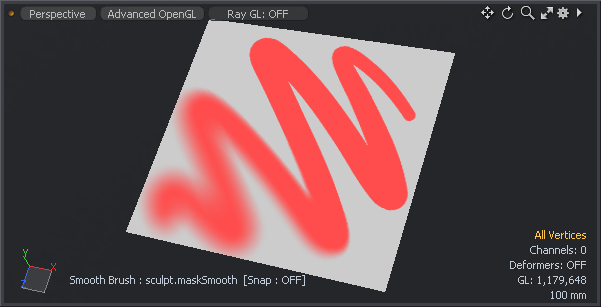
The Mask Smooth tool softens or blurs an existing mask. Modo blurs the mask based on the brush tip. You can also combine this tool with the Customizing Inks and Tablet Nozzles options to customize the brush strokes. While the tool is active, you can right-click and drag in the 3D viewport to set the size of the brush. Dragging over the target surface softens the mask, which gets softer with each additional stroke.
![]()
Smooth Amount: Determines the strength of the blurring effect on the mask.
Mask: Scale Down
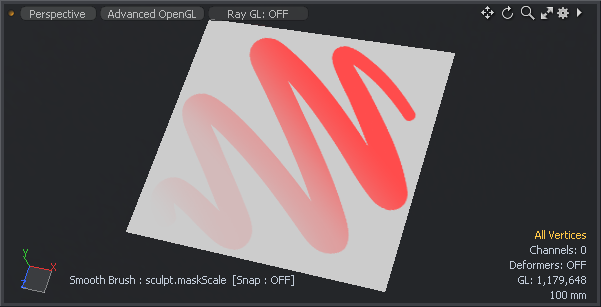
The Mask Scale Down tool decreases the strength of the target mask. How Modo scales the mask is determined by the brush tip. You can also combine this tool with the Customizing Inks and Tablet Nozzles options to customize the brush strokes. While the tool is active, you can right-click and drag in the 3D viewport to set the size of the brush. Dragging over the target surface decreases the strength of the mask, which gets weaker with each additional stroke. Pressing Ctrl while stroking over the surface inverts the brush's effect to strengthen (or increase) the mask's effect.
![]()
Scale Amount: Determines how quickly the values are scaled to adjust the overall strength of the scaling effect.
Mask: Erase
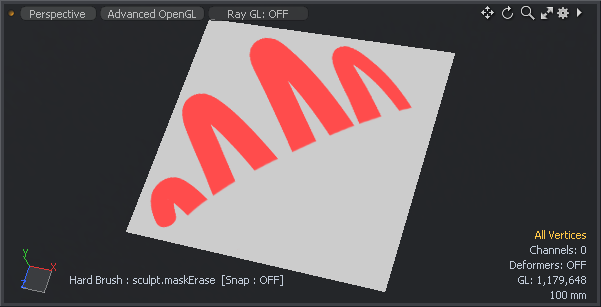
The Mask Erase tool completely removes masking from the target surface. While the tool is active, you can right-click and drag in the 3D viewport to set the size of the brush. Dragging over the target surface erases the mask from the surface. Pressing Ctrl while stroking over the surface inverts the brush's effect to act like the Mask Set Value tool. (The Mask Erase tool has no options panel.)
Mask: Set Value

The Mask Set Value tool applies the defined value to the mask to overwrite all existing values. This tool creates hard-edged, solid strokes. You can combine the Mask Set Value tool with the Tablet Nozzles option to customize the brush strokes. While the tool is active, you can right-click and drag in the 3D viewport to set the size of the brush. Dragging over the target surface applies the mask value to the target surface. Pressing Ctrl while stroking over the surface removes mask values to act like the Mask Erase tool.
![]()
Value: Determines the strength of the mask applied to the surface.
Masking Controls
Directly under the masking tools in the Sculpting toolbox, Modo provides are several options related to sculpting masks.
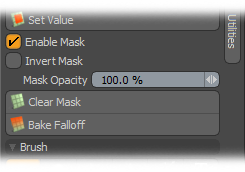
Enable Mask: By clearing this checkbox, you can temporarily disable a mask without having to clear or remove the mask. You can then use the mask at a later time during the same sculpting session. (Modo does not save masks with the model or scene.) When selected, the mask is active; when clear, the mask is inactive, but it is still visible.
Invert Mask: When enabled, inverts the effect of the mask (but not its viewport representation).
Mask Opacity: Determines the strength of the visible representation in the 3D viewport. This doesn't affect the mask strength, itself, but only changes how Modo displays it.
Clear Mask: Clears a mask from a surface quickly. Clicking this button completely removes all masking values from the surface.
Bake Falloff: Converts any active falloff into a sculpting mask. With any falloff active, clicking Bake Falloff opens the Bake Falloff dialog.

Bake To: Select either Mask to merge the current falloff into the current sculpting mask or Displacement to use the falloff as a means to displace (offset) the current surface.
Displacement Offset: Controls the maximum amount of displacement at 100% for the falloff when you set Bake To to Displacement.