Hair Material
The Hair Material is designed to replace the default BRDF shading calculations of the standard Material item when applied to fur. Fur, or hair as the case may be, is anisotropic (directionally dependent) and requires a different type of shading model to look correct. On a microscopic level, the surface of hair is quite complex and this affects how light reflects off it and scatters through it, producing a unique look that is difficult to simulate without a dedicated hair shader.
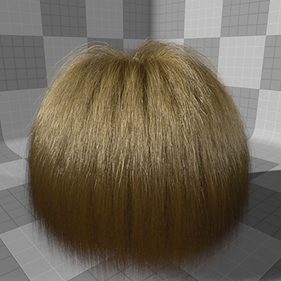
Modo ships with a hair shading system using a special model for quickly approximating multiple scattering layers, which is way too expensive to compute otherwise with brute force. The model is called Dual Scattering Approximation, and is based on this technical paper. The basic idea is that multiple scattering is essentially broken into two parts: global scattering (lighting of the overall volume) and local scattering (the shading on individual fibers that are visible).
The Hair Material item is added to the Shader Tree using the Add Layer function, Add Layer > Custom Materials > Hair Material.
Note: For more information on adding and manipulating Shader Tree layers, please see Shader Tree.
For the best results, the placement of the layer is important, as the Hair Shader itself must reside in the same group mask as the Fur Material item it is shading. Once a Hair Material is added, its settings supersede those of any Material item, rendering the material unnecessary. Once positioned, selecting the Hair Shader item reveals its attributes in the Properties viewport, where its settings may be adjusted to fine tune the look of the rendered hair.
|
Option |
Description |
|---|---|
|
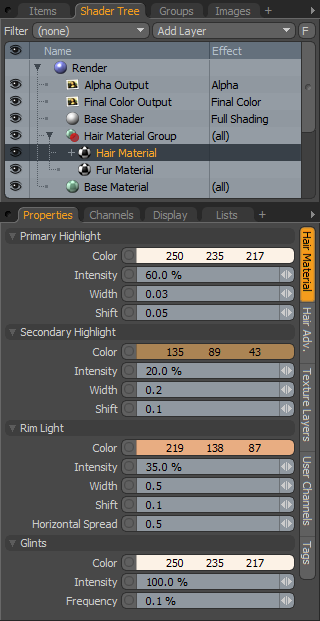
Primary Highlight - Represents the main light colored highlight that is reflected off the surface of the hair. The more apparent this highlight is, the more sheen the hair has. |
|
|
Primary Color |
R, G, and B values that determine the color of the Primary Highlight shading. |
|
Primary Intensity |
The Intensity option acts as a multiplier controlling the strength of the Primary Highlight. |
|
Primary Width |
This option controls the size of the highlight along the hairs length. |
|
Primary Shift |
This option controls the position of the highlight along the hairs length, basically simulating the tiny shingle-like cuticles of the hair's surface that modify the angle of the reflected highlight. |
|
Secondary Highlight - Represents light that is refracted into the hair strand, hitting the back surface and reflecting back towards the front. Realistically, the magnitude of the longitudinal shift for the Secondary Highlight should be larger than for the Primary Highlight because the light path is more disrupted with additional refractions and reflections. |
|
|
Secondary Color |
R, G, and B values that determine the color of the Secondary Highlight shading. |
|
Secondary Intensity |
The Intensity option acts as a multiplier controlling the strength of the Secondary Highlight. |
|
Secondary Width |
This option controls the size of the highlight along the hairs length. |
|
Secondary Shift |
This option controls the position of the highlight along the hairs length, basically simulating the tiny shingle-like cuticles of the hair's surface that modify the angle of the reflected highlight. |
|
Rim Light - Represents light that is transmitted through the hair similar to the effects of subsurface scattering. |
|
|
Rim Color |
R, G, and B values that determine the color of the Rim Highlight shading. |
|
Rim Intensity |
The Intensity option acts as a multiplier controlling the strength of the Rim Highlight. |
|
Rim Width |
This option controls the size of the highlight along the hairs length. |
|
Rim Shift |
This option controls the position of the highlight along the hairs length, basically simulating the tiny shingle-like cuticles of the hair's surface that modify the angle of the reflected highlight. |
|
Rim Spread |
Controls how broad or tight the Rim Light highlight is, similar to a specular highlight in a sense. |
|
Glints - Representative of tiny caustics refracted through the hair, basically this is how hair looks shimmery. |
|
|
Glints Color |
R, G, and B values that determine the color of the Glints shading. |
|
Glints Intensity |
The Intensity option acts as a multiplier controlling the strength of the Glints. |
|
Glints Frequency |
Determines how often a glint is shaded, controlling the overall density of Glints. |
Hair Shader Advanced
|
Option |
Description |
|---|---|
|
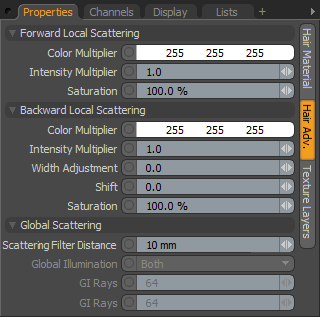
Forward Local Scattering - This controls how multiple fibers in a small area scatter light forward, or away from the source of light. It contributes to the appearance of rim lighting, but it is wider, darker, and the color is more saturated than direct rim lighting. This is because the light is scattering multiple times, making it spread out more. |
|
|
Forward Color Multiplier |
This setting allows you to adjust the color of the Forward Local Scattering by multiplying the color values. When each color channel is set to 1.0 (when the color is white), the Forward Local Scattering color is only dependent on the colors in the hair material settings overall. |
|
Forward Intensity Multiplier |
This allows you to make the Forward Local Scattering brighter or darker, by multiplying the value. |
|
Forward Saturation |
This allows you to control the color intensity of the Forward Local Scattering, making it more or less colorful. |
|
Backward Local Scattering - The backward scattering adjustments represent areas where the hair is front lit, but the specific hair strand is in shadow. |
|
|
Backward Color Multiplier |
This setting allows you to adjust the color of the Backward Local Scattering by multiplying the color values. When each color channel is set to 1.0 (when the color is white), the Forward Local Scattering color is only dependent on the colors in the hair material settings overall. |
|
Backward Intensity Multiplier |
This allows you to make the Backward Local Scattering brighter or darker, by multiplying the value. |
|
Backward Width Adjustment |
This option controls the size of the highlight along the hairs length, relative to the initial width, adjusting it wider or thinner. |
|
Backward Shift |
This option controls the position of the highlight along the hairs length, relative to the initial Shift value, moving the color of the backward scattering along the length of the hair strand. |
|
Backward Saturation |
This allows you to control the color intensity of the Backward Local Scattering, making it more or less colorful. |
|
Global Scattering - controls the way in which light transmits, scatters, and spreads through a whole volume of hair. It is brightest and least spread out closest to the light, and gets dimmer, more spread out, and more colorful as the light transmits through more strands of hair. It affects both forward and backward multiple scattering. |
|
|
Scattering Filter Distance |
The Hair Material uses advanced calculations to approximate the multi-scattering from light in dense fiber clusters. This estimation could occasionally produce sharp discontinuities which would appear as noise that no amount of samples would clear up. Scattering Filter Distance adds a random offset to the origin of the ray used to estimate the scattering. This effectively converts the sharp discontinuities into actual noise that goes away with more antialiasing samples. Note: Large filtering distances can also add illumination bias, shifting the overall brightness of the hair, but when applied sensibly it works very well. |
|
Global Illumination |
When illuminating hair (or fur) using Global Illumination, you can adjust the Global Illumination settings of the hair shader to control how the GI rays are used: • None - the color of the hair is only affected by direct and ambient lighting. It also doesn't bounce light onto other surfaces. • Receive Indirect Lighting - light bounces off other surfaces onto the hair, causing the hair to be lit indirectly. This is done with Monte-Carlo global illumination, by casting rays in every direction, instead of just towards a light. • Cast Indirect Lighting - the hair contributes indirect lighting onto other surfaces. In other words, indirect rays being fired from another surface cause the hair shading to be evaluated if they hit the hair surface, instead of just appearing black. • Both - receive and cast indirect lighting. |
|
GI Rays |
This controls how many rays are used for calculating indirect lighting, either in the Receive or Both modes. More rays produce smoother results at the expense of longer render times. |
Texture Layers
Since the Hair Material uses a custom shading model to render the resulting Fur, it is not compatible with blending or masking techniques allowed by other layers. It should also be noted that even when using Texture Layers to drive individual Hair Shader channels, the Hair Material channel values still affect the final result. This is because texturing only affects the single scattering of the hair material, but the multiple scattering calculations rely on the channels settings.
Layer Properties
>
|
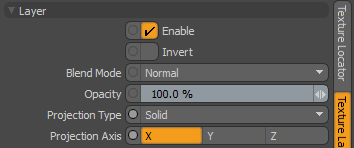
Layer |
|
|
Enable |
Toggles the effect of the layer on and off. This duplicates toggling visibility in the Shader Tree. When disabled, the layer has no effect on the shading of the scene. However, Modo saves disabled layers with the scene, and they are persistent across Modo sessions. |
|
Invert |
Inverts the colors (RGB values) for the layer to produce a negative effect. |
|
Blend Mode |
Affects the blending between different layers of the same effect type. With this, you can stack several layers for different effects. For more about blending, see Layer Blend Modes. |
|
Opacity |
Changes the transparency of the current layer. If there are layers below this layer in the Shader Tree, reducing this value increasingly reveals the lower layers. Reducing the value always dims the effect of the layer. |
|
Projection Type |
Defines how a material us applied to a 3D surface. Types vary significantly in their effects. For a guide to each Projection Type see Projection Type Samples. |
|
Projection Axis |
The material is projected down this axis. This applies to Planar, Cylindrical, Spherical, Cubic, Box, and, Light Probe projection types. |