Game Asset Exporter
Modo's Game Asset Exporter is available on the Export & Presets tab in the left panel of the Gamelayout. The exporter generates .fbx files and includes presets for Unreal Engine 4 and Unity. Engine presets are stored in a configuration file and new presets can be created and managed using the UI.
Note: In order to use the asset exporter, you need to have Modo Material Importer for Unreal Engine or Modo Material Importer for Unity installed.
When you export, an additional .xml file is generated with the same name, using the suffix _mat.xml, in the same directory as the .fbx file. For example, myStuff.fbx is renamed mystuff_mat.xml.
Note: Procedural and Enhance:modo textures cannot be exported or imported. If you want to preserve the appearance of these textures, you can bake them to the mesh(es).
Export and Presets Settings
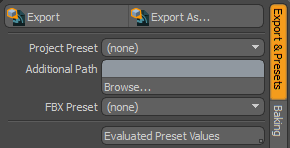
• Export - Triggers the export to the project root. The scene name is used as the filename.
• Export As ... - Opens a file browser, which allows you to select a filename and directory.
• Project Preset - Specifies the export settings for a particular engine. The settings include all the parameters on the panel. Presets are included for Unreal Engine 4 and Unity. The Default preset maintains the settings for general use.
• Additional Path - Specifies an additional path, which is appended to the project's root path to get the full .fbx export path. For example, if the project preset's root path is C:\MyGameProject\Content and your scene's additional path is Meshes\Props, then the full path that the .fbx file is exported to is C:\MyGameProject\Content\Meshes\Props. This way, you don't need to change the project's export path everytime you want to export a scene to a different directory or file.
Click Browse to select a directory.
Tip: Ctrl/Cmd+click this field to open the location in a file explorer and access your exported data quickly.
You can also type the directory path into the Additional Path field.
Note: You can specify an absolute path here, which is used instead, ignoring the project's root path.
Note: For setting up the project's root path, see Editing Project Presets.
• FBX Preset - Selects the FBX preset to use for exporting this scene. Each scene stores the name of the FBX preset selected, so when loading or changing scenes, the appropriate FBX preset is selected automatically. This makes having multiple FBX presets for one project, such as for static or animated meshes, easier to deal with.
• Evaluated Preset Values - Lists all relevant export settings, so you can easily check whether the final settings are correct before export.
Note: You can't edit the options in Evaluated Preset Values directly, they are for information only.
Editing Presets
All Export & Presets tab settings can be saved to a preset. This allows you to customize the settings for a particular game engine and save them for future use.
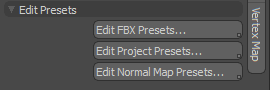
The Edit Presets section of the Export & Presets tab lets you choose existing presets and create new ones. You can edit the FBX, project, and normal map presets in separate panels.
• Click Edit FBX Presets... to select and edit the properties of the FBX preset to be used.
• Click Edit Project Presets... to edit settings related to the whole project.
• Click Edit Normal Map Presets... to select and edit the properties of the normal map preset to be used.
In each of the following preset panels, the Edit Preset dropdown shows the current preset being edited, and gives you the following options to manage presets.
• (save as) - saves the current settings as a new preset.
• (save) - saves the current settings to the current preset.
• (revert) - reverts any changes to the current preset.
• (delete) - deletes the current preset.
Note: You cannot remove built-in presets.
Note: Only preset names are stored with the scene, not the settings themselves. This means that if you modify the preset with that name, then any scenes using that preset will use the updated settings.
Editing FBX Presets
The options found in the Edit FBX Presets... panel are also available in the Preferences. From the menu bar, click System > Preferences > File I/O > FBX I/O.
For detailed information on each setting, see FBX Export.
Editing Project Presets
The project preset contains settings relevant to an entire project. Ideally, you set these up once for each project and then you don't have to edit them further.
In Edit Project Presets... you can set the following options:
|
Project Root Path |
Sets the root path for the project preset. This is the base directory where all FBX exports go. For Unity projects, this is the project's Assets folder, for Unreal projects, this is the Content folder. |
|
PBR XML Settings |
|
|
Relative Texture Paths in XML |
If you have enabled Export PBR XML in your FBX settings, this toggles whether texture file paths are stored relative to the exported FBX file or as absolute paths. When enabled, relative paths are used for texture images in the sidecar .xml file. This is needed for the Unity and Unreal material importers. For more information on these plug-ins, see Modo Material Importer for Unity and Modo Material Importer for Unreal Engine. |
|
If you have selected Export PBR XML in your FBX settings and enable this option, the importer matches up polygons to their materials using the polygon material tag of that material, as opposed to the material group's name in the Shader Tree. This is primarily used in engines such as Unreal Engine 4, which use the polygon's material tag to match up polygons to their materials. |
|
|
Texture Copying Settings |
|
|
Copy Textures on Export |
Enables textures to be copied to the project along with the .fbx file at export. The following options are available: • Never - never copies textures over to the project. Use this if you prefer to handle textures manually. • Different Only - only copies the texture over to the project if the texture file that Modo uses has been updated compared to the destination texture. Any textures which do not exist in the destination are also copied. • Always - always copies textures over to the project, even if they haven't been updated. |
|
Texture Path |
If any textures are to be copied over at export, this specifies where they are stored. This is closely linked to the Texture Path Mode setting. |
|
Texture Path Mode |
This specifies how to interpret the Texture Path setting. There are three available options: • Absolute - the texture path represents an absolute path that textures should be copied into. • Relative to Project Root - similar to the scene's Additional Path setting, appends the texture path to the project's root path to get the full destination for texture copies. • Relative to Export - appends the texture path to the scene's full FBX export path. |
|
Force Alphanumeric Names |
This is an aid for some game engines that prefer to use alphanumeric names for assets, and don't handle special characters well. Unreal Engine 4 is an example of this. When enabled, it strips out all special characters from copied texture files except underscores (_) and dashes (-), and replaces any spaces with underscores. |
|
Use Image Clip Filenames |
When enabled, copied texture files are named to match the name of the texture layer, rather than retaining the image's original filename. |
|
Normal Map Settings |
|
|
Auto Apply Normal Preset |
When enabled, normal maps are automatically set up according to the normal map preset selected for the project. |
|
Normal Map Preset |
The name of the normal map preset to be used with the project. The following options are available: • Source • Unity • Unity Legacy • Unreal |
Editing Normal Map Presets
The normal map preset specifies default settings for normal maps and tangent bases.
In Edit Normal Map Presets... you can set the following options:
|
Tangent Basis Command |
Selects the default command to generate tangent basis maps. This command is assigned as the default choice for the for the tangent basis map creation button in the Mesh Tangents section of the Vertex Map tab. See Creating Mesh Tangent Maps for details. |
|
Per-Pixel Bitangent |
Sets whether the bitangent vector of the tangent basis should be generated per-pixel rather than per-vertex, in order to achieve an exact match with the target game engine's normal mapping methods. Note: By default, this is enabled for Unreal and disabled for Unity. Other game engines may vary. |
|
Invert Green Channel |
Sets whether the green channel of the normal map should be inverted to match the game engine's requirements. |