Vertex Map Paint
You can use the Vertex Paint tool to define and adjust vertex color maps and vertex Weight Maps interactively. By using the familiar painting workflow already established for creating bitmap-based textures, you can select the Vertex Paint tool and paint directly onto the surface in the 3D viewport with either a tablet-based input or a mouse.
Using the tool
The Vertex Paint tool is in the Paint interface tab on the Vertex Map Tools sub-tab of the toolbox. To use the Vertex Paint tool, you first need to select a target Mesh Item layer in the Items (Scenes) List. You also need to create and select a vertex color map or a Weight Map in the Vertex Map list viewport. See the Working with Vertex Maps topic for information about creating Vertex Maps.
After selecting the tool, its attributes appear in its Properties viewport. When you first select the tool, it has Smooth Brush as the default brush tip. You can select an alternate brush tip before proceeding or right-click in the 3D viewport to scale the brush size. Drag in the viewport to apply the specified values to the designated map. Pressing Ctrl reduces the values applied to Weight Maps (instead of increasing them). Pressing Shift applies the Smooth Vertex Map function.
Paintbrush
|
Option |
Description |
|---|---|
|
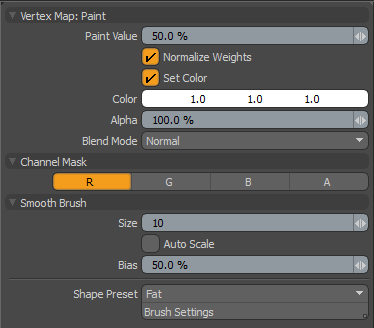
Paint Value |
Determines the strength of the painting action. Higher values saturate the canvas more quickly than lower values. Set this to 100% to quickly overlay an area, or set to 5% or less to make subtle adjustments. |
|
Normalize Weights |
In the case of Weight Maps, this option ensures that the values of all Weight Maps add up to exactly 100% at each vertex. So if you paint a Weight Map at full strength (100%), and paint another one at half-strength (50%), this option reduces the first map to 50%, so the total of the two is 100%. This option is useful for rigged meshes. For example, if you have two bones trying to move a vertex two different ways, normalizing weights makes sure that the total control each bone has isn't more than what it should safely have. |
|
Set Color |
Enabled automatically when applying values to a vertex color map. When enabled, you can define a Color value and apply it to the target map. |
|
Color |
Defines an RGB value to apply to the target vertex color map. |
|
Alpha |
Determines the opacity of the color applied to the RGBA vertex color map. Tip: Modo stores the Vertex Map values for the vertices themselves of the mesh's surface. Therefore, it is not possible to resolve any finer detail than the resolution of the target geometry (un-subdivided). If you don't want to subdivide the mesh, then using a bitmap-based texture may be a better option to assign colors to the surface. |
|
Blend Mode |
This specifies how multiple layers interact with each other. The standard blend modes are available for vertex color painting. For more information on blend modes, see Layer Blend Modes. |
|
Channel Masks |
|
|
R/G/B/A |
Vertex color painting can now be masked per channel. To mask a channel, click on the appropriate button. The button highlights orange and the corresponding channel doesn't get affected when painting. |
|
Smooth Brush |
|
|
Size |
This value sets the radius of the brush, in pixels, from screen space. This is important to understand, as zooming the view changes the result of the brush. With the brush size being fixed, zooming in on the model decreases the relative scale of the brush, whereas zooming out increases it. You can interactively adjust the tip Size value by right-clicking in the viewport and dragging to adjust an on-screen display representing the brush's size. |
|
Auto Scale |
When enabled, the brush Size scales automatically to remain constant, regardless of the zoom percentage. |
|
Bias |
This option is like a curve adjustment to the brush that favors one side of the range over the other, acting much like a gamma curve would affect the shades of an image. |
|
Shape Preset |
This dropdown includes several preset brush options for varying effects. This setting drives the profile of the airbrush. You can also adjust the In/Out Weight and Slope settings to produce customized brushes. |
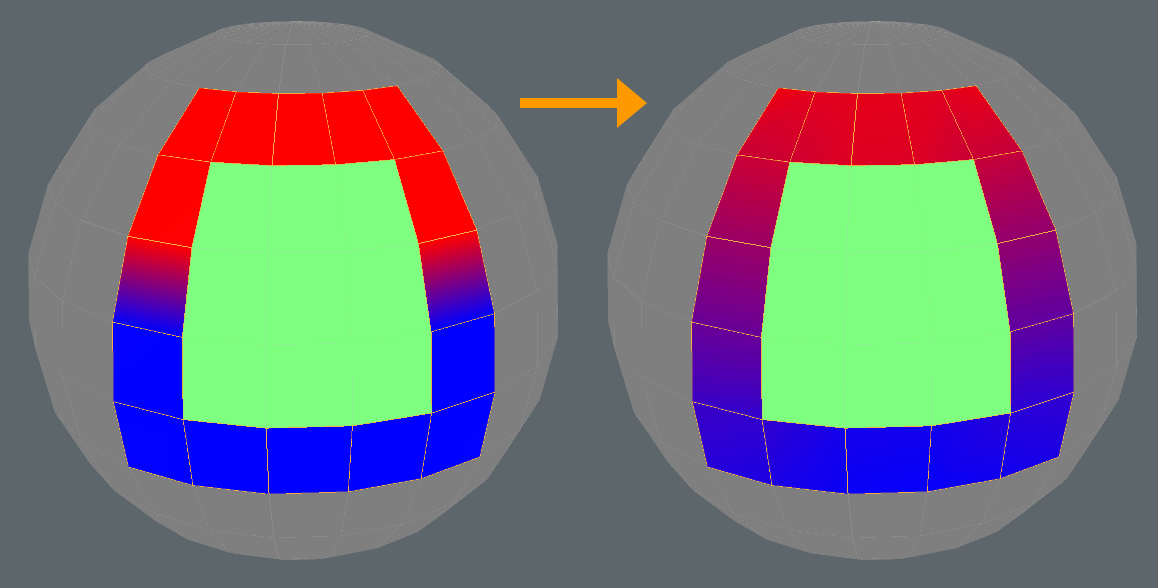
Polygon Masks
Vertex color painting and smoothing is now masked to the selected, unlocked, and visible polygons, so painting discontinuous values is easier.
Vertex color painting masked to polygon selection:
Vertex color blending (smoothing) masked to polygon selection: