Vertex Map Tools
You use the Vertex Map Tools to adjust vertex color maps and vertex Weight Maps by dragging a brush over the surface of the target map.
In addition to the Toolbox Paint tool, in the Vertex Map Tools sub-tab, other vertex map options are available. For more information, see Vertex Normal Tools.
Using the tools
The Vertex Map tools are found in the Paint layout. Open the Toolbox on the left panel, expand the Vertex Map Tools sub-tab, and click Paint. To use a Vertex Map tool, you first need to select a target Mesh Item layer in the Items (Scenes) List. You also need to create and select a vertex color map or a Weight Map in the Vertex Map list viewport. See the Working with Vertex Maps topic for information about creating Vertex Maps.
After selecting a tool, its attributes appear in the tool's Properties viewport. When you first select a tool, it has Smooth Brush as the default brush tip. You can select an alternate brush tip before proceeding or right-click in the 3D viewport to scale the brush size. Drag in the viewport to apply the brush's effect to the designated map. Usually, pressing Ctrl negates the effects of the brush.
Scale Down

The Scale Down tool adjusts the values in a map down toward 0 (zero) — slowly reducing the values. Pressing Ctrl scales up the values (acting as a Scale Up tool). The overall effect is similar to dodging and burning in an image editor.
Scale Amount: Determines the strength of the scaling applied to the Vertex Map values.
Erase
The Erase tool removes any values in the target map that the brush touches. This tool doesn't just lower the values of the map to 0%, but it completely removes the value for the vertex. There are no user-adjustable options available.
Set Value

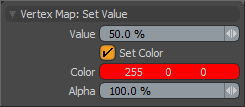
The Set Value tool is similar to a paint tool combined with an erase tool. It affects any vertex it touches 100% (changes the color or the weight as specified) with no fading or attenuation. Pressing Ctrl erases the value.
Value: Determines the weight value to apply when editing Weight Map values.
Set Color: Enabled automatically when painting onto vertex color maps for you to specify a color to apply to the map.
Color: Defines an RGB value to apply to the target RGB or RGBA vertex color map.
Alpha: Defines an Alpha (transparency) value to apply to the target RGBA vertex color map.
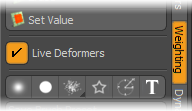
Live Deformers

Controls the way Modo updates the geometry in a 3D viewport when weight painting. When enabled, Modo updates deformations on the fly while you paint or adjust the weights. (On-the-fly updates affect performance.) When disabled, Modo updates the deformations after you release the mouse button when weight painting or making other adjustments. Having this disabled increases performance.
